References
有关 Annotation-based 相关的注解说明参考官方文档【7.9】Annotation-based container configuration;
前言
本文将梳理出 @Autowired,@Required 等注解背后的源码运行机制;
本文为作者的原创作品,转载需注明出处;
源码分析环境搭建
参考 Spring Core Container 源码分析一:环境准备
源码分析
此部分主要是针对在 Spring 容器中使用 @Autowired 注解注入的主流程分析;
测试用例
这里继续沿用 Spring Beans 初始化流程分析中所使用到的测试用例;这里呢,为了演示@Autowired的作用,我们定义一只 Dog,名字叫”Niba”(嘿嘿,以前我小狗狗的名字”泥巴“),是 Doe 夫妇所共有的一只小狗,我们通过@Autowired的方式,将其注入到 John 和 Jane 实例中
beans.xml
1 | <beans xmlns="http://www.springframework.org/schema/beans" |
注意,这里我们使用到了 <context:annotation-config/> 配置元素,有关描述参考 context:annotation-config 小节;然后配置了一个 Dog instance “Niba”;
Dog.java1
2
3
4
5
6
7
8
9
10
11
12
13
14
15package org.shangyang.spring.container;
public class Dog {
String name;
public String getName() {
return name;
}
public void setName(String name) {
this.name = name;
}
}
Person.java1
2
3
4
5
6
7
8
9
10
11
12
13
14
15
16
17
18
19
20
21
22
23
24
25
26
27
28
29
30
31
32
33
34
35
36
37
38
39
40
41
42
43package org.shangyang.spring.container;
import org.springframework.beans.factory.annotation.Autowired;
/**
*
* @author shangyang
*
*/
public class Person {
String name;
Person spouse;
Dog dog;
public String getName() {
return name;
}
public void setName(String name) {
this.name = name;
}
public Person getSpouse() {
return spouse;
}
public void setSpouse(Person spouse) {
this.spouse = spouse;
}
public Dog getDog() {
return dog;
}
public void setDog(Dog dog) {
this.dog = dog;
}
}
在 Person 代码中,我们通过@Autowired注入了 Dog 实例 “Niba”,注意,@Autowired是通过 Type 类型注入的,也就是说,在容器中,它会去找到 Class Type 为 org.shangyang.spring.container.Dog 的单例,并注入,这里,找到的就是单例 “Niba”;
执行测试1
2
3
4
5
6
7
8
9
10
11
12
13
14
15
16
17
public void testApplicationContext(){
("resource")
ApplicationContext context = new ClassPathXmlApplicationContext("beans.xml");
Person p = context.getBean("john", Person.class);
assertEquals("John Doe", p.getName() );
assertEquals("Jane Doe", p.getSpouse().getName() );
assertEquals("Niba", p.getDog().getName() );
assertEquals("Niba", p.getSpouse().getDog().getName() );
}
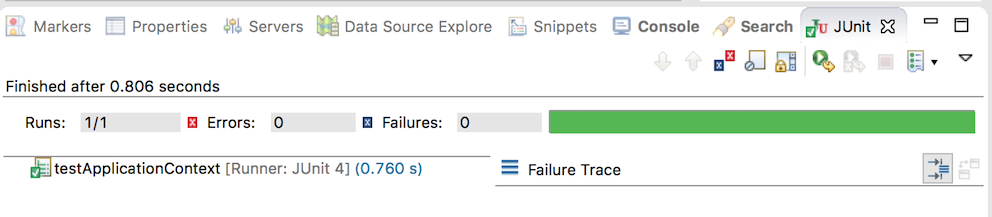
测试通过,可见,john 和 jane 都拥有了自己的宠物 niba;下面我们就其内部运行机制从源码层面进行深度剖析;
context:annotation-config element
从 【7.8.1】Customizing beans using a BeanPostProcessor官方文档小节中,我们知道,通过 @Autowired 注解注入 bean 的逻辑主要是通过 AutowiredAnnotationBeanPostProcessor bean-post-processor 所实现的,那么本章节要回答的问题是,AutowiredAnnotationBeanPostProcessor 是什么时候,在什么地方被作为 bean-post-processor 注入到 Spring 容器中的?
该部分的实现分为两个部分,
注册 post-processor-bean-definitions
该部分的详细逻辑参考 Spring Core Container 源码分析六:注册 Bean Definitions中的注册 post-processor-bean-definitions 小节;这里需要额外说明的是,在通过上述步骤解析 element <context:annotation-config/> 的时候,并不会像解析 <context:component-scan/> 那样去遍历 .class 文件解析相关的注解,这里唯一做的事情就是,将创建好的 post-process-bean-definitions 注册到当前的容器( bean factory )中即可;具体解析 @Autowired 元素的过程是在作为 inner-bean-post-processor 的行为小节中进行的;
实例化 post-processor-bean-definitions
该步骤主要是通过 instantiate and register bean-post-processor 完成对 #1 所生成的 post-processor-bean-definitions 的实例化并注册的过程;
AutowiredAnnotationBeanPostProcessor
从 context:annotation-config 配置元素小节中,知道了AutowiredAnnotationBeanPostProcessor, CommonAnnotationBeanPostProcessor, PersistenceAnnotationBeanPostProcessor 以及 RequiredAnnotationBeanPostProcessor等四个与基于 Annotation 配置相关的 bean-post-processors 是如何被注入 Spring 容器的;那么,Spring 容器又是如何通过 @Autowired 注解将对象 niba 注入对象 john 和 jane 的呢?
类图
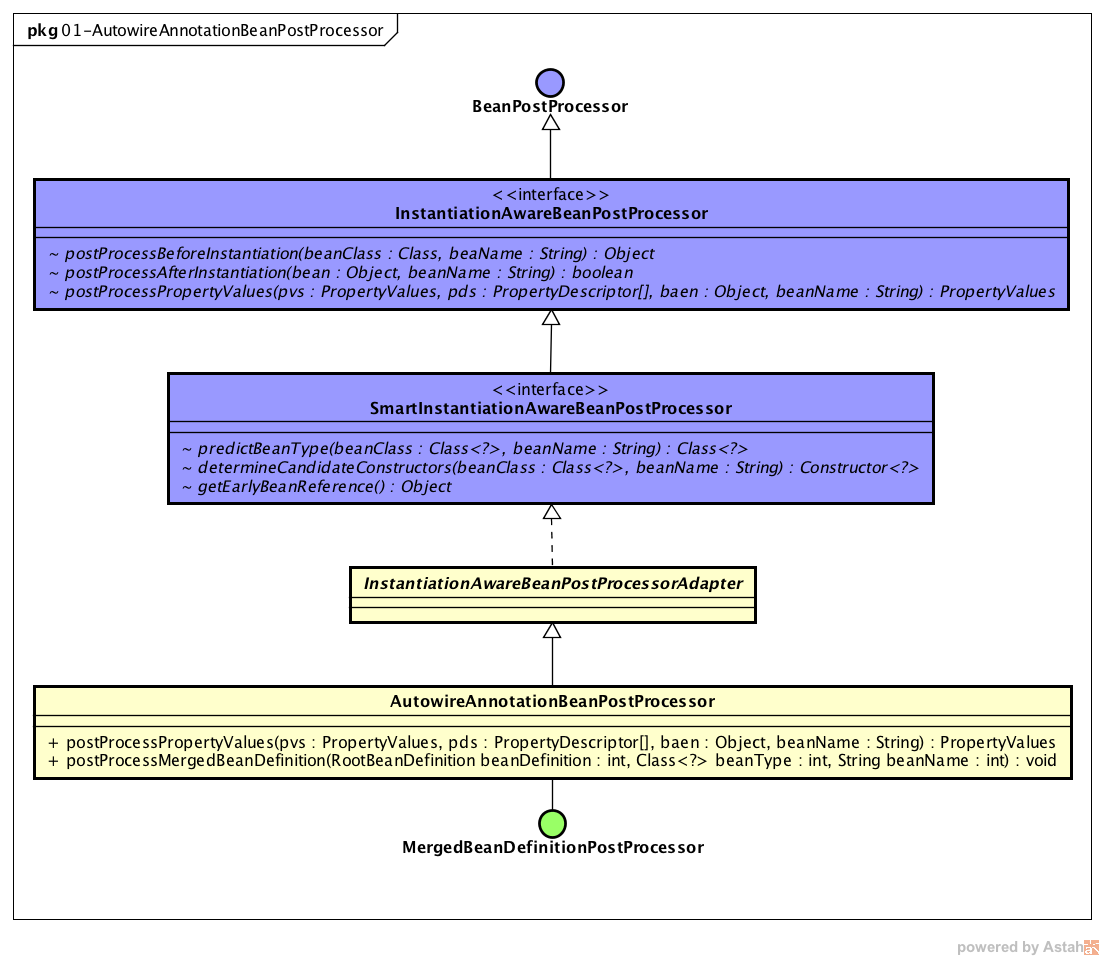
可以看到,AutowiredAnnotationBeanPostProcessor实现了两个派系的接口,
首先通过继承 InstantiationAwareBeanPostProcessorAdapter 实现了三个接口,蓝色部分,其实就这三个接口而言,其实最终由 AutowiredAnnotationBeanPostProcessor 实现的接口只有一个
InstantiationAwareBeanPostProcessor,对应的方法为 postProcessPropertyValues;先来看看它的父类的源码,InstantiationAwareBeanPostProcessorAdapter.java1
2
3
4
5
6
7
8
9
10
11
12
13
14
15
16
17
18
19
20
21
22
23
24
25
26
27
28
29
30
31
32
33
34
35
36
37
38
39
40
41
42
43
44
45public abstract class InstantiationAwareBeanPostProcessorAdapter implements SmartInstantiationAwareBeanPostProcessor {
public Class<?> predictBeanType(Class<?> beanClass, String beanName) {
return null;
}
public Constructor<?>[] determineCandidateConstructors(Class<?> beanClass, String beanName) throws BeansException {
return null;
}
public Object getEarlyBeanReference(Object bean, String beanName) throws BeansException {
return bean;
}
public Object postProcessBeforeInstantiation(Class<?> beanClass, String beanName) throws BeansException {
return null;
}
public boolean postProcessAfterInstantiation(Object bean, String beanName) throws BeansException {
return true;
}
public PropertyValues postProcessPropertyValues(
PropertyValues pvs, PropertyDescriptor[] pds, Object bean, String beanName) throws BeansException {
return pvs;
}
public Object postProcessBeforeInitialization(Object bean, String beanName) throws BeansException {
return bean;
}
public Object postProcessAfterInitialization(Object bean, String beanName) throws BeansException {
return bean;
}
}可见,其父类提供了这三个接口八个接口方法的所有默认实现;AutowiredAnnotationBeanPostProcessor 其实只覆盖实现了其中的一个方法,那就是 postProcessPropertyValues 方法;该方法相关的逻辑将会在作为 InstantiationAwareBeanPostProcessor 的行为做更进一步详细的分析;
但是爱折腾的 AutowiredAnnotationBeanPostProcessor 并没有从此消停,它还私自实现了另外一个接口
MergedBeanDefinitionPostProcessor( 该接口在 bean-post-processors 中被定义为 inner-bean-post-processors),如下,
AutowiredAnnotationBeanPostProcessor.java1
2
3
4
5
6
7
public void postProcessMergedBeanDefinition(RootBeanDefinition beanDefinition, Class<?> beanType, String beanName) {
if (beanType != null) {
InjectionMetadata metadata = findAutowiringMetadata(beanName, beanType, null);
metadata.checkConfigMembers(beanDefinition);
}
}可见,其逻辑主要是去调用 findAutowiringMetadata 方法;相关调用流程参考作为 inner-bean-post-processor 的行为;
总结,AutowiredAnnotationBeanPostProcessor不是一个简单的 bean-post-processor,而是一个实现了多重接口的 bean-post-processor,在我的后续分析中,大家将会看到它根据不同的接口实现而对应的不同行为特点。
调用过程源码分析
从类图分析的结果上可以看到,AutowiredAnnotationBeanPostProcessor并不是一个简单的 bean-post-processor,而是一个爱折腾的玩家,它先后直接的间接的实现了四个接口,而实际上与它有直接交集的只有两个接口 InstantiationAwareBeanPostProcessor 和 MergedBeanDefinitionPostProcessor;我们先来看看与之相关的调用过程,回顾一下Spring Beans 初始化流程分析中的 Do Get Bean 流程
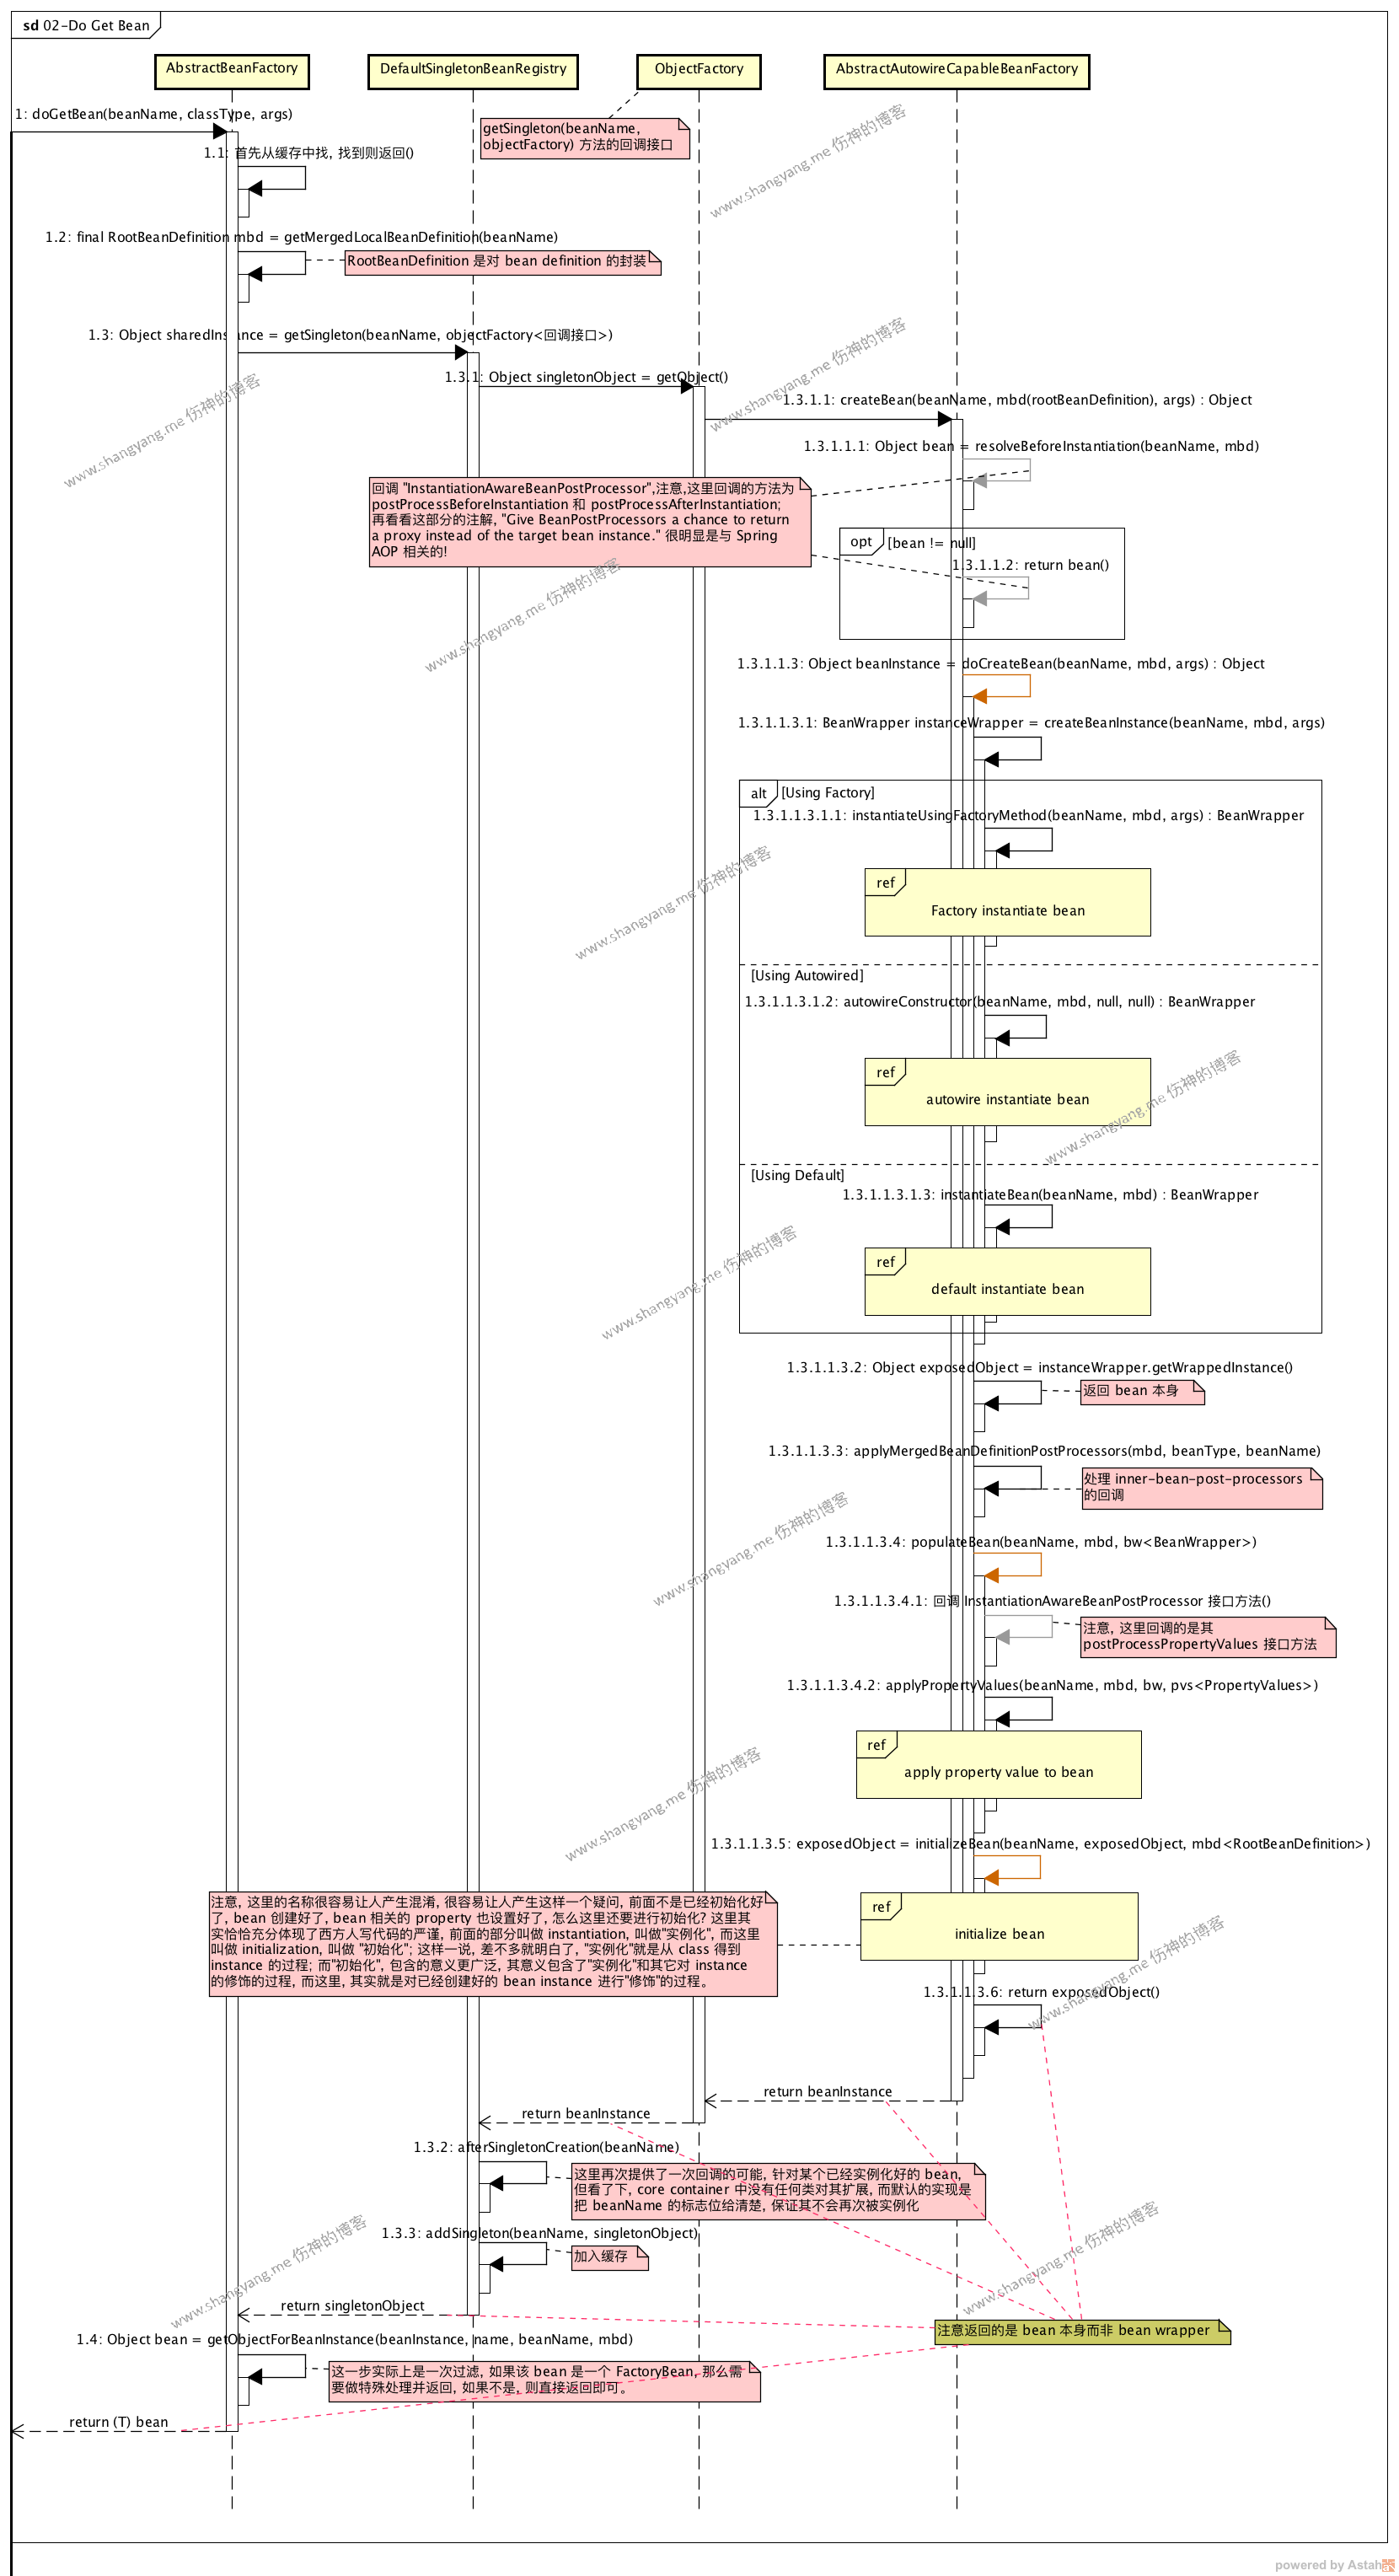
- AutowiredAnnotationBeanPostProcessor 作为接口
MergedBeanDefinitionPostProcessor的实现的时候(既是作为 inner-bean-post-processor 角色的时候),其行为发生在 step 1.3.1.1.3.3 applyMergedBeanDefinitionPostProcessors;该步骤发生在 实例化 bean 之后,主要是通过反射识别出 bean 实例当中的属性和方法级别的 @Autowired 注解属性,并缓存;具体分析参考 作为 inner-bean-post-processor 的行为小节; - 当作为接口
InstantiationAwareBeanPostProcessor的实现的时候,其行为发生在 step 1.3.1.1.3.4.1 回调 InstantiationAwareBeanPostProcessor 方法,该步骤主要发生在 populate bean 的过程当中,通过 @Autowired 注解所引用的对象给 bean 的属性赋值,具体的分析过程参考作为 InstantiationAwareBeanPostProcessor 的行为
作为 inner-bean-post-processor 的行为
为什么将 MergedBeanDefinitionPostProcessor 称做 inner-bean-post-processor 参看 classify and register bean-post-processors by order章节;
该行为对应流程图中的步骤是 step 1.3.1.1.3.3 applyMergedBeanDefinitionPostProcessors,一旦 bean instantiation 完毕,在 populate bean 之前,回调 inner-bean-post-processors;
AbstractAutowireCapableBeanFactory.java1
2
3
4
5
6
7
8
9
10
11
12
13
14
15
16
17
18
19protected Object doCreateBean(final String beanName, final RootBeanDefinition mbd, final Object[] args)
throws BeanCreationException {
.....
synchronized (mbd.postProcessingLock) {
if (!mbd.postProcessed) {
try {
applyMergedBeanDefinitionPostProcessors(mbd, beanType, beanName); // 处理 internal-bean-post-processors
}
catch (Throwable ex) {
throw new BeanCreationException(mbd.getResourceDescription(), beanName,
"Post-processing of merged bean definition failed", ex);
}
mbd.postProcessed = true;
}
}
....
}
可见,是直接通过调用 applyMergedBeanDefinitionPostProcessors 方法开始回调 inner-bean-post-processors 的;
AbstractAutowireCapableBeanFactory.java1
2
3
4
5
6
7
8
9
10
11
12
13
14
15
16/**
* Apply MergedBeanDefinitionPostProcessors to the specified bean definition,
* invoking their {@code postProcessMergedBeanDefinition} methods.
* @param mbd the merged bean definition for the bean
* @param beanType the actual type of the managed bean instance
* @param beanName the name of the bean
* @see MergedBeanDefinitionPostProcessor#postProcessMergedBeanDefinition
*/
protected void applyMergedBeanDefinitionPostProcessors(RootBeanDefinition mbd, Class<?> beanType, String beanName) {
for (BeanPostProcessor bp : getBeanPostProcessors()) {
if (bp instanceof MergedBeanDefinitionPostProcessor) {
MergedBeanDefinitionPostProcessor bdp = (MergedBeanDefinitionPostProcessor) bp;
bdp.postProcessMergedBeanDefinition(mbd, beanType, beanName);
}
}
}
回调过程简单直接,直接获取当前 Spring Container 中所有已注册的 inner-bean-post-processors,注册过程参考 classify and register bean-post-processors by order章节,然后依次回调 inner-bean-post-processors 的接口方法;这里想要补充的是,Spring 容器默认注册的 inner-bean-post-processors 有
- org.springframework.context.support.ApplicationContextAwareProcessor,
- org.springframework.context.annotation.ConfigurationClassPostProcessor$ImportAwareBeanPostProcessor,
- org.springframework.context.support.PostProcessorRegistrationDelegate$BeanPostProcessorChecker,
- org.springframework.context.annotation.CommonAnnotationBeanPostProcessor,
- org.springframework.beans.factory.annotation.AutowiredAnnotationBeanPostProcessor,
- org.springframework.beans.factory.annotation.RequiredAnnotationBeanPostProcessor,
- org.springframework.context.support.ApplicationListenerDetector]
有关 CommonAnnotationBeanPostProcessor、AutowiredAnnotationBeanPostProcessor 和 RequiredAnnotationBeanPostProcessor 的注册过程参考 context:annotation-config 配置元素小节的描述;也就是说,这里针对每个 bean 在其初始化的过程中,都会被上述的 inner-bean-post-processors 的回调方法所调用;不过这里,我们只关注 AutowiredAnnotationBeanPostProcessor 的行为;
备注,在 debug 过程中,可以在上述方法中设置条件断点1
beanName.equals("john") && bp instanceof org.springframework.beans.factory.annotation.AutowiredAnnotationBeanPostProcessor
加速调试过程,注意 AutowiredAnnotationBeanPostProcessor 必须设置为全包名,否则调试过程中会找不到 AutowiredAnnotationBeanPostProcessor 类型;
继续挖矿,
AutowiredAnnotationBeanPostProcessor.java1
2
3
4
5
6
7
public void postProcessMergedBeanDefinition(RootBeanDefinition beanDefinition, Class<?> beanType, String beanName) {
if (beanType != null) {
InjectionMetadata metadata = findAutowiringMetadata(beanName, beanType, null);
metadata.checkConfigMembers(beanDefinition);
}
}
可见,通过调用 findAutowiringMetadata 方法返回一个 InjectionMetadata 类型的 metadata;
继续挖矿,
AutowiredAnnotationBeanPostProcessor#findAutowiringMetadata1
2
3
4
5
6
7
8
9
10
11
12
13
14
15
16
17
18
19
20
21
22
23
24
25private InjectionMetadata findAutowiringMetadata(String beanName, Class<?> clazz, PropertyValues pvs) {
// Fall back to class name as cache key, for backwards compatibility with custom callers.
String cacheKey = (StringUtils.hasLength(beanName) ? beanName : clazz.getName());
// Quick check on the concurrent map first, with minimal locking.
InjectionMetadata metadata = this.injectionMetadataCache.get(cacheKey); // 先从缓存中找 InjectionMetadata,诸如 @Autowire,@Inject? 等,如果找不到,
if (InjectionMetadata.needsRefresh(metadata, clazz)) { // 如果找不到,则从这里开始,通过分析 bean,去找到它的 InjectionMetadata
synchronized (this.injectionMetadataCache) {
metadata = this.injectionMetadataCache.get(cacheKey);
if (InjectionMetadata.needsRefresh(metadata, clazz)) {
if (metadata != null) {
metadata.clear(pvs);
}
try {
metadata = buildAutowiringMetadata(clazz); // 去找,并构建其 InjectionMetadata 对象
this.injectionMetadataCache.put(cacheKey, metadata); // 如果找到了,将其放入 injectionMetadataCache 中返回;
}
catch (NoClassDefFoundError err) {
throw new IllegalStateException("Failed to introspect bean class [" + clazz.getName() +
"] for autowiring metadata: could not find class that it depends on", err);
}
}
}
}
return metadata;
}
代码注解中,我已经给了比较详细的行为描述;这里大致总结下,先从缓存中找是否已经有该 InjectionMetadata 存在了?如有,且无需进行 refresh,则返回;如果在缓存中不存在(或者存在且需要 refresh),那么就需要去构建一个 InjectionMetadata 类型的 AutowiringMetadata;上述代码为了防止在并发情况下创建 Metadata,所以代码逻辑稍显复杂;不过,我们这里只关注最重要的一行代码,那就是代码第 14 行,buildAutowiringMetadata(clazz),
继续挖矿,
AutowiredAnnotationBeanPostProcessor#buildAutowiringMetadata1
2
3
4
5
6
7
8
9
10
11
12
13
14
15
16
17
18
19
20
21
22
23
24
25
26
27
28
29
30
31
32
33
34
35
36
37
38
39
40
41
42
43
44
45
46
47
48
49
50
51
52
53
54
55
56
57
58
59
60
61private InjectionMetadata buildAutowiringMetadata(final Class<?> clazz) {
LinkedList<InjectionMetadata.InjectedElement> elements = new LinkedList<InjectionMetadata.InjectedElement>();
Class<?> targetClass = clazz;
do {
final LinkedList<InjectionMetadata.InjectedElement> currElements =
new LinkedList<InjectionMetadata.InjectedElement>();
// 1. 通过反射从 targetClass 的 field 中去找 annotation
ReflectionUtils.doWithLocalFields(targetClass, new ReflectionUtils.FieldCallback() {
public void doWith(Field field) throws IllegalArgumentException, IllegalAccessException {
AnnotationAttributes ann = findAutowiredAnnotation(field); // 是否存在 @Autowired
if (ann != null) {
if (Modifier.isStatic(field.getModifiers())) {
if (logger.isWarnEnabled()) {
logger.warn("Autowired annotation is not supported on static fields: " + field);
}
return; // 如果当前处理的属性是静态属性,则直接返回
}
boolean required = determineRequiredStatus(ann);
currElements.add(new AutowiredFieldElement(field, required));
}
}
});
// 2. 通过反射从 targetClass 的 method 中去找 annotation
ReflectionUtils.doWithLocalMethods(targetClass, new ReflectionUtils.MethodCallback() {
public void doWith(Method method) throws IllegalArgumentException, IllegalAccessException {
Method bridgedMethod = BridgeMethodResolver.findBridgedMethod(method);
if (!BridgeMethodResolver.isVisibilityBridgeMethodPair(method, bridgedMethod)) {
return;
}
// 上述代码处理 bridged method 相关情况;可忽略;
AnnotationAttributes ann = findAutowiredAnnotation(bridgedMethod); // 是否存在 @Autowired
if (ann != null && method.equals(ClassUtils.getMostSpecificMethod(method, clazz))) {
if (Modifier.isStatic(method.getModifiers())) {
if (logger.isWarnEnabled()) {
logger.warn("Autowired annotation is not supported on static methods: " + method);
}
return; // 如果方法是静态的,则直接返回;
}
if (method.getParameterTypes().length == 0) {
if (logger.isWarnEnabled()) {
logger.warn("Autowired annotation should only be used on methods with parameters: " +
method); // 警告,方法参数长度为 0
}
}
boolean required = determineRequiredStatus(ann);
PropertyDescriptor pd = BeanUtils.findPropertyForMethod(bridgedMethod, clazz);
currElements.add(new AutowiredMethodElement(method, required, pd));
}
}
});
elements.addAll(0, currElements);
targetClass = targetClass.getSuperclass();
}
while (targetClass != null && targetClass != Object.class);
return new InjectionMetadata(clazz, elements);
}
该方法分为两部分,通过工具类 ReflectionUtils 分别从当前 bean 实例 fields 和 methods 中去查找@Autowired注解,
- 从 fields 找
@Autowired注解
若找到,则创建AutowiredFieldElement实例,并放入 currElements 队列中 - 从 methods 中找
@Autowired注解
若找到,则创建AutowiredMethodElement实例,并放入 currElements 队列中 - 最后,通过 bean 的 Class 对象 和 curreElements 构建
InjectionMetadata实例并返回
❗️这里,对我而言,额外的收获是,学到了两个比较😎的方法,ReflectionUtils.doWithLocalFields和ReflectionUtils.doWithLocalMethods,这两个方法会遍历 Class 中的所有 Field 和 Method 并提供相应的回调,这样,就可以使得我们非常通过 Java 反射而处理相关的Method和Field;
继续挖矿,
最后回到 AutowiredAnnotationBeanPostProcessor#findAutowiringMetadata 方法中,将刚才生成并返回的 InjectionMetadata 注入缓存 injectionMetadataCache 中,返回;
总结,
通过上述的一系列步骤,可以看到,当AutowiredAnnotationBeanPostProcessor作为 inner-bean-post-processor 的时候,从当前 instantiated bean 的属性和方法中解析出了@Autowired注解属性,并将其通过 injectionMetadataCache 缓存到了当前的FactoryBean中;
作为 InstantiationAwareBeanPostProcessor 的行为
从调用过程源码分析所引述的流程图中可以看到,该步骤是发生在 step 1.3.1.1.3.4.1: 回调 InstantiationAwareBeanPostProcessor 接口方法,摘取相关代码如下,
AbstractAutowireCapableBeanFactory#populateBean1
2
3
4
5
6
7
8
9
10
11
12
13
14
15
16
17if (hasInstAwareBpps || needsDepCheck) {
PropertyDescriptor[] filteredPds = filterPropertyDescriptorsForDependencyCheck(bw, mbd.allowCaching);
if (hasInstAwareBpps) {
for (BeanPostProcessor bp : getBeanPostProcessors()) {
if (bp instanceof InstantiationAwareBeanPostProcessor) {
InstantiationAwareBeanPostProcessor ibp = (InstantiationAwareBeanPostProcessor) bp;
pvs = ibp.postProcessPropertyValues(pvs, filteredPds, bw.getWrappedInstance(), beanName);
if (pvs == null) {
return;
}
}
}
}
if (needsDepCheck) {
checkDependencies(beanName, mbd, filteredPds, pvs);
}
}
在代码第 7 行,正式回调 InstantiationAwareBeanPostProcessor 的接口方法;备注,为了加快调试过程,最好在第 7 行设置条件断点,1
beanName.equals("john") && bp instanceof org.springframework.beans.factory.annotation.AutowiredAnnotationBeanPostProcessor
继续挖矿,
AutowiredAnnotationBeanPostProcessor#postProcessPropertyValues1
2
3
4
5
6
7
8
9
10
11
12
13
14
15
16
public PropertyValues postProcessPropertyValues(
PropertyValues pvs, PropertyDescriptor[] pds, Object bean, String beanName) throws BeanCreationException {
InjectionMetadata metadata = findAutowiringMetadata(beanName, bean.getClass(), pvs);
try {
metadata.inject(bean, beanName, pvs);
}
catch (BeanCreationException ex) {
throw ex;
}
catch (Throwable ex) {
throw new BeanCreationException(beanName, "Injection of autowired dependencies failed", ex);
}
return pvs;
}
代码第 5 行,由于在作为 inner-bean-post-processor 的行为过程中,AutowiredAnnotationBeanPostProcessor 已经作为 inner-bean-post-processor 调用过此方法,既从当前 bean 对象中的属性和方法中找到了
@Autowired注解,并将其封装为 InjectionMetadata 放入了当前 FactoryBean 的缓存对象 injectionMetadataCache 中,详细过程不再赘述;所以,这里直接返回该 bean 与@Autowired注解相关的 InjectionMetadata;代码第 7 行,这里是重点了,通过 InjectionMetadata 进行注入,下面我们深入分析
继续挖矿,
InjectionMetadata#inject1
2
3
4
5
6
7
8
9
10
11
12
13public void inject(Object target, String beanName, PropertyValues pvs) throws Throwable {
Collection<InjectedElement> elementsToIterate =
(this.checkedElements != null ? this.checkedElements : this.injectedElements);
if (!elementsToIterate.isEmpty()) {
boolean debug = logger.isDebugEnabled();
for (InjectedElement element : elementsToIterate) {
if (debug) {
logger.debug("Processing injected element of bean '" + beanName + "': " + element);
}
element.inject(target, beanName, pvs);
}
}
}
从上一小节作为 inner-bean-post-processor 的行为的分析结果中,可以得知,InjectionMetadata对象本身是一个包含了一系列AutowiredFieldElement和AutowiredMethodElement对象的队列所构成;这里呢,通过迭代InjectedElement依次处理AutowiredFieldElement或AutowiredMethodElement元素;关键代码在第 10 行,
继续挖矿,
注意,InjectedElement 是 AutowiredFieldElement 和 AutowiredMethodElement 的超类,所以,接下来的流程会分为两种情况,
AutowiredFieldElement#inject(Object bean, String beanName, PropertyValues pvs)
删除了部分不太相关的代码,1
2
3
4
5
6
7
8
9
10
11
12
13
14
15
16
17
18
19
20
21
22
23
24
25
26
27
28
protected void inject(Object bean, String beanName, PropertyValues pvs) throws Throwable {
Field field = (Field) this.member; // the @Autowired annotated field, my example, Dog
Object value;
if (this.cached) {
// 如果该 @Autowired ref bean 已经被解析过,直接从缓存中获取;
value = resolvedCachedArgument(beanName, this.cachedFieldValue);
}
else {
DependencyDescriptor desc = new DependencyDescriptor(field, this.required);
desc.setContainingClass(bean.getClass());
Set<String> autowiredBeanNames = new LinkedHashSet<String>(1);
TypeConverter typeConverter = beanFactory.getTypeConverter();
try {
// 1. 解析出 @Autowired 所 annotated 的实例,
value = beanFactory.resolveDependency(desc, beanName, autowiredBeanNames, typeConverter);
}
catch (BeansException ex) {
throw new UnsatisfiedDependencyException(null, beanName, new InjectionPoint(field), ex);
}
....
}
if (value != null) {
ReflectionUtils.makeAccessible(field); // 如果该属性是 private 的,那么 make accessiable
field.set(bean, value); // 2. 好了,最后的重点来了,通过反射将 @Autowired annotated ref-bean 写入当前 bean 的属性中;
}
}
}其实重点就是做了两件事情:首先,解析 @Autowired 所标注的 ref bean,见代码第 16 行;然后,将该 ref bean 通过 field
注入当前的 bean,见代码第 25 行;这里,值得深挖的是代码第 16 行的底层代码逻辑,见下一小节解析 ref bean 流程,不过如果只想了解 @Autowired 的运行机理,到这里就可以了;有兴趣的读者可以跟随我一起再继续挖矿;AutowiredMethodElement#inject
该方法与 #1 非常类似,有兴趣的读者可以深入的取专研一下;这里我就不再赘述;
解析 ref bean 流程
首先,为了更为清晰的调试出底层的代码逻辑,将测试用例做稍微的修改,添加使用 @Qualifier 注解的用例情况,如下所述,
beans.xml1
2
3
4
5
6
7
8
9
10
11
12
13
14
15
16
17
18
19
20
21
22
23
24
25
26
27
28
29<beans xmlns="http://www.springframework.org/schema/beans"
xmlns:xsi="http://www.w3.org/2001/XMLSchema-instance"
xmlns:p="http://www.springframework.org/schema/p"
xmlns:context="http://www.springframework.org/schema/context"
xsi:schemaLocation="http://www.springframework.org/schema/beans
http://www.springframework.org/schema/beans/spring-beans.xsd
http://www.springframework.org/schema/context
http://www.springframework.org/schema/context/spring-context.xsd">
<context:annotation-config/>
<bean name="john" class="org.shangyang.spring.container.Person">
<property name="name" value="John Doe"/>
<property name="spouse" ref="jane"/>
</bean>
<bean name="jane" class="org.shangyang.spring.container.Person">
<property name="name" value="Jane Doe"/>
</bean>
<bean name="niba" class="org.shangyang.spring.container.Dog">
<property name="name" value="Niba" />
</bean>
<bean name="kiba" class="org.shangyang.spring.container.Dog">
<property name="name" value="Niba" />
</bean>
</beans>
配置中,我们新增一个 Dog 实例 kiba,
Person.java1
2
3
4
5
6
7
8
9
10
11
12
13
14
15
16
17
18
19
20
21
22
23
24
25
26
27
28
29
30
31
32
33
34
35
36
37
38
39
40
41
42
43
44
45package org.shangyang.spring.container;
import org.springframework.beans.factory.annotation.Autowired;
import org.springframework.beans.factory.annotation.Qualifier;
/**
*
* @author shangyang
*
*/
public class Person {
String name;
Person spouse;
("niba")
Dog dog;
public String getName() {
return name;
}
public void setName(String name) {
this.name = name;
}
public Person getSpouse() {
return spouse;
}
public void setSpouse(Person spouse) {
this.spouse = spouse;
}
public Dog getDog() {
return dog;
}
public void setDog(Dog dog) {
this.dog = dog;
}
}
通过 @Qualifier 标注,Person 实例 john 和 jane 需要的是 niba;下面进入正题,分析源码,
DefaultListableBeanFactory#resolveDependency1
2
3
4
5
6
7
8
9
10
11
12
13
14
15
16
17
18
19
20
21
22
23
24
25
26
public Object resolveDependency(DependencyDescriptor descriptor, String requestingBeanName,
Set<String> autowiredBeanNames, TypeConverter typeConverter) throws BeansException {
descriptor.initParameterNameDiscovery(getParameterNameDiscoverer());
if (javaUtilOptionalClass == descriptor.getDependencyType()) {
return new OptionalDependencyFactory().createOptionalDependency(descriptor, requestingBeanName);
}
else if (ObjectFactory.class == descriptor.getDependencyType() ||
ObjectProvider.class == descriptor.getDependencyType()) {
return new DependencyObjectProvider(descriptor, requestingBeanName);
}
else if (javaxInjectProviderClass == descriptor.getDependencyType()) {
return new Jsr330ProviderFactory().createDependencyProvider(descriptor, requestingBeanName);
}
else {
// 返回该 lazy proxy 表示延迟初始化,实现过程是查看在 @Autowired 注解处是否使用了 @Lazy = true 注解
Object result = getAutowireCandidateResolver().getLazyResolutionProxyIfNecessary(
descriptor, requestingBeanName);
if (result == null) {
// 大部分的通过 @Autowired 注解的普通 bean 将会在这里进行初始化
result = doResolveDependency(descriptor, requestingBeanName, autowiredBeanNames, typeConverter);
}
return result;
}
}
这里的解析过程根据 @Autowired 所 ref bean 的类型,分为了四种情况进行处理
- javaUtilOptionalClass 类型
- ObjectFactory 或者 ObjectProvider 类型
- javaxInjectProviderClass 既是 JSR330 类型
有关 @Inject,大概也可以清楚其底层解析的入口了; - 普通的 ref bean,代码第 22 行,
下面根据 #4 情况的主线流程继续分析
DefaultListableBeanFactory#doResolveDependency ( 删除了大量与主流程不相干的代码 )1
2
3
4
5
6
7
8
9
10
11
12
13
14
15
16
17
18
19
20
21
22
23
24
25
26
27
28
29
30
31
32
33
34
35
36
37
38
39
40
41
42
43
44
45
46
47
48
49
50
51
52
53
54
55
56public Object doResolveDependency(DependencyDescriptor descriptor, String beanName,
Set<String> autowiredBeanNames, TypeConverter typeConverter) throws BeansException {
InjectionPoint previousInjectionPoint = ConstructorResolver.setCurrentInjectionPoint(descriptor);
try {
....
Class<?> type = descriptor.getDependencyType();
....
//1. 根据 type 去找到对应的 candidates,该方法内部会处理 @Qualifier 的情况,
Map<String, Object> matchingBeans = findAutowireCandidates(beanName, type, descriptor);
if (matchingBeans.isEmpty()) {
if (descriptor.isRequired()) {
raiseNoMatchingBeanFound(type, descriptor.getResolvableType(), descriptor);
}
return null;
}
String autowiredBeanName;
Object instanceCandidate;
if (matchingBeans.size() > 1) {
//2. 根据 @Primary and @Priority 注解进行筛选
autowiredBeanName = determineAutowireCandidate(matchingBeans, descriptor);
if (autowiredBeanName == null) {
if (descriptor.isRequired() || !indicatesMultipleBeans(type)) {
return descriptor.resolveNotUnique(type, matchingBeans);
}
else {
// In case of an optional Collection/Map, silently ignore a non-unique case:
// possibly it was meant to be an empty collection of multiple regular beans
// (before 4.3 in particular when we didn't even look for collection beans).
return null;
}
}
instanceCandidate = matchingBeans.get(autowiredBeanName);
}
else {
// We have exactly one match.
Map.Entry<String, Object> entry = matchingBeans.entrySet().iterator().next();
autowiredBeanName = entry.getKey();
instanceCandidate = entry.getValue(); // 这里返回的是 Class Type
}
if (autowiredBeanNames != null) {
autowiredBeanNames.add(autowiredBeanName);
}
// 3. 这个方法 xx 的太重要了,好隐晦,descriptor.resolveCandidate(autowiredBeanName, type, this) 会调用 Factory.getBean.. 去实例化找到的 Class Type..
return (instanceCandidate instanceof Class ?
descriptor.resolveCandidate(autowiredBeanName, type, this) : instanceCandidate); // 注意,instanceCandidate 会有两种类型,Class Type 和 instance,因为 candidate 有可能之前已经初始化好并缓存了。
}
...
}
这段代码的主流程主要做了以下三件事情,
根据 Class Type 去找到对应的 candidates,见代码第 14 行;备注,该方法内部会处理 @Qualifier 的情况,具体分析过程参考通过 Class Type 寻找 Candidates (同时会处理 @Qualifer) 小节的分析;
如果返回的 candidates 有多个,再根据 @Primary and @Priority 注解进行筛选,见代码第 27 行;参考根据 @Primary and @Priority 注解进行筛选
最后初始化 candiate 并返回,见代码第 52 行;看下源码
DependencyDescriptor#resolveCandidate1
2
3
4
5public Object resolveCandidate(String beanName, Class<?> requiredType, BeanFactory beanFactory)
throws BeansException {
return beanFactory.getBean(beanName, requiredType);
}可以看到,通过 Do Get Bean 流程初始化对应的 candidate;
通过 Class Type 以及 @Qualifer 寻找 Candidates
DefaultListableBeanFactory#findAutowireCandidates (删除部分与主流程不相干代码)1
2
3
4
5
6
7
8
9
10
11
12
13
14
15
16
17
18
19
20
21
22
23
24
25
26
27
28
29
30
31
32
33
34
35
36
37
38
39
40
41
42/**
* Find bean instances that match the required type.
* Called during autowiring for the specified bean.
* @param beanName the name of the bean that is about to be wired
* @param requiredType the actual type of bean to look for
* (may be an array component type or collection element type)
* @param descriptor the descriptor of the dependency to resolve
* @return a Map of candidate names and candidate instances that match
* the required type (never {@code null})
* @throws BeansException in case of errors
* @see #autowireByType
* @see #autowireConstructor
*/
protected Map<String, Object> findAutowireCandidates(
String beanName, Class<?> requiredType, DependencyDescriptor descriptor) {
String[] candidateNames = BeanFactoryUtils.beanNamesForTypeIncludingAncestors(
this, requiredType, true, descriptor.isEager()); // 返回 niba 和 kiba
Map<String, Object> result = new LinkedHashMap<String, Object>(candidateNames.length);
// 1. 依次从所有已经解析的 Type 去找是否已经存在对应的 Type 了?如果有,则添加对应 Type 的 bean 实例到 result 队里当中;注意,如果找到了,这里加入 result 的就不再是 Class Type 了,而是 instance
for (Class<?> autowiringType : this.resolvableDependencies.keySet()) {
if (autowiringType.isAssignableFrom(requiredType)) {
Object autowiringValue = this.resolvableDependencies.get(autowiringType);
autowiringValue = AutowireUtils.resolveAutowiringValue(autowiringValue, requiredType);
if (requiredType.isInstance(autowiringValue)) {
result.put(ObjectUtils.identityToString(autowiringValue), autowiringValue);
break;
}
}
}
for (String candidate : candidateNames) {
// 2. isAutowireCandidate(candidate, descriptor) 会去判断 @Qualifier 逻辑
if (!isSelfReference(beanName, candidate) && isAutowireCandidate(candidate, descriptor)) {
// 根据 candidate 的名字找到其对应的 Type,返回并添加入 result, 比如得到 niba = class org.shangyang.spring.container.Dog
addCandidateEntry(result, candidate, descriptor, requiredType);
}
}
....
return result;
}
从该方法的注解中可以知道,就是通过 required type (既是 @Autowired 注解的需要被注入的实例的 Class Type) 去查找 Spring 容器中的 candidates;这里需要注意的是它的几个参数,
- beanName <String>
当前 bean,比如 john - requiredType <Class<?>>
@Autowired 注解的需要被注入的 niba 的 Class Type,这里是 org.shangyang.spring.container.Dog - descriptor <DependencyDescriptor>
DependencyDescriptor 一个简单的 POJO 对象,用来保存当前 Dependency 的一些当前状态,为了加深印象,给一张 debug 的截图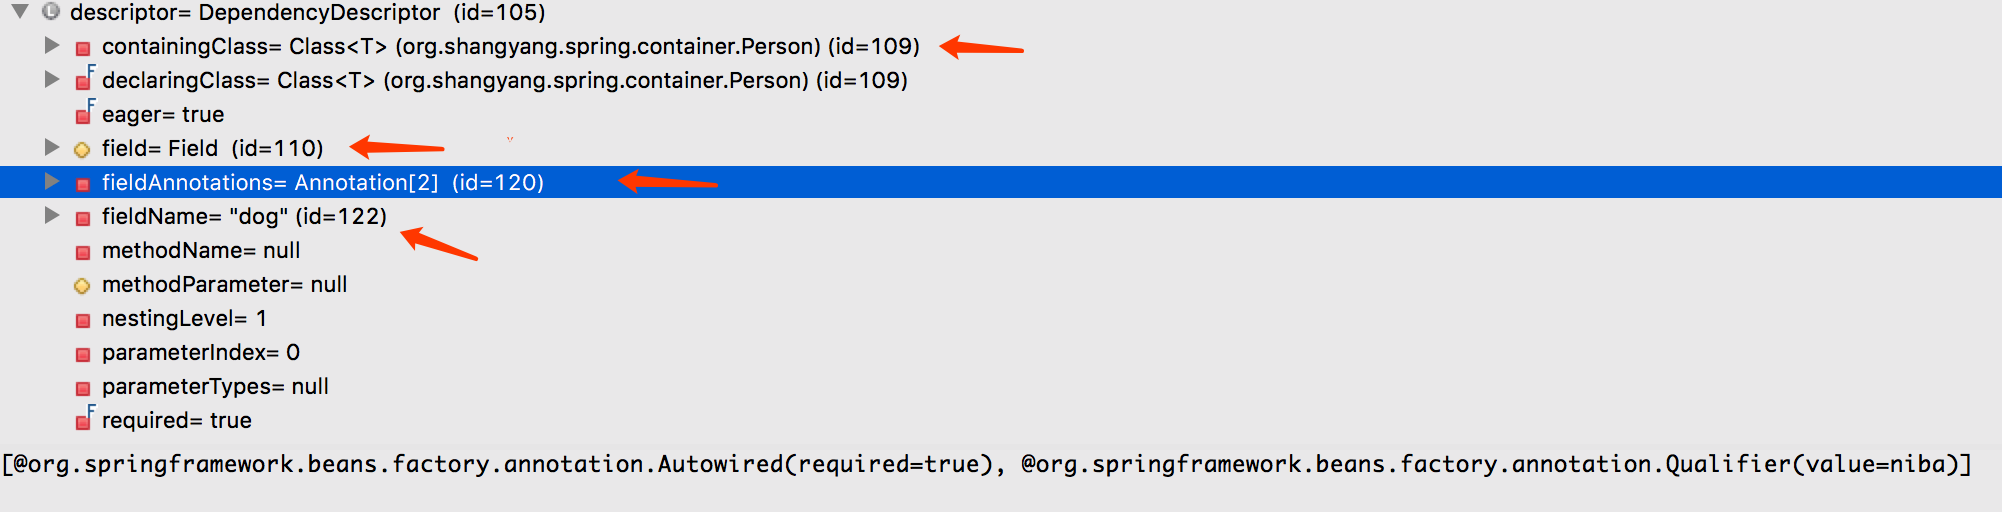 可见,DependencyDescriptor 主要保存了三类信息,1. Person Class Type;2. The @Autowired Field Dog;3. @Autowired Field 上所有相关的 Annotation 信息,这里只使用到了 @Autowired 和 @Qualifier,当然也可以使用注入 @Primary 或者 @Priority 等相关注解;
下面,我们来分析这段代码的代码逻辑,主要做了两件事情,
从缓存中找该 requiredType 是否已经被成功解析过,若是,则直接返回缓存中已经解析好的实例;
注意,这里是该方法比较特殊的地方,它通过返回类型 Object 既可以返回 candidate Class Type,也可以返回 candidate instance;若在缓存中没有找到,它会依次从当前的 candidates ( 这里的是 niba 和 kiba )中去查找是否是最终符合的 candidate,如果是符合的 candidate,将会加入 result;
下面就 #2 的寻找过程做进一步的分析,
DefaultListableBeanFactory.java1
2
3
4
5
6
public boolean isAutowireCandidate(String beanName, DependencyDescriptor descriptor)
throws NoSuchBeanDefinitionException {
return isAutowireCandidate(beanName, descriptor, getAutowireCandidateResolver());
}
getAutowireCandidateResolver() 返回 ContextAnnotationAutowireCandidateResolver
DefaultListableBeanFactory.java1
2
3
4
5
6
7
8
9
10
11
12
13
14
15
16
17
18
19
20
21
22
23
24
25
26
27
28
29
30
31
32
33
34/**
* Determine whether the specified bean definition qualifies as an autowire candidate,
* to be injected into other beans which declare a dependency of matching type.
* @param beanName the name of the bean definition to check
* @param descriptor the descriptor of the dependency to resolve
* @param resolver the AutowireCandidateResolver to use for the actual resolution algorithm
* @return whether the bean should be considered as autowire candidate
*/
protected boolean isAutowireCandidate(String beanName, DependencyDescriptor descriptor, AutowireCandidateResolver resolver)
throws NoSuchBeanDefinitionException {
String beanDefinitionName = BeanFactoryUtils.transformedBeanName(beanName);
if (containsBeanDefinition(beanDefinitionName)) {
// 该方法的内部流程中会去判断 @Qualifier 逻辑
return isAutowireCandidate(beanName, getMergedLocalBeanDefinition(beanDefinitionName), descriptor, resolver);
}
else if (containsSingleton(beanName)) {
// 该方法的内部流程中会去判断 @Qualifier 逻辑
return isAutowireCandidate(beanName, new RootBeanDefinition(getType(beanName)), descriptor, resolver);
}
// 如果在当前的 BeanFactory 中没有找到,将会继续从 Parent BeanFactory 中查找;
BeanFactory parent = getParentBeanFactory();
if (parent instanceof DefaultListableBeanFactory) {
// No bean definition found in this factory -> delegate to parent.
return ((DefaultListableBeanFactory) parent).isAutowireCandidate(beanName, descriptor, resolver);
}
else if (parent instanceof ConfigurableListableBeanFactory) {
// If no DefaultListableBeanFactory, can't pass the resolver along.
return ((ConfigurableListableBeanFactory) parent).isAutowireCandidate(beanName, descriptor);
}
else {
return true;
}
}
该方法主要包含两部分逻辑,
- 从当前的 FactoryBean 中查找,有两个分支流程,不过最终都是调用的 isAutowireCandidate 方法来判断是否是 Autowired 所需要的 ref bean;
- 若 #1 没有找到,则从其 Parent Factory Bean 中查找;
下面就 #1 的 isAutowireCandidate 方法继续进行分析,
DefaultListableBeanFactory.java1
2
3
4
5
6
7
8
9
10protected boolean isAutowireCandidate(String beanName, RootBeanDefinition mbd,
DependencyDescriptor descriptor, AutowireCandidateResolver resolver) {
String beanDefinitionName = BeanFactoryUtils.transformedBeanName(beanName);
// 解析 bean name 对应的 ClassType,并且将解析后的 ClassType 缓存到 bean definitions 中;
resolveBeanClass(mbd, beanDefinitionName);
...
return resolver.isAutowireCandidate(
new BeanDefinitionHolder(mbd, beanName, getAliases(beanDefinitionName)), descriptor);
}
QualifierAnnotationAutowireCandidateResolver.java1
2
3
4
5
6
7
8
9
10
11
12
13
14
15
16
17
18public boolean isAutowireCandidate(BeanDefinitionHolder bdHolder, DependencyDescriptor descriptor) {
boolean match = super.isAutowireCandidate(bdHolder, descriptor);
if (match && descriptor != null) {
// 1. 在这里判断的 Qualifier;如果当前的 descriptor 中有标注 @Qualifier,那么 bean 必须与之匹配,才可以返回;
match = checkQualifiers(bdHolder, descriptor.getAnnotations());
if (match) {
// 2. 继续匹配 method 参数..
MethodParameter methodParam = descriptor.getMethodParameter();
if (methodParam != null) {
Method method = methodParam.getMethod();
if (method == null || void.class == method.getReturnType()) {
match = checkQualifiers(bdHolder, methodParam.getMethodAnnotations());
}
}
}
}
return match;
}
这里分别对属性和方法进行了匹配,首先对属性进行匹配,然后对方法进行匹配;这里我将重点分析第一种情况,
QualifierAnnotationAutowireCandidateResolver#checkQualifiers1
2
3
4
5
6
7
8
9
10
11
12
13
14
15
16
17
18
19
20
21
22
23
24
25
26
27
28
29
30
31
32
33
34
35
36
37
38
39
40
41
42
43/**
* Match the given qualifier annotations against the candidate bean definition. 通过 @Qualifer 中指定的 name 与当前的 ref-bean 进行深度匹配,还是否能 match,若 matched,则返回之;
*/
protected boolean checkQualifiers(BeanDefinitionHolder bdHolder, Annotation[] annotationsToSearch) {
if (ObjectUtils.isEmpty(annotationsToSearch)) {
return true;
}
SimpleTypeConverter typeConverter = new SimpleTypeConverter();
for (Annotation annotation : annotationsToSearch) {
Class<? extends Annotation> type = annotation.annotationType();
boolean checkMeta = true;
boolean fallbackToMeta = false;
if (isQualifier(type)) { // 判断当前的注解是不是 @Qualifier
//1. 深度的根据 @Qualifier 中定义的 name 与当前 ref-bean 进行匹配 ..
if (!checkQualifier(bdHolder, annotation, typeConverter)) {
fallbackToMeta = true;
}
else {
checkMeta = false;
}
}
// 2. 从 meta annoation 中查找;
if (checkMeta) {
boolean foundMeta = false;
for (Annotation metaAnn : type.getAnnotations()) {
Class<? extends Annotation> metaType = metaAnn.annotationType();
if (isQualifier(metaType)) {
foundMeta = true;
// Only accept fallback match if @Qualifier annotation has a value...
// Otherwise it is just a marker for a custom qualifier annotation.
if ((fallbackToMeta && StringUtils.isEmpty(AnnotationUtils.getValue(metaAnn))) ||
!checkQualifier(bdHolder, metaAnn, typeConverter)) {
return false;
}
}
}
if (fallbackToMeta && !foundMeta) {
return false;
}
}
}
return true;
}
这里处理 annotation 分为两个分支,
- 分支 1, 处理 @Qualifier;
- 分支 2, 处理 meta annotation,有关 meta annotation 的描述参考 【7.10.2】Meta-annotations;
这里,重点关注与当前主流程相关的分支 1,既当当前的注解是 @Qualifier 的处理流程,见代码第 15 行,
1 | /** |
在分析这个方法内部逻辑以前,先来看看其两个重要的参数,
- bdHolder <BeanDefinitionHolder>
BeanDefinitionHolder,注意这里是对 candidates( ref-beans ) definitions 的包装对象,测试用例中使用到的 candidates 为 niba 和 kiba,为了加深映像,给一张 debug 截图, 可见,是对 candidate 既是 target class 进行的封装;
 - annotation <Annotation>
既是当前 bean 的 @Qualifier 对象;
上述代码的逻辑主要分为两个部分,
从 target class 中去找与当前 bean 所匹配的 @Qualifier
可以理解为从 niba 和 kiba 的 Class Type 中去找是否有相应的 @Qualifier 注解;若有则赋值给变量 qualifier,涉及的代码从 13-53 行根据
@Qualifier来匹配适合的 candidate使用一个循环分别来匹配 @Qualifier 中的所有键值对,不过当前测试用例中使用到的 @Qualifier 只定义了一个键值对,那就是 value=niba,这里,以当前流程执行到 target niba 为例,
首先,从 target-class niba 中去找相同的 @Qualfifier,(既是根据 value=niba 键值对去匹配),相关核心代码逻辑摘录如下,
1
2
3
4
5
6
7
8
9
10
11
12// Check qualifier first,从当前的 target-class 对象去找 @Qualifier 对应的值
if (qualifier != null) {
actualValue = qualifier.getAttribute(attributeName);
}
if (actualValue == null) {
// Fall back on bean definition attribute,从 xml bean configuration 中找 <qualifier> 元素的定义的值
actualValue = bd.getAttribute(attributeName);
}
...
if (!expectedValue.equals(actualValue)) {
return false;
}从 target-class niba Class Type 对象或者从相关的 bean niba xml 配置定义中去找 @Qualifier 的值,并赋值给 actualValue,既是 target-class 对应的 @Qualifier 的实际值;最后,如果 expectedValue 和 actualValue 不匹配,则返回 false;等等,别以为这样就完了,在上面代码的省略处,代码第 9 行,有一个 fallback 的逻辑,我们来看看是什么,呵呵就对应我们下面的其次部分了,
其次,如果 actualValue == null,既 target-class 压根没有配置 @Qualifier (正如我们的当前用例 niba 对象),便回溯至使用 target-class niba 的 bean name 或者是 alias name 的来匹配了,相关核心代码摘要如下,
1
2
3
4
5
6// 最重要的就是 bdHolder.matchesName((String) expectedValue) 方法,比对 target 的 beanname 与 aliasname 是否与 @Qualifier 中的 value 值相匹配
if (actualValue == null && attributeName.equals(AutowireCandidateQualifier.VALUE_KEY) &&
expectedValue instanceof String && bdHolder.matchesName((String) expectedValue)) {
// Fall back on bean name (or alias) match;这里回溯至使用 target (my case is dog instance) 的 bean name 或者是 alias name 的与 @Qualifier 的 value 的匹配方式了
continue;
}既是去匹配 xml 中所定义的 bean name
1
2
3<bean name="niba" class="org.shangyang.spring.container.Dog">
<property name="name" value="Niba" />
</bean>或者匹配由 @Service、@Component 等注解中使用的 bean name (这里涉及到了 component-scan 相关知识,将会再后续博文中描述)
1
2
3
4
5package org.shangyang.spring.container;
("niba")
public class Dog{
...
}怎么样?看完上面的代码是不是觉得 Spring 的某些局部源码其实写得真的也不怎么滴,甚至可以用烂来形容;相信当你翻开 Spring 4.7 源码,查看到该方法的时候,会和我一样,有同样的感触;
最后,这里为什么使用一个循环来匹配 @Qualifier 中的所有属性值,而且必须是全部匹配,如果有一个属性不匹配,则返回 false?
主要是为了应对自定义 @Qualifier 并且包含多个键值对的情况,诸如,在当前 bean 中使用如下的注解,1
2
3
(format=Format.VHS, genre="Action")
private MovieCatalog actionVhsCatalog;要求,target-class 中的 @Qualifier 必须全匹配,匹配其中所有的键值对才算成功匹配;更多描述参考官方文档【7.9.4】Fine-tuning annotation-based autowiring with qualifiers
写在此小节的最后,
可见,通过 Class Type 去寻找 Candidates 并不是一件容易的事情,里面涉及到如何根据 @Qualifier 去处理有多个 candidates 的逻辑;
可见,@Autowired 主要是根据 Class Type 去匹配 candidates,如果有多个 candidates,只有当 @Qualifier 匹配失败以后,才会 fall back 至使用 bean name 的方式进行匹配,这也是为什么 Spring 官方文档中明确说明的,如果是期望用 bean name 的方式来匹配 target bean,不建议使用 @Autowired,而建议使用 @Resource,因为 @Resource 本身的实现逻辑就是使用 bean name 的方式来进行匹配的,相关描述参考【7.9.4】Fine-tuning annotation-based autowiring with qualifiers;所以,在 Person 中使用的 @Autowired 最好改为使用 @Resource 的方式,
1
2
3
4
5
6
7
8
9
10
11
12
13
14
15
16
17
18
19
20
21package org.shangyang.spring.container;
import javax.annotation.Resource;
/**
-
- @author shangyang
*
*/
public class Person {
String name;
Person spouse;
(name="niba")
Dog dog;
...
}注意,@Resource 注解需要引用 javax.annoation-api.jar;最后,如果当 @Resource 没有通过名字找到对应的 candidate,将会 fall back to @Autowired 的查找逻辑;
根据 @Primary and @Priority 注解对多个 candidates 进行筛选
如果[通过 Class Type 以及 @Qualifer 寻找 Candidates] 返回多个 candidates,将会使用 @Primary 和 @Priority 继续筛选;这里不再深挖,有兴趣的读者可以自行分析;详细逻辑参考【7.9.3】Fine-tuning annotation-based autowiring with @Primary
特殊调用
注入 ApplicationContext 等
可以直接通过 @Autowired 注入接口 BeanFactory, ApplicationContext, Environment, ResourceLoader, ApplicationEventPublisher, 和 MessageSource 以及注入他们的扩展接口ConfigurableApplicationContext和ResourcePatternResolver 等等;
这里我通过注入ApplicationContext为例,讲解 Spring 容器是如何将其注入当前 bean 实例中的;沿用本章所使用的例子,对 Person 对象做如下修改,添加一个注入ApplicationContext的 @Autowired 注解;
Person.java1
2
3
4
5
6
7
8
9
10
11
12
13
14
15
16
17
18
19
20
21
22
23
24
25
26
27
28
29
30
31package org.shangyang.spring.container;
import javax.annotation.Resource;
import org.springframework.beans.factory.annotation.Autowired;
import org.springframework.context.ApplicationContext;
/**
*
* @author shangyang
*
*/
public class Person {
String name;
Person spouse;
(name="niba")
Dog dog;
ApplicationContext context;
public ApplicationContext getContext(){
return context;
}
...
}
_测试_
1 |
|
测试结果是,可以通过 @Autowired 使得 Person 实例获得当前的ApplicationContext容器实例;那么,ApplicationContext是在什么时候注入 Person 实例中的呢?通过作者以往的章节描述,我们知道,通过ApplicationContextAwareProcessor可以将ApplicationContext注入给实现了接口ApplicatonContextAware的 bean,有关详细描述参考注入 Aware 对象的延生部分,不过,这个方式比较的笨拙,必须与 Spring 的ApplicatonContextAware接口进行耦合;而这里,我们直接通过 @Autowired 注解的方式,同样也得到了ApplicaitonContext,那它又是如何实现的呢?
整个流程和通过 @Autowired 注解注入普通 bean 非常类同,从解析 ref bean 流程到通过 Class Type 以及 @Qualifer 寻找 Candidates 流程之间的步骤都相同,唯一的区别是当进入通过 Class Type 以及 @Qualifer 寻找 Candidates 流程以后,
DefaultListableBeanFactory#findAutowireCandidates1
2
3
4
5
6
7
8
9
10
11
12
13
14
15
16
17
18
19
20
21
22
23
24
25
26protected Map<String, Object> findAutowireCandidates(
String beanName, Class<?> requiredType, DependencyDescriptor descriptor) {
String[] candidateNames = BeanFactoryUtils.beanNamesForTypeIncludingAncestors(
this, requiredType, true, descriptor.isEager()); // 返回 niba 和 kiba
Map<String, Object> result = new LinkedHashMap<String, Object>(candidateNames.length);
// 1. 依次从所有已经解析的 Type 去找是否已经存在对应的 Type 了?如果有,则添加对应 Type 的 bean 实例到 result 队里当中;注意,如果找到了,这里加入 result 的就不再是 Class Type 了,而是 instance
for (Class<?> autowiringType : this.resolvableDependencies.keySet()) {
if (autowiringType.isAssignableFrom(requiredType)) {
Object autowiringValue = this.resolvableDependencies.get(autowiringType);
autowiringValue = AutowireUtils.resolveAutowiringValue(autowiringValue, requiredType);
if (requiredType.isInstance(autowiringValue)) {
result.put(ObjectUtils.identityToString(autowiringValue), autowiringValue);
break;
}
}
}
for (String candidate : candidateNames) {
// 2. isAutowireCandidate(candidate, descriptor) 会去判断 @Qualifier 逻辑
if (!isSelfReference(beanName, candidate) && isAutowireCandidate(candidate, descriptor)) {
// 根据 candidate 的名字找到其对应的 Type,返回并添加入 result, 比如得到 niba = class org.shangyang.spring.container.Dog
addCandidateEntry(result, candidate, descriptor, requiredType);
}
}
....
return result;
}
通过 @Autowired 注入的普通 bean 走的是第二个流程,而这里,走的是第一个流程,既是从缓存 (this.resolvableDependencies) 中去找,找到当前容器 bean ApplicaitonContext既返回;
备注,在容器启动以后,在当前的 default BeanFactory 中通过 resolvableDependencies 缓存了如下的键值对,
| 键 | 值 |
|---|---|
| interface org.springframework.core.io.ResourceLoader | org.springframework.context.support.ClassPathXmlApplicationContext |
| interface org.springframework.context.ApplicationContext | org.springframework.context.support.ClassPathXmlApplicationContext |
| interface org.springframework.context.ApplicationEventPublisher | org.springframework.context.support.ClassPathXmlApplicationContext |
| interface org.springframework.beans.factory.BeanFactory | org.springframework.beans.factory.support.DefaultListableBeanFactory |
好玩的是,ClassPathXmlApplicationContext 一人饰演多个角色,ResourceLoader、ApplicationContext、ApplicationEventPublisher;