前言
通读官方文档中有关 Spring Core Container 的章节,摘录核心论点,翻译,并做重要批注;
本文为作者的原创作品,转载需注明出处;
References
【2.2.1】 Spring Core Container 概述
The Core Container consists of the
spring-core,spring-beans,spring-context,spring-context-support, andspring-expression(Spring Expression Language) modules.
Core Container 由Spring-core, spring-beans, spring-context, spring-context-support和spring-expression几大部分组成。
The
spring-coreandspring-beansmodules provide the fundamental parts of the framework, including theIoCandDependency Injection features. TheBeanFactoryis a sophisticated implementation of the factory pattern. It removes the need for programmatic singletons and allows you to decouple the configuration and specification of dependencies from your actual program logic.
spring-core和spring-beans提供了 Spring Framework 的最基本部分,包括IoC(反转控制)和依赖注入特性。BeanFactory是一个通过工厂模式实现的一个复杂的组件,它让你不用再通过程序的方式实现单例模式,同时让配置和特定依赖之间解耦;
The Context (
spring-context) module builds on the solid base provided by the Core and Beans modules: it is a means to access objects in a framework-style manner that is similar to a JNDI registry. The Context module inherits its features from the Beans module and adds support forinternationalization(using, for example, resource bundles),event propagation,resource loading, and the transparent creation of contexts by, for example, a Servlet container. The Context module also supports Java EE features such as EJB, JMX, and basic remoting. TheApplicationContextinterface is the focal point of the Context module.spring-context-supportprovides support for integrating common third-party libraries into a Spring application context for caching (EhCache, Guava, JCache), mailing (JavaMail), scheduling (CommonJ, Quartz) and template engines (FreeMarker, JasperReports, Velocity).
Context 模块是基于 Core 和 Beans 模块之上的;它使得你可以通过类似于 JNDI 注册的方式访问对象。Context 继承了 Beans 模块的特性并且添加了诸如国际化、事件模型、资源加载等。Context 模块同时支持 Java EE 的特性,比如 EJB,JMX 和基本的远程调用;ApplicationContext接口是 Context 模型的焦点,核心;spring-context-support提供了对第三方包的集成支持…
The
spring-expressionmodule provides a powerful Expression Language for querying and manipulating an object graph at runtime. It is an extension of the unified expression language (unified EL) as specified in the JSP 2.1 specification. The language supports setting and getting property values, property assignment, method invocation, accessing the content of arrays, collections and indexers, logical and arithmetic operators, named variables, and retrieval of objects by name from Spring’s IoC container. It also supports list projection and selection as well as common list aggregations.
【7.1】 Introduction to the Spring IoC container and beans
The
org.springframework.beansandorg.springframework.contextpackages are the basis for Spring Framework’s IoC container. TheBeanFactoryinterface provides an advanced configuration mechanism capable of managing any type of object.ApplicationContextis a sub-interface ofBeanFactory. It adds easier integration with Spring’s AOP features; message resource handling (for use in internationalization), event publication; and application-layer specific contexts such as theWebApplicationContextfor use in web applications.
org.springframework.beans和org.springframework.context两个包是 Spring IoC 容器中最核心的两个包;BeanFactory接口提供了先进的配置机制使得它有能力管理任何类型的对象;ApplicationContext是BeanFactory接口的子接口,它能够非常容易的和 Spring AOP、message resource handling、event publication 以及应用于 web 应用的WebApplicatonContext等特性进行整合。
In short, the
BeanFactoryprovides the configuration framework and basic functionality, and theApplicationContextadds more enterprise-specific functionality. TheApplicationContextis a complete superset of theBeanFactory, and is used exclusively in this chapter in descriptions of Spring’s IoC container. For more information on using theBeanFactoryinstead of theApplicationContext, refer to Section 7.16, “The BeanFactory”.
简而言之,BeanFactory提供了可配置的架构以及基础的功能,而ApplicationContext加入了更多的企业功能的特性。ApplicationContext是BeanFactory的一个超集,它只被 Spring IoC 容器所使用。在使用过程中,可以使用BeanFactory来替代ApplicationContext,参考 Section 7.16,”The BeanFactory”,(备注:在一些资源有限的环境当中,可以使用BeanFactory来替代ApplicationContext。)
【7.2】 Container Overview
【7.2.1】 Coniguration metadata
Annotation-based configuration: Spring 2.5 introduced support for annotation-based configuration metadata.Java-based configuration: Starting with Spring 3.0, many features provided by the Spring JavaConfig project became part of the core Spring Framework. Thus you can define beans external to your application classes by using Java rather than XML files. To use these new features, see the@Configuration,@Bean,@Importand@DependsOnannotations.However, you can use Spring’s integration with
AspectJto configure objects that have been created outside the control of an IoC container. See Using AspectJ to dependency-inject domain objects with Spring.
【7.2.2】Instantiating a container
Instantiating a Spring IoC container is straightforward. 通过如下的方式初始化得到一个
ApplicationContext即可
1 | ApplicationContext context = |
举了一个例子,
service.xml
1 |
|
daos.xml
1 |
|
Composing XML-based configuration metadata
通过
to load bean definitions from another file or files. For example:
1 | <beans> |
The Groovy Bean Definition DSL
Typically, such configuration will live in a “.groovy” file with a structure as follows:
1 | beans { |
【7.2.3】Using the container
The ApplicationContext is the interface for an advanced factory capable of maintaining a registry of different beans and their dependencies.
The ApplicationContext enables you to read bean definitions and access them as follows:
1 | // create and configure beans |
【7.3】 Bean overview
beans 的元数据 metadata:
- A package-qualified class name: typically the actual implementation class of the bean being defined.
- Bean behavioral configuration elements, which state how the bean should behave in the container (
scope,lifecycle callbacks, and so forth).Referencesto other beans that are needed for the bean to do its work; these references are also called collaborators or dependencies.- Other configuration settings to set in the newly created object, for example, the number of connections to use in a bean that manages a connection pool, or the size limit of the pool.
bean 的属性有
Property Explained in…
classSection 7.3.2, “Instantiating beans”nameSection 7.3.1, “Naming beans”scopeSection 7.5, “Bean scopes”constructor argumentsSection 7.4.1, “Dependency Injection”propertiesSection 7.4.1, “Dependency Injection”autowiring modeSection 7.4.5, “Autowiring collaborators”lazy-initialization modeSection 7.4.4, “Lazy-initialized beans”initialization methodthe section called “Initialization callbacks”destruction methodthe section called “Destruction callbacks”
This is done by accessing the
ApplicationContext’s BeanFactory via the methodgetBeanFactory()which returns the BeanFactory implementationDefaultListableBeanFactory.DefaultListableBeanFactorysupports this registration through the methodsregisterSingleton(..)andregisterBeanDefinition(..).
可以通过 DefaultListableBeanFactory.registerSingleton(..)或者 DefaultListableBeanFactory.registerBeanDefinition(..)注册新的bean
【7.4】 Dependencies
【7.4.1】 Dependency Injection
Dependency injection(DI) is a process whereby objects define their dependencies, that is, the other objects they work with, only through constructor arguments, arguments to a factory method, or properties that are set on the object instance after it is constructed or returned from a factory method. The container then injects those dependencies when it creates the bean. This process is fundamentally theinverse, hence the nameInversion of Control(IoC), of the bean itself controlling the instantiation or location of its dependencies on its own by using direct construction of classes, or the Service Locator pattern.
依赖注入是在某个对象实例被初始化或者从一个工厂方法被构造返回以后,再通过构造参数,工厂方法参数或者 set 方法的参数就可以设置该对象的依赖的一种 process (过程);然后是由容器将这些依赖注入到对象中的;这个过程就是反转(全名是 反转控制(IOC)) 一个 bean 靠自己通过构造方法或 Service Locator 的方式有自己去控制如何定位依赖关系,如何进行实例化的方式。
Ok,上面的语言过于官方,言外之意,以前在编写程序的时候,某个 bean 要引用某个实例,必须由 bean 自己去控制,定位这个实例的 class,然后由 bean 自己去实例化这个被引用的实例;这样做带来最大的问题就是扩展,因为被引用的实例是在该 bean 中写死的,如果将来需要替换这个引用,必须重写代码。
上述就是依赖注入的核心了。
DI exists in two major variants, Constructor-based dependency injection and Setter-based dependency injection.
Dependency resolution process
该章节主要讲解依赖是如何被解析的。
The Spring container validates the configuration of each bean as the container is created. However, the bean properties themselves are not set until the bean is actually created. Beans that are singleton-scoped and set to be pre-instantiated (the default) are created when the container is created. Scopes are defined in Section 7.5, “Bean scopes”. Otherwise, the bean is created only when it is requested. Creation of a bean potentially causes a graph of beans to be created, as the bean’s dependencies and its dependencies’ dependencies (and so on) are created and assigned. Note that resolution mismatches among those dependencies may show up late, i.e. on first creation of the affected bean.
这段话主要讲解了几点
- 属性的设置是在 bean 创建以后;
- 当 bean 被设置为单例模式(singleton-scoped) 以及被设置为”预先加载”,那么一旦容器启动就会立即初始化 beans;如果不是,则会延迟到当使用到这个 bean 以后才会开始进行初始化并且进行加载。
- 初始化一个 bean 往往会导致一系列的其依赖的 bean 进行创建,就像一幅相互依赖的图;
- 要注意的是,当解析一个 bean 的时候,也许会因为去解析并加载它的依赖的时候会出现问题,所以,推荐不要使用延迟加载的方式。
Circular dependencies
If you use predominantly constructor injection, it is possible to create an unresolvable circular dependency scenario.
For example: Class A requires an instance of class B through constructor injection, and class B requires an instance of class A through constructor injection. If you configure beans for classes A and B to be injected into each other, the Spring IoC container detects this circular reference at runtime, and throws a BeanCurrentlyInCreationException.
One possible solution is to edit the source code of some classes to be configured by setters rather than constructors. Alternatively, avoid constructor injection and use setter injection only. In other words, although it is not recommended, you can configure circular dependencies with setter injection.
Unlike the typical case (with no circular dependencies), a circular dependency between bean A and bean B forces one of the beans to be injected into the other prior to being fully initialized itself (a classic chicken/egg scenario).
这段主要讲解了循环依赖解析出错的可能,但问题只会出在构造函数的循环依赖中,如果构造 bean A 的时候需要初始化它的依赖 bean B,而构造 bean B 的时候需要依赖初始化 Bean A,那么在构造 Bean A 和 Bean B 的过程中形成了循环依赖而最终导致谁也初始化不了,容器最终会抛出 BeanCurrentlyInCreationException的错误。而解决这种循环依赖的错误,办法就是使用 setter 注入依赖的方式来替换构造方法进行依赖注入的方式。
本章节后面描述的内容主要是说了一些注意事项,尽量使用单例模式,尽量使用 pre-installed 模式,而非懒加载模式,尽量让问题能够提早的暴露出来。
Examples of dependency injection
Dependencies and configuration in detail
Straight values (primitives, Strings, and so on)
1 | <bean id="myDataSource" class="org.apache.commons.dbcp.BasicDataSource" destroy-method="close"> |
可以使用 p-namespace 来进行简化配置
1 | <beans xmlns="http://www.springframework.org/schema/beans" |
Inner Beans
A
<bean/>element inside the<property/>or<constructor-arg/>elements defines a so-called inner bean.
1 | <bean id="outer" class="..."> |
Collections
<list/>,<set/>,<map/>, and<props/>
1 | <bean id="moreComplexObject" class="example.ComplexObject"> |
Collections merging
The Spring container also supports the merging of collections. An application developer can define a parent-style
,
子类定义的 Collections 可以扩展或父类的 Collections 定义,相同的则覆盖
1 | <beans> |
Notice the use of the
merge=trueattribute on theelement of the adminEmails property of the child bean definition. When the child bean is resolved and instantiated by the container, the resulting instance has an adminEmails Properties collection that contains the result of the merging of the child’s adminEmails collection with the parent’s adminEmails collection.
1 | administrator=administrator@example.com |
support 属性被子类覆盖了,然后子类新增了一个 sales 的邮箱地址。
Strongly-typed collection
1 | public class Foo { |
1 | <beans> |
当 Foo 的属性 accounts 准备要注入的时候,Spring 容器会使用 strong-typed Map<String, Float>对配置的值进行反射注入,如果类型出错,比如不是 Float 类型,则会报错。
Null and empty string values
1 | <bean class="ExampleBean"> |
等价于
1 | exampleBean.setEmail(""); |
1 | <bean class="ExampleBean"> |
等价于
1 | exampleBean.setEmail(null) |
XML shortcut with the p-namespace
The p-namespace enables you to use the bean element’s attributes, instead of nested
elements, to describe your property values and/or collaborating beans.
Spring supports extensible configuration formats with namespaces, which are based on an XML Schema definition.
例子一、1
2
3
4
5
6
7
8
9
10
11
12
13<beans xmlns="http://www.springframework.org/schema/beans"
xmlns:xsi="http://www.w3.org/2001/XMLSchema-instance"
xmlns:p="http://www.springframework.org/schema/p"
xsi:schemaLocation="http://www.springframework.org/schema/beans
http://www.springframework.org/schema/beans/spring-beans.xsd">
<!-- 传统的方式 -->
<bean name="classic" class="com.example.ExampleBean">
<property name="email" value="foo@bar.com"/>
</bean>
<!-- 使用 p-namespace 的方式 -->
<bean name="p-namespace" class="com.example.ExampleBean"
p:email="foo@bar.com"/>
</beans>
例子二、1
2
3
4
5
6
7
8
9
10
11
12
13
14
15
16
17
18
19
20<beans xmlns="http://www.springframework.org/schema/beans"
xmlns:xsi="http://www.w3.org/2001/XMLSchema-instance"
xmlns:p="http://www.springframework.org/schema/p"
xsi:schemaLocation="http://www.springframework.org/schema/beans
http://www.springframework.org/schema/beans/spring-beans.xsd">
<!-- 传统的方式 -->
<bean name="john-classic" class="com.example.Person">
<property name="name" value="John Doe"/>
<property name="spouse" ref="jane"/>
</bean>
<!-- 使用 p-namespace 的方式 -->
<bean name="john-modern"
class="com.example.Person"
p:name="John Doe"
p:spouse-ref="jane"/>
<bean name="jane" class="com.example.Person">
<property name="name" value="Jane Doe"/>
</bean>
</beans>
XML shortcut with the c-namespace
c-namespace, newly introduced in Spring 3.1, allows usage of inlined attributes for configuring the constructor arguments rather then nested
constructor-argelements.
1 | <beans xmlns="http://www.springframework.org/schema/beans" |
Compound property names
You can use compound or nested property names when you set bean properties, as long as all components of the path except the final property name are not null. Consider the following bean definition.
1 | <bean id="foo" class="foo.Bar"> |
The
foobean has a fred property, which has abobproperty, which has asammyproperty, and that final sammy property is being set to the value 123
【7.4.3】 Using depends-on
If a bean is a dependency of another that usually means that one bean is set as a property of another. Typically you accomplish this with the
<ref/>element in XML-based configuration metadata. However, sometimes dependencies between beans are less direct; for example, a static initializer in a class needs to be triggered, such as database driver registration. Thedepends-onattribute can explicitly force one or more beans to be initialized before the bean using this element is initialized. The following example uses thedepends-onattribute to express a dependency on a single bean:
通常来说,依赖关系会通过<ref/>完成解析,但是,有些时候并不能直接使用这种方式;比如,想数据库驱动的注册,需要通过一个静态构造器首先初始化该数据库驱动,而不能直接通过<ref/>完成;这个时候,我们就需要使用depends-on在使用到它之前将它进行初始化。
1 | <bean id="beanOne" class="ExampleBean" depends-on="manager"/> |
1 | <bean id="beanOne" class="ExampleBean" depends-on="manager,accountDao"> |
【7.4.4】 Lazy-initialized beans
1 | <bean id="lazy" class="com.foo.ExpensiveToCreateBean" lazy-init="true"/> |
【7.4.5】 Autowiring collaborators
【7.4.6】 Method injection
In most application scenarios, most beans in the container are singletons. When a singleton bean needs to collaborate with another singleton bean, or a non-singleton bean needs to collaborate with another non-singleton bean, you typically handle the dependency by defining one bean as a property of the other. A problem arises when the bean lifecycles are different. Suppose singleton bean A needs to use non-singleton (prototype) bean B, perhaps on each method invocation on A. The container only creates the singleton bean A once, and thus only gets one opportunity to set the properties. The container cannot provide bean A with a new instance of bean B every time one is needed.
开篇则从一个矛盾出发,大多数依赖关系是建立在单例依赖单例的方式上,或者一个 non-singleton bean 依赖于另外一个 non-singleton bean 之上;但是,我们会有这样一种需求,既是一个 singleton bean A 依赖于 non-singleton bean B,而我们期望的是,每次通过 getter 方法去获取 non-singleton bean B 的时候,都是能够得到一个新构建的 B;但是因为,A 是单例的,所以 B 往往只能被容器初始化一次;那么这个时候,我们该怎么办呢?
A solution is to forego some inversion of control. You can make bean A aware of the container by implementing the
ApplicationContextAwareinterface, and by making a getBean(“B”) call to the container ask for (a typically new) bean B instance every time bean A needs it. The following is an example of this approach:
一个解决办法就是暂时忘掉反转控制,你可以通过ApplicationContextAware接口创建一个能够感知 container 的 bean A,然后当每一次 A 需要 B 的时候通过 container 去创建一个新的 B,如同下面这例子这样,
1 | // Spring-API imports |
解读,CommandManager 就是我们的 Bean A,通过实现 ApplicationContextAware 接口可以获得 ApplicationContext,这样,我们就可以非常方便的通过 ApplicationContext 既 Spring 容器获取 B,且每次 B 都是一个新的 bean。
The preceding is not desirable, because the business code is aware of and coupled to the Spring Framework. Method Injection, a somewhat advanced feature of the Spring IoC container, allows this use case to be handled in a clean fashion.
但是这种方式并不是可取的方式,因为业务代码和 Spring Framework 冗余在了一起。Method Injection,是 Spring Container 的一种更高级的属性,可以使用一种简洁的方式来处理这种情况。
( 备注,当你使用 @Service、@Component 等注解的方式来管理 bean 的时候,ApplicationContext 是由 Spring 容器自动控制的,如果你需要使用到 ApplicationContext 的时候,可以使用上述 ApplicationContextAware 接口的方式。)
也就导出了为什么我们需要 Method Injection
Lookup method injection
Lookup method injection is the ability of the container to override methods on container managed beans, to return the lookup result for another named bean in the container. The lookup typically involves a prototype bean( 就是 non-singleton bean ) as in the scenario described in the preceding section. The Spring Framework implements this method injection by using bytecode generation from the CGLIB library to generate dynamically a subclass that overrides the method.
Lookup method injection 提供了这样一种能力可以覆盖容器实例中的方法,使这些方法从容器中能够返回另外一个 named bean;而这个返回的 bean 通常是一个 non-singleton bean;Spring 是通过使用 CGLIB 字节码技术,动态的生成一个子类注入。使用这种方式需要注意的几点
- 因为需要动态的生成子类,所以父类不能使用 final
- Unit-testing 的时候需要你根据 abstract 方法模拟实现一个 mock 方法,stub implementation
改造Method injection中所提到的例子,
1 | // no more Spring imports! |
abstract 方法的实现在什么地方呢?
If the method is
abstract, the dynamically-generated subclass implements the method. Otherwise, the dynamically-generated subclass overrides the concrete method defined in the original class.
这里解释了如何通过 CGLIB 实现的,如果方法是abstract的,将会动态生成一个实现了该抽象方法的子类;如果不是abstract的,动态生成的子类将会覆盖该 concrete 方法;也就是说,当你使用 lookup-method 以后,容器使用的不再是CommandManager,而是一个有关其动态生成的子类。
For example:
1 | <!-- a stateful bean deployed as a prototype (non-singleton) --> |
The bean identified as commandManager calls its own method
createCommand()whenever it needs a new instance of the myCommand bean. You must be careful to deploy themyCommandbean as a prototype, if that is actually what is needed. If it is as asingleton, the same instance of the myCommand bean is returned each time.
使用的时候,注意要将 myCommand bean 设置为 prototype 既 non-singleton。
如果使用的是 annotation-based component model,
1 | public abstract class CommandManager { |
【7.5】 Bean Scopes
Spring Framework supports
sevenscopes, five of which are available only if you use a web-aware ApplicationContext.The following scopes are supported out of the box. You can also create a custom scope.
| Scope | Description |
|---|---|
| singleton | |
| prototype | |
| request | |
| session | |
| globalSession | |
| application | |
| websocket |
As of Spring 3.0, a thread scope is available, but is not registered by default. For more information, see the documentation for
SimpleThreadScope.
【7.5.1】The singleton scope
The GoF Singleton hard-codes the scope of an object such that one and only one instance of a particular class is created per ClassLoader. The scope of the Spring singleton is best described as per container and per bean.
通常意义上的单例模式是针对 ClassLoader 的,既是一个 ClassLoader 一个单例,而 Spring 是一个单例一个 Spring 容器的。
【7.5.2】The prototype scope
The non-singleton, prototype scope of bean deployment results in the creation of a new bean instance every time a request for that specific bean is made.
That is, the bean is injected into another bean or you request it through a
getBean()method call on thecontainer.
As a rule, use the
prototypescope for allstatefulbeans and thesingletonscope forstatelessbeans.
规则,prototype用来表示状态 bean…
【7.5.3】Singleton beans with prototype-bean dependencies
If you need a new instance of a prototype bean at runtime more than once, see Section 7.4.6, “Method injection”
【7.5.4】Request, session, global session, application, and WebSocket scopes
The
request,session,globalSession,application, andwebsocketscopes are only available if you use a web-aware SpringApplicationContextimplementation (such asXmlWebApplicationContext). If you use these scopes with regular Spring IoC containers such as theClassPathXmlApplicationContext, an IllegalStateException will be thrown complaining about an unknown bean scope.
Initial web configuration
To support the scoping of beans at the
request,session,globalSession,application, andwebsocketlevels (web-scoped beans), some minor initial configuration is required before you define your beans. (This initial setup is not required for the standard scopes,singletonandprototype.)
If you access scoped beans within Spring Web MVC, in effect, within a request that is processed by the Spring
DispatcherServletorDispatcherPortlet, then no special setup is necessary:DispatcherServletandDispatcherPortletalready expose all relevant state.
If you use a Servlet 2.5 web container, with requests processed outside of Spring’s
DispatcherServlet(for example, when using JSF or Struts), you need to register theorg.springframework.web.context.request.RequestContextListenerServletRequestListener. For Servlet 3.0+, this can be done programmatically via theWebApplicationInitializerinterface. Alternatively, or for older containers, add the following declaration to your web application’sweb.xmlfile:
1 | <web-app> |
Alternatively, if there are issues with your listener setup, consider using Spring’s
RequestContextFilter. The filter mapping depends on the surrounding web application configuration, so you have to change it as appropriate.
1 | <web-app> |
DispatcherServlet,RequestContextListener, andRequestContextFilterall do exactly the same thing, namely bind the HTTP request object to theThreadthat is servicing that request. This makes beans that are request- and session-scoped available further down the call chain.
DispatcherServlet, RequestContextListener, and RequestContextFilter 三者做了同样一件事情,就是通过名称将 HTTP Request 绑定到当前的Thread,
Request scope
1 | <bean id="loginAction" class="com.foo.LoginAction" scope="request"/> |
The Spring container creates a new instance of the
LoginActionbean by using theloginActionbean definition for each and every HTTP request. That is, the loginAction bean is scoped at the HTTP request level. they are particular to an individual request. When the request completes processing, the bean that is scoped to the request is discarded.
上面的描述说得非常的清楚了,就是一个 request scope 的 bean 会在每个 request 请求中创建一个,并且当 request 请求结束以后自动销毁。
When using annotation-driven components or Java Config, the
@RequestScopeannotation can be used to assign a component to the request scope.
1 |
|
说实话,我在努力的想,有什么对象是 request 级别需要的?应该不会到Action这样高级别的对象( Controller ),因为 Controller 一般都是单例模式的。应该是一些细粒度的对象,比如某个验证码对象?加密解密对象?
Session scope
1 | <bean id="userPreferences" class="com.foo.UserPreferences" scope="session"/> |
1 |
|
Global session scope
1 | <bean id="userPreferences" class="com.foo.UserPreferences" scope="globalSession"/> |
The
globalSessionscope is similar to the standard HTTP Session scope (described above), and applies only in the context of portlet-based web applications.
注意,这里明确指出了,globalSession只会用在 portlet-based 的 web 应用中。
If you write a standard Servlet-based web application and you define one or more beans as having
globalSessionscope, the standardHTTP Sessionscope is used, and no error is raised.
如果使用在标准的 Servlet-based web 应用的环境中,你如果使用 globalSession 将会默认使用 HTTP Session scope 而不会报任何的错误。
Application scope
1 | <bean id="appPreferences" class="com.foo.AppPreferences" scope="application"/> |
the
appPreferencesbean is scoped at theServletContextlevel, stored as a regularServletContextattribute.
This is somewhat similar to a Spring singleton bean but differs in two important ways: It is a singleton per
ServletContext, not per Spring ‘ApplicationContext‘ (for which there may be several in any given web application), and it is actually exposed and therefore visible as aServletContextattribute.
1 |
|
Scoped beans as dependencies
本小节描述的场景是,如何将一个短生命周期的 bean,比如 session scope 的 bean 注入到一个长生命周期的 bean 当中?如果我们像下面这样注入,
1 | <bean id="userPreferences" class="com.foo.UserPreferences" scope="session"/> |
这里的问题是,userManager 本身是一个单例模式,只会被容器初始化并加载一次;那么它的依赖,userPreferences 也同样只会被加载一次,就是最初的那个(即便容器会自动的创建和销毁 userPreferences,但 userManager 仍然只保留着最初的那个 userPreferences 的引用,如果被销毁了,那么该引用就指向 null);所以,像上面的这种方式是不可取的。
我们需要换一种方式来注入,Spring 提供的解决方案就是,注入一个 UserPreferences 的代理 Proxy 而非 UserPrefereences 的对象本身,通过 UserPreference 的代理获取当前 Session Scope 中的 UserPreferences,如果当前 Session Scope 中该对象为 null,那么返回的是 null,如果当前对象不为 null,则返回该对象;这样,通过 Proxy 能够获取当前 Session Scope 中的 UserPreferences,就避开了前面 userManager 为单例所带来的初始化和加载的问题。
所以,正确的做法是,
1 | <!-- an HTTP Session-scoped bean exposed as a proxy --> |
通过<aop:scoped-proxy/>将 UserPreferences 封装为其的代理对象。
Choosing the type of proxy to create
By default, when the Spring container creates a proxy for a bean that is marked up with the aop:scoped-proxy/ element, a
CGLIB-basedclass proxy is created.
Alternatively, you can configure the Spring container to create standard JDK
interface-based proxiesfor such scoped beans, by specifying false for the value of the proxy-target-class attribute of the<aop:scoped-proxy/>element; However, it also means that the class of the scoped beanmustimplement at least one interface,
1 | <!-- DefaultUserPreferences implements the UserPreferences interface --> |
要求DefaultUserPreferences必须实现至少一个接口。
【7.5.5】 Custom scopes
The bean scoping mechanism is extensible; You can define your own scopes, or even redefine existing scopes, although the latter is considered bad practice and you cannot override the built-in singleton and prototype scopes.
Creating a custom scope
To integrate your custom scope(s) into the Spring container, you need to implement the org.springframework.beans.factory.config.Scope interface
Using a custom scope
to register a new Scope with the Spring container:
1 | void registerScope(String scopeName, Scope scope); |
This method is declared on the
ConfigurableBeanFactoryinterface,
【7.6】 Customizing the nature of a bean
【7.6.1】 Lifecycle callbacks
To interact with the container’s management of the bean lifecycle, you can implement the Spring
InitializingBeanandDisposableBeaninterfaces. The container callsafterPropertiesSet()for the former anddestroy()for the latter to allow the bean to perform certain actions upon initialization and destruction of your beans.
你可以通过 bean 实现InitializingBean和DisposableBean接口与 bean 的声明周期进行交互. 容器通过调用afterPropertiesSet()调用 bean 的InitializingBean方法,通过destroy()方法去调用 bean 的DisposableBean方法。
The JSR-250
@PostConstructand@PreDestroyannotations are generally considered best practice for receiving lifecycle callbacks in a modern Spring application. Using these annotations means that your beans are not coupled to Spring specific interfaces. For details see Section 7.9.8, “@PostConstruct and @PreDestroy”.
If you don’t want to use the JSR-250 annotations but you are still looking to remove coupling consider the use of init-method and destroy-method object definition metadata.
使用@PostConstruct和@PreDestroy注解的方式实现 bean 声明周期交互式更好的方式,使得你的 bean 无需实现 Spring 额外的接口。
Internally, the Spring Framework uses
BeanPostProcessorimplementations to process any callback interfaces it can find and call the appropriate methods. If you need custom features or other lifecycle behavior Spring does not offer out-of-the-box, you can implement aBeanPostProcessoryourself. For more information, see Section 7.8, “Container Extension Points”.
在 Spring 内部,Spring 框架通过使用BeanPostProcessor接口的实现去处理接口的回调;如果你需要一些 Spring 容器没有提供的需要自定义的特性或者其它的生命周期相关的行为,你可以通过BeanPostProcessor接口自己实现。
In addition to the initialization and destruction callbacks, Spring-managed objects may also implement the
Lifecycleinterface so that those objects can participate in the startup and shutdown process as driven by the container’s own lifecycle.
额外的,除了 initialization 和 destruction 回调方法,Spring 容器中的 bean 也许可以实现容器的Lifecycle接口,使得它们能够参与到容器的启动和关闭的过程当中来。
下面就来看看容器Lifecycle的这些接口
Initialization callbacks
The
org.springframework.beans.factory.InitializingBeaninterface allows a bean to perform initialization work after all necessary properties on the bean have been set by the container. TheInitializingBeaninterface specifies a single method:
1 | void afterPropertiesSet() throws Exception; |
当 bean 所有的 properties 设置完毕以后,可以通过这个接口方法实现回调;
It is recommended that you
do notuse theInitializingBeaninterface because it unnecessarily couples the code to Spring.
不过不建议使用InitializingBean来实现一些前期初始化的工作,因为它与 Spring 的代码耦合。
Alternatively, use the
@PostConstructannotation or specify a POJO initialization method
或者也可以使用@PostConstruct注解的方式。
In the case of XML-based configuration metadata, you use the init-method attribute to specify the name of the method that has a void no-argument signature. With Java config, you use the initMethod attribute of @Bean,
如果使用的是 XML-based 的方式,可以使用 init-method 属性,见下面的例子,
1 | <bean id="exampleInitBean" class="examples.ExampleBean" init-method="init"/> |
1 | public class ExampleBean { |
…is exactly the same as…
1 | public class AnotherExampleBean implements InitializingBean { |
Destruction callbacks
Implementing the
org.springframework.beans.factory.DisposableBeaninterface allows a bean to get a callback when the container containing it is destroyed.
1 | void destroy() throws Exception; |
同样不建议使用DisposableBean回调方法,因为它与 Spring 的代码耦合。建议使用@PreDestroy 或者 With XML-based configuration metadata, you use the destroy-method attribute on the
Default initialization and destroy methods
如果你想自定义并且同意命名 initialization and destroy 方法的名称,可以在 XML-based 中的 default-init-method和default-destroy-method属性。举例,
1 | public class DefaultBlogService implements BlogService { |
1 | <beans default-init-method="init"> |
Combining lifecycle mechanisms
如果在一个 bean 中同时使用了几种声明周期方法的声明的方式,the InitializingBean and DisposableBean callback interfaces; custom init() and destroy() methods; and the @PostConstruct and @PreDestroy annotations. You can combine these mechanisms to control a given bean
他们依次被调用的方式如下,
Multiple lifecycle mechanisms configured for the same bean, with different initialization methods, are called as follows:
- Methods annotated with
@PostConstruct- afterPropertiesSet() as defined by the
InitializingBeancallback interface- A custom configured
init()method
Destroy methods are called in the same order:
- Methods annotated with
@PreDestroy- destroy() as defined by the
DisposableBeancallback interface- A custom configured
destroy()method
Startup and shutdown callbacks
Spring 容器中的 bean 可以实现Lifecycle接口参与容器启动和销毁的声明周期中,
1 | public interface Lifecycle { |
Then, when the
ApplicationContextitself receivesstartandstopsignals, e.g. for a stop/restart scenario at runtime, it will cascade those calls to allLifecycleimplementations defined within that context. It does this by delegating to aLifecycleProcessor:
然后,当ApplicationContext收到了启动和停止的信号以后,容器将会把这些调用级联给容器中实现了Lifecycle的实例;它是通过LifecycleProcessor实现的这个行为,
1 | public interface LifecycleProcessor extends Lifecycle { |
Note that the regular org.springframework.context.
Lifecycleinterface is just a plain contract for explicit start/stop notifications and does NOT imply auto-startup at context refresh time. Consider implementing org.springframework.context.SmartLifecycleinstead for fine-grained control over auto-startup of a specific bean (including startup phases).
使用Lifecycle接口有弊端,建议使用SmartLifecycle接口
Shutting down the Spring IoC container gracefully in non-web applications
本章节大致的意思是,如果你将 Spring Container 使用到桌面应用开发,非 web 应用开发,这个时候,如果你想要 shut down the Spring IoC container gracefully when the relevant client application is shut down 的话,you should register a shutdown hook with the JVM. Doing so ensures a graceful shutdown and calls the relevant destroy methods on your singleton beans so that all resources are released. Of course, you must still configure and implement these destroy callbacks correctly. 你就需要注册一个 shutdown hook,这样的话,才会优雅的 shutdown 并且会调用你的 singleton beans 的 destroy 方法进而释放掉其它资源。
1 | import org.springframework.context.ConfigurableApplicationContext; |
【7.6.2】ApplicationContextAware and BeanNameAware
When an
ApplicationContextcreates an object instance that implements theorg.springframework.context.ApplicationContextAwareinterface, the instance is provided with a reference to thatApplicationContext.
当ApplicationContext试图创建一个实现了ApplicationContextAware接口的对象实例的时候,该对象实例将会获得一个ApplicationContext的引用;
1 | public interface ApplicationContextAware { |
因此,这个使得开发者有能力通过ApplicationContext来获得并控制容器中的 bean,但这不是被推荐的,因为它违背了 IoC 的设计初衷,
Other methods of the
ApplicationContextprovide access to file resources, publishing application events, and accessing aMessageSource. These additional features are described in Section 7.15, “Additional Capabilities of the ApplicationContext”
You can also use
@Autowiredfor interfaces that are well-known resolvable dependencies:BeanFactory,ApplicationContext,Environment,ResourceLoader,ApplicationEventPublisher, andMessageSource. These interfaces and their extended interfaces, such as ConfigurableApplicationContext or ResourcePatternResolver, are automatically resolved, with no special setup necessary.
同样,可以直接使用@Autowired注解直接注入ApplicationContext。
1 | public class MovieRecommender { |
Ok,这里总结一下,获得 ApplicationContext 的两种途径
- XML-bean 的方式,可以通过实现
ApplicationContextAware的方式获得 - @Autowired 的方式
When an ApplicationContext creates a class that implements the org.springframework.beans.factory.BeanNameAware interface, the class is provided with a reference to the name defined in its associated object definition.
1 | public interface BeanNameAware { |
【7.6.3】Other Aware interfaces
Table 7.4. Aware interfaces
ApplicationContextAware
ApplicationEventPublisherAware
BeanClassLoaderAware
BeanFactoryAware
BeanNameAware
BootstrapContextAware
LoadTimeWeaverAware
….
http://docs.spring.io/spring/docs/current/spring-framework-reference/htmlsingle/#aware-list
【7.7】Bean definition inheritance
定义 bean 的继承关系
If you work with an
ApplicationContextinterface programmatically, child bean definitions are represented by theChildBeanDefinitionclassWhen you use XML-based configuration metadata, you indicate a child bean definition by using the
parentattribute, specifying the parent bean as the value of this attribute.
1 | <bean id="inheritedTestBean" abstract="true" |
A child bean definition inherits scope, constructor argument values, property values, and method overrides from the parent,
【7.8】Container Extension Points
Typically, an application developer does not need to subclass
ApplicationContextimplementation classes. Instead, the Spring IoC container can be extended by plugging in implementations of special integration interfaces. The next few sections describe these integration interfaces.
【7.8.1】Customizing beans using a BeanPostProcessor
The
BeanPostProcessorinterface defines callback methods that you can implement to provide your own (or override the container’s default) instantiation logic, dependency-resolution logic, and so forth.
BeanPostProcessor接口定义了允许你自定义实例化的逻辑,依赖解析的逻辑等等的回调方法。
If you want to implement some custom logic after the Spring container finishes instantiating, configuring, and initializing a bean, you can plug in one or more
BeanPostProcessorimplementations.
如果你想在当 Spring 容器完成实例化、配置以及初始化完一个 bean 的时候加入一些自定义的逻辑,你可以插入一个或者多个BeanPostProcessor的实现。
备注:Annotation-based 解析的模式就是通过BeanPostProcessor接口实现了AutowiredAnnotationBeanPostProcessor, CommonAnnotationBeanPostProcessor, PersistenceAnnotationBeanPostProcessor, as well as the aforementioned RequiredAnnotationBeanPostProcessor等实现类完成的。
You can configure multiple
BeanPostProcessorinstances, and you can control theorderin which theseBeanPostProcessorsexecute by setting the order property. You can set this property only if the BeanPostProcessor implements the Ordered interface; if you write your ownBeanPostProcessoryou should consider implementing the Ordered interface too. For further details, consult the javadocs of the BeanPostProcessor and Ordered interfaces. See also the note below on programmatic registration ofBeanPostProcessors.
注意以下几点,
BeanPostProcessorsoperate on bean (or object) instances; that is to say, the Spring IoC container instantiates a bean instance and then BeanPostProcessors do their work.BeanPostProcessors只是在 bean 或者对象的实例上操作;也就是说,Spring IoC 容器初始化好一个 bean,然后由BeanPostProcessors来进行处理;BeanPostProcessorsare scoped per-container. This is only relevant if you are using container hierarchies. If you define aBeanPostProcessorin one container, it will only post-process the beans in that container. In other words, beans that are defined in one container are not post-processed by a BeanPostProcessor defined in another container, even if both containers are part of the same hierarchy.
这大段内容表明,BeanPostProcessors的作用域只在当前的容器中,提出这个论点的背景在于,当在一个具有继承关系的多个容器中的时候;- To change the actual bean definition (i.e., the blueprint that defines the bean), you instead need to use a
BeanFactoryPostProcessoras described in Section 7.8.2, “Customizing configuration metadata with a BeanFactoryPostProcessor”.
要改变一个 bean 的定义(比如,改变一个 bean 的 receip ),你需要使用的是BeanFactoryProcessor。
The
org.springframework.beans.factory.config.BeanPostProcessorinterface consists of exactly two callback methods. When such a class is registered as apost-processorwith the container, for each bean instance that is created by the container, thepost-processorgets a callback from the container both before container initialization methods (such as InitializingBean’s afterPropertiesSet() and any declared init method) are called as well as after any bean initialization callbacks. Thepost-processorcan take any action with the bean instance, including ignoring the callback completely. A bean post-processor An ApplicationContext automatically detects any beans that are defined in the configuration metadata which implement the BeanPostProcessor interface. The ApplicationContext registers these beans as post-processors so that they can be called later upon bean creation. Bean post-processors can be deployed in the container just like any other beans.
org.springframework.beans.factory.config.BeanPostProcessor接口只包含两个回调方法;当某个类在容器中被注册为post-processor,当每一个 bean 实例被容器创建的时候,该post-processor将会从容器中接收到两次回调,一次是当容器在进行实例的初始化方法之前(比如在调用 InitializingBean 的 afterPropertiesSet 方法或者任何 init 方法)的回调,一次是在 bean 实例化后的回调;(我的补充,BeanPostProcessor只是在 bean 实例化之前和之后进行额外的回调操作,并不会影响 bean 的实例化过程,bean 的实例化逻辑依然是通过 Spring 容器控制的);
An
ApplicationContextautomatically detects any beans that are defined in the configuration metadata which implement theBeanPostProcessorinterface. TheApplicationContextregisters these beans aspost-processorsso that they can be called later upon bean creation. Bean post-processors can be deployed in the container just like any other beans.
ApplicationContext会自动的检测哪些 bean 在配置属性中实现了BeanProcessor接口,然后ApplicationContext会将这些 bean 作为post-processors进行注册,所以他们可以在 bean creation 的时候被回调。post-processors beans 可以和其它类型的 bean 一样在容器中部署。
Note that when declaring a
BeanPostProcessorusing an@Beanfactory method on a configuration class, the return type of the factory method should be the implementation class itself or at least theorg.springframework.beans.factory.config.BeanPostProcessorinterface, clearly indicating thepost-processornature of that bean. Otherwise, theApplicationContextwon’t be able to autodetect it by type before fully creating it. Since aBeanPostProcessorneeds to be instantiated early in order to apply to the initialization of other beans in the context, this early type detection is critical.
要注意的是,当在一个声明为 @Bean 的configuration 类的工厂方法上声明BeanPostProcessor,其返回类型应该是BeanPostProcessor接口的实现类或者至少实现了org.springframework.beans.factory.config.BeanPostProcessor接口,目的是为了清晰的表明我是一个具有post-processor特性的 bean;不然的话,ApplicationContext不能自动识别其为post-processor。而因为BeanPostProcessor需要在早起就进行实例化,所以,这里的类型检查尤为重要。
注意事项
- While the recommended approach for
BeanPostProcessorregistration is throughApplicationContextauto-detection (as described above), it is also possible to register themprogrammaticallyagainst aConfigurableBeanFactoryusing theaddBeanPostProcessormethod. This can be useful when needing to evaluate conditional logic before registration, or even for copying bean post processors across contexts in a hierarchy. Note however thatBeanPostProcessorsadded programmatically do not respect theOrderedinterface. Here it is the order of registration that dictates the order of execution. Note also thatBeanPostProcessorsregistered programmatically are always processed before those registered through auto-detection, regardless of any explicit ordering.
虽然推荐使用ApplicationContext自动检测的方式来注册BeanPostProcessor,但是,也可以通过ConfigurableBeanFactory使用程序代码的方式进行注册;这样做当需要在注册之前进行验证或者是直接在多重继承的 contexts 中拷贝 post-processors 是有用的;但是,需要注意的是,当通过程序代码的方式添加的BeanPostProcessors会忽略Ordered接口,他们会在通过 auto-detected 注入的 post-processors 之前执行。
- Classes that implement the
BeanPostProcessorinterface are special and are treated differently by the container. AllBeanPostProcessorsand beans that they reference directly are instantiated on startup, as part of the special startup phase of theApplicationContext. Next, allBeanPostProcessorsare registered in a sorted fashion and applied to all further beans in the container. Because AOP auto-proxying is implemented as aBeanPostProcessoritself, neitherBeanPostProcessorsnor the beans they reference directly are eligible for auto-proxying, and thus do not have aspects woven into them.
For any such bean, you should see an informational log message: “Bean foo is not eligible for getting processed by all BeanPostProcessor interfaces (for example: not eligible for auto-proxying)“.
通过接口BeanPostProcessor实现的类比较特殊而被容器特殊对待;所有的BeanPostProcessors和与其相关的 bean 都会在容器启动的时候((on startup)的进行实例化,被当做是ApplicationContext的一个特殊的启动阶段进行。然后,所有的BeanPostProcessor统一按照排序规则注册并提供给所有容器中的 beans。因为 AOP 自动代理(auto-proxing)自身是被实现为BeanPostProcessor,所以,无论是BeanPostProcessors或者是与之有关联关系的 beans 都不能使用自动代理(auto-proxing),也因此,就不能对它们进行切面编织。如果这样做,你将会看到这样的错误信息:“ Bean foo 不适合 … auto-proxing..”
- Note that if you have beans wired into your
BeanPostProcessorusingautowiringor@Resource(which may fall back toautowiring), Spring might access unexpected beans when searching for type-matching dependency candidates, and therefore make them ineligible for auto-proxying or other kinds of bean post-processing. For example, if you have a dependency annotated with@Resourcewhere the field/setter name does not directly correspond to the declared name of a bean and no name attribute is used, then Spring will access other beans for matching them by type.
要注意的是,如果你在BeanPostProcessor中使用注解autowired或者@Resource,当使用类型匹配所依赖的 beans 的时候( type-matching dependency candidates ) Spring 很有可能访问不到你所期望的 beans,…..
Example: Hello World, BeanPostProcessor-style
The example shows a custom
BeanPostProcessorimplementation that invokes the toString() method of each bean as it is created by the container and prints the resulting string to the system console.
下面这个例子显示了如何通过使用自定义的BeanPostProcessor打印出某个被 Spring Container 所创建的 bean 的信息;
1 | package scripting; |
1 |
|
Notice how the
InstantiationTracingBeanPostProcessoris simply defined. It does not even have a name, and because it is a bean it can be dependency-injected just like any other bean.
注意,InstantiationTracingBeanPostProcessor为什么可以就这么简单的定义,甚至没有一个名字,这是因为它本身就是一个 bean 和其它 bean 一样可以被注入到容器中,而容器发现它实现了BeanPostProcessor接口,就会自动的将它注册为post-processors。
下面的代码将初始化并启动容器。1
2
3
4
5
6
7
8
9
10
11
12
13import org.springframework.context.ApplicationContext;
import org.springframework.context.support.ClassPathXmlApplicationContext;
import org.springframework.scripting.Messenger;
public final class Boot {
public static void main(final String[] args) throws Exception {
ApplicationContext ctx = new ClassPathXmlApplicationContext("scripting/beans.xml");
Messenger messenger = (Messenger) ctx.getBean("messenger");
System.out.println(messenger);
}
}
The output of the preceding application resembles the following:
1 | Bean 'messenger' created : org.springframework.scripting.groovy.GroovyMessenger@272961 |
Example: The RequiredAnnotationBeanPostProcessor
Using callback interfaces or annotations in conjunction with a custom
BeanPostProcessorimplementation is a common means of extending the Spring IoC container. An example is Spring’sRequiredAnnotationBeanPostProcessor- aBeanPostProcessorimplementation that ships with the Spring distribution which ensures that JavaBean properties on beans that are marked with an (arbitrary) annotation are actually (configured to be) dependency-injected with a value.
当一个自定义的BeanPostProcessor是通过回调接口或者注解实现的,实际上都是 Spring IoC 容器的延生;一个例子,RequiredAnnotationBeanPostProcessor - BeanPostProcessor的实现类,保证 JavaBean 的 annotation 属性被实实在在的被依赖注入了一个值;(感觉像是类型检查?)
【7.8.2】Customizing configuration metadata with a BeanFactoryPostProcessor
The next
extension pointthat we will look at is theorg.springframework.beans.factory.config.BeanFactoryPostProcessor. The semantics of this interface are similar to those of theBeanPostProcessor, with one major difference:BeanFactoryPostProcessoroperates on the bean configuration metadata; that is, the Spring IoC container allows aBeanFactoryPostProcessorto read the configuration metadata and potentiallychangeit before the container instantiates any beans other thanBeanFactoryPostProcessors.
下一个出场的扩展点是org.springframework.beans.factory.config.BeanFactoryPostProcessor;它的语法定义和行为和BeanPostProcessor非常相似,但是有一个重要的区别:BeanFactoryPostProcessor是在定义 bean 的元数据上进行操作,也就是说,Spring IoC 容器允许在一个 bean 实例化之前通过BeanFactoryPostProcessor读取并修改定义 bean 的元数据,而这一点BeanPostProcessor做不到。
You can configure multiple
BeanFactoryPostProcessors, and you can control theorderin which theseBeanFactoryPostProcessorsexecute by setting theorderproperty. However, you can only set this property if theBeanFactoryPostProcessorimplements theOrdered interface. If you write your ownBeanFactoryPostProcessor, you should consider implementing the Ordered interface too. Consult the javadocs of theBeanFactoryPostProcessorandOrdered interfacesfor more details.
你可以配置多个BeanFactoryPostProcessors,你可以通过设置 order 属性来控制BeanFactoryPostProcessors的执行顺序。但是,你的BeanFactoryPostProcessors必须实现Ordered interface接口才能设置Order…
注意如下两点
- If you want to change the actual bean instances (i.e., the objects that are created from the configuration metadata), then you instead need to use a
BeanPostProcessor(described above in Section 7.8.1, “Customizing beans using aBeanPostProcessor”). While it is technically possible to work with bean instances within aBeanFactoryPostProcessor(e.g., using BeanFactory.getBean()), doing so causes premature bean instantiation, violating the standard container lifecycle. This may cause negative side effects such as bypassing bean post processing.
如果你只是想要修改已经创建好的 bean instances,那么请使用BeanPostProcessor;当然你可以使用BeanFactoryPostProcessor在实例初始化之前修改 bean 的配置,但这会破坏 bean 实例化的原有行为,而导致一些副作用;这里作者是在强调要慎用BeanFactoryPostProcessor
- Also,
BeanFactoryPostProcessorsare scoped per-container. This is only relevant if you are using container hierarchies. If you define a BeanFactoryPostProcessor in one container, it will only be applied to the bean definitions in that container. Bean definitions in one container will not be post-processed byBeanFactoryPostProcessorsin another container, even if both containers are part of the same hierarchy.BeanFactoryPostProcessors的作用范围也是 per-container 的。
A bean factory post-processor is executed automatically when it is declared inside an
ApplicationContext, in order to apply changes to the configuration metadata that define the container. Spring includes a number of predefined bean factory post-processors, such asPropertyOverrideConfigurerandPropertyPlaceholderConfigurer. A customBeanFactoryPostProcessorcan also be used, for example, to register custom property editors.
一个在ApplicationContext中声明为 bean factory post-processor 的实例将会被自动执行,目的是为了修改定义容器的配置元数据。Spring 包含了一些列的预先定义好的 bean factory post-processors,比如PropertyOverrideConfigurer、PropertyPlaceholderConfigurer等;当然也可以通过BeanFactoryPostProcessor接口实现自定义,比如,注册一个自定义的属性编辑器(property editors)。
An
ApplicationContextautomatically detects any beans that are deployed into it that implement theBeanFactoryPostProcessorinterface. It uses these beans as bean factory post-processors, at the appropriate time. You can deploy these post-processor beans as you would any other bean.
ApplicationContext自动的检测那些实现了BeanFactoryPostProcessor接口的 beans,并且在合适的时间将它们当做 bean factory post-processors 使用;你可以像部署其它 beans 那样部署 bean factory post-processors。
Example: the Class name substitution PropertyPlaceholderConfigurer
You use the
PropertyPlaceholderConfigurerto externalize property values from a bean definition in a separate file using the standard Java Properties format. Doing so enables the person deploying an application to customize environment-specific properties such as database URLs and passwords, without the complexity or risk of modifying the main XML definition file or files for the container.
你可以使用PropertyPlaceholderConfigurer通过标准的 Java Properties 格式将一个 bean 的配置信息写入到一个外部文件中。这样做,使得一个应用可以部署到不同的特定的环境中,比如不同的数据库链接或者密匙的环境中,而不必担心直接修改某些核心 XML 配置定义而带来的复杂性和风险性。(感受,这段比较难翻译… 能看得很明白,但是要写成中文,怎么感觉那么难.. )
Consider the following XML-based configuration metadata fragment, where a
DataSourcewith placeholder values is defined. The example shows properties configured from an externalPropertiesfile. At runtime, aPropertyPlaceholderConfigureris applied to the metadata that will replace some properties of theDataSource. The values to replace are specified as placeholders of the form${property-name}which follows the Ant / log4j / JSP EL style.
考虑如下这个 XML-based configuration metadata 的段落,一个含有 placeholder values 的DataSource元素被定义。下面的这个例子显示了如何将其配置定义到一个外部配置文件中。在执行的时候,一个PropertyPlaceholderConfigurer实例将会替换某些DataSource的属性。这些可以被替换的 placeholders 被标注为 ${property-name} 的形式,符合 Ant / log4j /JSP EL 的风格。
1 | <bean class="org.springframework.beans.factory.config.PropertyPlaceholderConfigurer"> |
The actual values come from another file in the standard Java
Propertiesformat:
1 | jdbc.driverClassName=org.hsqldb.jdbcDriver |
Therefore, the string
${jdbc.username}is replaced at runtime with the value ‘sa’, and the same applies for other placeholder values that match keys in the properties file. ThePropertyPlaceholderConfigurerchecks for placeholders in most properties and attributes of a bean definition. Furthermore, the placeholder prefix and suffix can be customized.
因此,dataSource中的配置定义${jdbc.username}将会被sa值在 runtime 的时期被替换掉,其它的 placeholders 也会被相应的替换;PropertyPlaceholderConfigurer将会检查 bean definition 中几乎素有的 properties 和 attributes;进一步,the placeholder prefix and suffix can be customized.
With the
contextnamespace introduced in Spring 2.5, it is possible to configure property placeholders with a dedicated configuration element. One or more locations can be provided as a comma-separated list in the location attribute.
从 Spring 2.5 开始,可以使用 context namespace property-placeholder 来简化引用外部属性文件的配置,可以使用逗号分隔符部署多个配置文件,
1 | <context:property-placeholder location="classpath:com/foo/jdbc.properties"/> |
The
PropertyPlaceholderConfigurernot only looks for properties in thePropertiesfile you specify. By default it also checks against the Java System properties if it cannot find a property in the specified properties files. You can customize this behavior by setting thesystemPropertiesModeproperty of the configurer with one of the following three supported integer values:
- never (0): Never check system properties
- fallback (1): Check system properties if not resolvable in the specified properties files. This is the default.
- override (2): Check system properties first, before trying the specified properties files. This allows system properties to override any other property source.
PropertyPlaceholderConfigurer不仅仅从你所指定的属性文件中查找,默认的,如果它从你所指定的文件中没有找到需要的属性,它还会从 Java System properties中进行查找;你可以通过配置systemPropertiesMode来定义该行为,
- never (0): 从不检查 system properties
- fallback (1) …..
Consult the
PropertyPlaceholderConfigurerjavadocs for more information.
You can use the
PropertyPlaceholderConfigurerto substitute class names, which is sometimes useful when you have to pick a particular implementation class at runtime. For example:
1 | <bean class="org.springframework.beans.factory.config.PropertyPlaceholderConfigurer"> |
PropertyPlaceholderConfigurer可以直接通过PropertyPlaceholderConfigurer来进行提花,功能不可谓不强大;
If the class cannot be resolved at runtime to a valid class, resolution of the bean fails when it is about to be created, which is during the
preInstantiateSingletons()phase of anApplicationContextfor a non-lazy-init bean.
当然,如果通过上述的配置方式,在 runtime 的时候若解析失败,这个失败是从容器初始化过程中ApplicationContext的preInstantiateSingletons()阶段抛出来的,前提是,non-lazy-init bean。
Example: the PropertyOverrideConfigurer
The
PropertyOverrideConfigurer, another bean factory post-processor, resembles thePropertyPlaceholderConfigurer, but unlike the latter, the original definitions can have default values or no values at all for bean properties. If an overriding Properties file does not have an entry for a certain bean property, the default context definition is used.
PropertyOverrideConfigurer另外一个 bean factory post-processor,类似PropertyPlaceholderConfigurer,但是又和它不同,当在 overriding Properties 文件中并没有找到与 bean property 对应的 entry 的时候,将会使用默认的 context definition
Note that the bean definition is not aware of being overridden, so it is not immediately obvious from the XML definition file that the override configurer is being used. In case of multiple
PropertyOverrideConfigurerinstances that define different values for the same bean property, the last one wins, due to the overriding mechanism.
注意,bean definitions 自身并不知道正在被 overriden,所以正在被 overriden 的 xml definitiion 并不会马上生效,万一同时有多个PropertyOverrideConfigurer为同一个 bean property 定义了不同的替换值,这个时候,采取的是 last wins 机制;
Properties file configuration lines take this format:
注意,有个beanName;
For Example,
1 | dataSource.driverClassName=com.mysql.jdbc.Driver |
This example file can be used with a container definition that contains a bean called dataSource, which has driver and url properties.
Compound property names are also supported, as long as every component of the path except the final property being overridden is already non-null (presumably initialized by the constructors). In this example…
1 | foo.fred.bob.sammy=123 |
the
sammyproperty of thebobproperty of thefredproperty of thefoobean is set to the scalar value123.
这里非常形象的描述了如何对原有的 bean definitions 进行覆盖的..
With the context namespace introduced in Spring 2.5, it is possible to configure property overriding with a dedicated configuration element:
1 | <context:property-override location="classpath:override.properties"/> |
【7.8.3】Customizing instantiation logic with a FactoryBean
Implement the
org.springframework.beans.factory.FactoryBeaninterface for objects that are themselves factories.
通过实现org.springframework.beans.factory.FactoryBean接口实现自己的工厂类;
The
FactoryBeaninterface is a point of pluggability into the Spring IoC container’s instantiation logic. If you have complex initialization code that is better expressed in Java as opposed to a (potentially) verbose amount of XML, you can create your ownFactoryBean, write the complex initialization inside that class, and then plug your customFactoryBeaninto the container.
FactoryBean接口是 Spring IoC 容器实例化的一个可插入的节点;如果你有比较复杂的实例化逻辑最好使用 Java Code 而不是使用 XML 配置,你可以创建你自己的FactoryBean,在里面写一些复杂的实例化逻辑,然后将该FactoryBean插入到容器中。
The
FactoryBeaninterface provides three methods:
Object getObject(): returns an instance of the object this factory creates. The instance can possibly be shared, depending on whether this factory returns singletons or prototypes.boolean isSingleton(): returns true if thisFactoryBeanreturns singletons, false otherwise.Class getObjectType(): returns the object type returned by thegetObject()method ornullif the type is not known in advance.
The
FactoryBeanconcept and interface is used in a number of places within the Spring Framework; more than 50 implementations of theFactoryBeaninterface ship with Spring itself.
When you need to ask a container for an actual
FactoryBeaninstance itself instead of the bean it produces, preface the bean’s id with the ampersand symbol (&) when calling thegetBean()method of theApplicationContext. So for a givenFactoryBeanwith an id of myBean, invokinggetBean("myBean")on the container returns the product of theFactoryBean; whereas, invokinggetBean("&myBean")returns theFactoryBeaninstance itself.
如果你想获得一个真正的FactoryBean实例比如称作 myBean,使用getBean(&myBean),它会返回FactoryBean实例自己,如果使用getBean(myBean),只会返回由FactoryBean构造出来的 product( beans )。
【7.9】Annotation-based container configuration
As mentioned in the section called “Example: The RequiredAnnotationBeanPostProcessor”, using a
BeanPostProcessorin conjunction with annotations is a common means of extending the Spring IoC container. For example, Spring 2.0 introduced the possibility of enforcing required properties with the@Requiredannotation. Spring 2.5 made it possible to follow that same general approach to drive Spring’s dependency injection. Essentially, the@Autowiredannotation provides the same capabilities as described in Section 7.4.5, “Autowiring collaborators” but with more fine-grained control and wider applicability. Spring 2.5 also added support for JSR-250 annotations such as@PostConstruct, and@PreDestroy. Spring 3.0 added support for JSR-330 (Dependency Injection for Java) annotations contained in the javax.inject package such as@Injectand@Named. Details about those annotations can be found in the relevant section.
(上面这段摘要描述了 Spring Annotation 的发展过程)
正如“Example: The RequiredAnnotationBeanPostProcessor”小节所描述的那样,和 annotations 的结合是 Spring IoC Container 的一般意义上的延生;比如,Spring 2.0 提供了能够强制注入所需要的 properties 的可能性的@Required注解;如Section 7.4.5, “Autowiring collaborators” 所描述的那样,Spring 2.5 所提供的@Autowired注解基本上提供了差不多相同的能力,但有更细粒度的控制和更广泛的用途;Spring 2.5 还添加了对 JSR0250 注解的支持,比如@PstConstruct和@PreDestroy注解。Spring 3.0 添加了对 JSR-330注解的支持,比如@Inject和@Named。
注意,
Annotation injection is performed before XML injection, thus the latter configuration will override the former for properties wired through both approaches.
这里重要了,Annotation 注入是先于 XML 注入的,并且注意,后注入的实例会覆盖掉先前注入的相同实例;也就是说,如果通过 Annotation 和 XML 共同注册了同一个实例,那么 XML 所注入的实例会覆盖掉通过 Annotation 所注入的实例。
1 |
|
(The implicitly registered post-processors include
AutowiredAnnotationBeanPostProcessor,CommonAnnotationBeanPostProcessor,PersistenceAnnotationBeanPostProcessor, as well as the aforementionedRequiredAnnotationBeanPostProcessor.)
上述配置方式,将会隐含的注入AutowiredAnnotationBeanPostProcessor,CommonAnnotationBeanPostProcessor,PersistenceAnnotationBeanPostProcessor以及RequiredAnnotationBeanPostProcessor;言外之意,Annotation Driven Configuration 就是通过这些实现类实现的。
context:annotation-config/ only looks for annotations on beans in the same application context in which it is defined. This means that, if you put context:annotation-config/ in a
WebApplicationContextfor a DispatcherServlet, it only checks for@Autowiredbeans in your controllers, and not your services. See Section 22.2, “The DispatcherServlet” for more information.
【7.9.1】@Required
The @Required annotation applies to bean property setter methods, as in the following example:
1 | public class SimpleMovieLister { |
【7.9.2】@Autowired
JSR 330’s
@Injectannotation can be used in place of Spring’s@Autowiredannotation in the examples below. See here for more details.
You can apply the
@Autowiredannotation toconstructors:
1 | public class MovieRecommender { |
As expected, you can also apply the
@Autowiredannotation to “traditional”settermethods:
1 | public class SimpleMovieLister { |
You can also apply the annotation to methods with arbitrary names and/or
multiplearguments:
1 | public class MovieRecommender { |
You can apply
@Autowiredto fields as well and even mix it with constructors:
1 | public class MovieRecommender { |
By default, the autowiring
failswheneverzerocandidate beans are available; the default behavior is to treat annotated methods, constructors, and fields as indicating required dependencies. This behavior can be changed as demonstrated below.
正常情况下,当没有找到候选 beans 自动装载会失败,不过可以通过设置为 require=false 改变这一行为。
1 | public class SimpleMovieLister { |
You can also use
@Autowiredfor interfaces that are well-known resolvable dependencies:BeanFactory,ApplicationContext,Environment,ResourceLoader,ApplicationEventPublisher, andMessageSource. These interfaces and their extended interfaces, such asConfigurableApplicationContextorResourcePatternResolver, are automatically resolved, with no special setup necessary.
我的神,这个比较重要了,可以直接通过 @Autowired 注入接口 BeanFactory, ApplicationContext, Environment, ResourceLoader, ApplicationEventPublisher, 和 MessageSource 以及注入他们的扩展接口ConfigurableApplicationContext和ResourcePatternResolver。
1 | public class MovieRecommender { |
@Autowired,@Inject,@Resource, and@Valueannotations are handled by SpringBeanPostProcessorimplementations which in turn means that you cannot apply these annotations within your ownBeanPostProcessororBeanFactoryPostProcessortypes (if any). These types must be ‘wired up’ explicitly via XML or using a Spring@Beanmethod.
@Autowired, @Inject, @Resource, 和 @Value 这些注解是通过BeanPostProcessor的实现处理的,也因此,你不能在 BeanPostProcessor or BeanFactoryPostProcessor 的 beans 中使用这些 Annotations,也因此你必须通过 XML 或者 @Bean 显示的声明它们。
【7.9.3】Fine-tuning annotation-based autowiring with @Primary
Because autowiring by type may lead to multiple candidates, it is often necessary to have more control over the selection process. One way to accomplish this is with Spring’s
@Primaryannotation.@Primaryindicates that a particular bean should be given preference when multiple beans are candidates to be autowired to a single-valued dependency. If exactly one ‘primary’ bean exists among the candidates, it will be the autowired value.
当 autowiring 多个候选的时候,通常你需要在选择的过程中做一些额外的定义。一种方式是通过@Primary
1 |
|
1 | public class MovieRecommender { |
这样,当通过 MovieRecommender 注入 MovieCatalog 的时候会使用的是 firstMovieCatalog
使用 XML-Based,
1 |
|
【7.9.4】Fine-tuning annotation-based autowiring with qualifiers
可以使用在属性上1
2
3
4
5
6
7
8
9public class MovieRecommender {
("main")
private MovieCatalog movieCatalog;
// ...
}
可以使用再构造函数上1
2
3
4
5
6
7
8
9
10
11
12
13
14
15
16public class MovieRecommender {
private MovieCatalog movieCatalog;
private CustomerPreferenceDao customerPreferenceDao;
public void prepare(@Qualifier("main")MovieCatalog movieCatalog,
CustomerPreferenceDao customerPreferenceDao) {
this.movieCatalog = movieCatalog;
this.customerPreferenceDao = customerPreferenceDao;
}
// ...
}
相关的候选 beans 的定义如下,这里通过 XML-based
1 |
|
For a fallback match, the bean name is considered a default qualifier value. Thus you can define the bean with an id “main” instead of the nested qualifier element, leading to the same matching result.
当你没有设置 qualifier value 的是偶,bean name 被当做是默认的 qualifier value,当然你也可以设置 id 属性。
Qualifiers also apply to typed collections, as discussed above, for example, to
Set<MovieCatalog>. In this case, all matching beans according to the declared qualifiers are injected as a collection. This implies that qualifiers do not have to be unique; they rather simply constitute filtering criteria. For example, you can define multiple MovieCatalog beans with the same qualifier value “action”, all of which would be injected into aSet<MovieCatalog>annotated with@Qualifier("action").
你可以对候选 MoiveCatalog bean 使用同一个 qualifier value,然后可以通过Set<MoiveCatalog>注入所有的 bean。
@Autowiredis fundamentally about type-driven injection with optional semantic qualifiers.
@Autowired 是根据 type-driven 进行注入的。(备注:什么是 type-driven?这里指的就是 Class Type )
If you intend to express annotation-driven injection by name, do not primarily use
@Autowired, even if is technically capable of referring to a bean name through@Qualifiervalues. Instead, use the JSR-250@Resourceannotation, which is semantically defined to identify a specific target component by its unique name, with the declared type being irrelevant for the matching process.@Autowiredhas rather different semantics: After selecting candidate beans by type, the specified String qualifier value will be considered within those type-selected candidates only, e.g. matching an “account” qualifier against beans marked with the same qualifier label.
这里有个很重要的提醒,如果你试图通过名字的方式来注入 bean,即便是@Autowired配合@Qualifier也可以找到对应的 bean,但最好不要首先考虑使用@Autowired,最好是使用@Resource注解,为什么呢?首先@Resource本身就是通过名字的方式注入的;而@Autowired有不同的解析过程,当根据 Class Type 选择完候选的 bean 是以后,才会在根据 qulifer value 在这些 candidates 中匹配,但是往往有可能事与愿违,有可能你希望的是,在不同的 Type (比如继承自同一个父类的多个 subclasses )中通过 qualifer value 筛选出想要的 bean 就很有可能找不到了。
You can create your own custom
qualifierannotations. Simply define an annotation and provide the@Qualifierannotation within your definition:
1 | ({ElementType.FIELD, ElementType.PARAMETER}) |
Then you can provide the custom qualifier on autowired fields and parameters:
1 | public class MovieRecommender { |
XML-based1
2
3
4
5
6
7
8
9
10
11
12
13
14
15
16
17
18
19
20
21
22
23
24
<beans xmlns="http://www.springframework.org/schema/beans"
xmlns:xsi="http://www.w3.org/2001/XMLSchema-instance"
xmlns:context="http://www.springframework.org/schema/context"
xsi:schemaLocation="http://www.springframework.org/schema/beans
http://www.springframework.org/schema/beans/spring-beans.xsd
http://www.springframework.org/schema/context
http://www.springframework.org/schema/context/spring-context.xsd">
<context:annotation-config/>
<bean class="example.SimpleMovieCatalog">
<qualifier type="Genre" value="Action"/>
<!-- inject any dependencies required by this bean -->
</bean>
<bean class="example.SimpleMovieCatalog">
<qualifier type="example.Genre" value="Comedy"/>
<!-- inject any dependencies required by this bean -->
</bean>
<bean id="movieRecommender" class="example.MovieRecommender"/>
</beans>
In some cases, it may be sufficient to use an annotation without a value. This may be useful when the annotation serves a more generic purpose and can be applied across several different types of dependencies.
这里介绍的是可以通过自定的 Qualifier 的 type (不包含 value) 来区分需要加载的 bean
1 | ({ElementType.FIELD, ElementType.PARAMETER}) |
1 | public class MovieRecommender { |
1 | <bean class="example.SimpleMovieCatalog"> |
然而,还可以更进一步,自定义一个不使用 single value 的 Qualifier,可以定义 multiple attribute,但是匹配的时候,需要都匹配,看例子,
1 | ({ElementType.FIELD, ElementType.PARAMETER}) |
Format 这里是一个 enum,
1 | public enum Format { |
The fields to be autowired are annotated with the custom qualifier and include values for both attributes: genre and format.
1 | public class MovieRecommender { |
xml-based1
2
3
4
5
6
7
8
9
10
11
12
13
14
15
16
17
18
19
20
21
22
23
24
25
26
27
28
29
30
31
32
33
34
35
36
37
38
39
40
<beans xmlns="http://www.springframework.org/schema/beans"
xmlns:xsi="http://www.w3.org/2001/XMLSchema-instance"
xmlns:context="http://www.springframework.org/schema/context"
xsi:schemaLocation="http://www.springframework.org/schema/beans
http://www.springframework.org/schema/beans/spring-beans.xsd
http://www.springframework.org/schema/context
http://www.springframework.org/schema/context/spring-context.xsd">
<context:annotation-config/>
<bean class="example.SimpleMovieCatalog">
<qualifier type="MovieQualifier">
<attribute key="format" value="VHS"/>
<attribute key="genre" value="Action"/>
</qualifier>
<!-- inject any dependencies required by this bean -->
</bean>
<bean class="example.SimpleMovieCatalog">
<qualifier type="MovieQualifier">
<attribute key="format" value="VHS"/>
<attribute key="genre" value="Comedy"/>
</qualifier>
<!-- inject any dependencies required by this bean -->
</bean>
<bean class="example.SimpleMovieCatalog">
<meta key="format" value="DVD"/>
<meta key="genre" value="Action"/>
<!-- inject any dependencies required by this bean -->
</bean>
<bean class="example.SimpleMovieCatalog">
<meta key="format" value="BLURAY"/>
<meta key="genre" value="Comedy"/>
<!-- inject any dependencies required by this bean -->
</bean>
</beans>
【7.9.5】Using generics as autowiring qualifiers
该篇文章介绍了如何使用泛型来作为 autowiring qualifiers
In addition to the
@Qualifierannotation, it is also possible to useJava generic typesas an implicit form of qualification. For example, suppose you have the following configuration:
1 |
|
Assuming that beans above implement a generic interface, i.e. Store
1 |
|
可以看到,通过泛型可以 autowired 与之匹配的候选 bean
Generic qualifiers also apply when autowiring Lists, Maps and Arrays:
1 | // Inject all Store beans as long as they have an <Integer> generic |
【7.9.6】CustomAutowireConfigurer
The
CustomAutowireConfigureris aBeanFactoryPostProcessorthat enables you to register your own custom qualifier annotation types even if they are not annotated with Spring’s@Qualifierannotation.
customAutowireConfigurer
1 | <bean id="customAutowireConfigurer" |
The
AutowireCandidateResolverdetermines autowire candidates by:
AutowireCandidateResolver如何决定注入它的 candidates 的
- the
autowire-candidatevalue of each bean definition- any
default-autowire-candidatespattern(s) available on theelement - the presence of
@Qualifierannotations and any custom annotations registered with theCustomAutowireConfigurer
【7.9.7】@Resource
Spring also supports injection using the JSR-250
@Resourceannotation on fields or bean property setter methods. This is a common pattern in Java EE 5 and 6, for example in JSF 1.2 managed beans or JAX-WS 2.0 endpoints. Spring supports this pattern for Spring-managed objects as well.
@Resourcetakes a name attribute, and by default Spring interprets that value as the bean name to be injected. In other words, it follows by-name semantics, as demonstrated in this example:
1 | public class SimpleMovieLister { |
If no name is specified explicitly, the default name is derived from the
fieldname orsettermethod; So the following example is going to have the bean with name “movieFinder” injected into its setter method:
1 | public class SimpleMovieLister { |
In the exclusive case of
@Resourceusage with no explicit name specified, and similar to@Autowired,@Resourcefinds a primary type match instead of a specific named bean and resolves well-known resolvable dependencies: theBeanFactory,ApplicationContext,ResourceLoader,ApplicationEventPublisher, andMessageSourceinterfaces.
当通过@Resource通过名称找不到对应的 candidates 以后,行为就和@Autowired差不多了,首先通过 type 查找,查找路径为,BeanFactory, ApplicationContext, ResourceLoader, ApplicationEventPublisher, and MessageSource interfaces
例子,1
2
3
4
5
6
7
8
9
10
11
12
13
14public class MovieRecommender {
private CustomerPreferenceDao customerPreferenceDao;
private ApplicationContext context;
public MovieRecommender() {
}
// ...
}
Thus in the following example, the
customerPreferenceDaofield first looks for a bean named customerPreferenceDao, then falls back to a primary type match for thetypeCustomerPreferenceDao. The “context” field is injected based on the known resolvable dependencytypeApplicationContext.
【7.9.8】@PostConstruct and @PreDestroy
The
CommonAnnotationBeanPostProcessornot only recognizes the@Resourceannotation but also the JSR-250 lifecycle annotations. Introduced in Spring 2.5, the support for these annotations offers yet another alternative to those described in initialization callbacks and destruction callbacks. Provided that theCommonAnnotationBeanPostProcessoris registered within the Spring ApplicationContext, a method carrying one of these annotations is invoked at the same point in the lifecycle as the corresponding Spring lifecycle interface method or explicitly declared callback method. In the example below, the cache will be pre-populated upon initialization and cleared upon destruction.
CommonAnnotationBeanPostProcessor不仅仅可以识别@Resource,同样可以识别生命周期相关的 Annotation,这里指的就是@PostConstruct and @PreDestroy
1 | public class CachingMovieLister { |
【7.10】Classpath scanning and managed components
This section describes an option for implicitly detecting the candidate components by scanning the classpath. Candidate components are classes that match against a filter criteria and have a corresponding bean definition registered with the container. This removes the need to use XML to perform bean registration; instead you can use annotations (for example
@Component), AspectJ type expressions, or your own custom filter criteria to select which classes will have bean definitions registered with the container.
Starting with Spring 3.0, many features provided by the Spring
JavaConfigproject are part of the core Spring Framework. This allows you to define beans using Java rather than using the traditional XML files. Take a look at the@Configuration,@Bean,@Import,and@DependsOnannotations for examples of how to use these new features.
【7.10.1】@Component and further stereotype annotations
The
@Repositoryannotation is a marker for any class that fulfills the role or stereotype of a repository (also known as Data Access Object or DAO). Among the uses of this marker is the automatic translation of exceptions as described in Section 20.2.2, “Exception translation”.
@Repository注解主要是为 Data Access Object 或者 DAO 提供的注解,使用这种注解将会自动的做相应的异常转换。
Spring provides further stereotype annotations:
@Component,@Service, and@Controller.@Componentis a generic stereotype for any Spring-managed component.
@Component是一个公共的 stereotype
@Repository,@Service, and@Controllerare specializations of@Componentfor more specific use cases, for example, in the persistence, service, and presentation layers, respectively. Therefore, you can annotate your component classes with @Component, but by annotating them with @Repository, @Service, or @Controller instead, your classes are more properly suited for processing by tools or associating with aspects.
@Repository, @Service, and @Controller是@Component的特殊例子,分别用在 persistence, service, and presentation layers;现在,你也可以使用@Component来统一注解,因为目前针对这些注解没有太多的定制化,但是最佳实践是服务层使用@Service而不是使用@Component,因为将来可能会做定制化的东西。
不过,正如该章节开篇描述的那样,DAO 应该使用 @Repository,因为它针对 DAO 层的异常做了转换。
【7.10.2】Meta-annotations
Many of the annotations provided by Spring can be used as meta-annotations in your own code. A meta-annotation is simply an annotation that can be applied to another annotation. For example, the
@Serviceannotation mentioned above is meta-annotated with@Component:
1 | (ElementType.TYPE) |
可以将 meta-annotations 理解为 annotation 之间的继承关系吗?
Meta-annotations can also be combined to create composed annotations. For example, the
@RestControllerannotation from Spring MVC is composed of@Controllerand@ResponseBody.
Meta-annotations 可以是多个注解的组合,比如@RestController注解就是@Controller和ResponseBody的组合。
In addition, composed annotations may optionally redeclare attributes from meta-annotations to allow user customization. This can be particularly useful when you want to only expose a subset of the meta-annotation’s attributes. For example, Spring’s
@SessionScopeannotation hardcodes the scope name tosessionbut still allows customization of theproxyMode.
允许用户通过 composed annotations 去重新定义 meta-annotations 的属性;这个对于只想暴露部分 meta-annotation’s 属性非常有意义;比如@SessionScope applied from @Scope,通过@SessionScope暴露出可以自定义的proxyMode,但是 scope name 却被 hard coded 为 session。下面来看看@SessionScope的例子,
1 | ({ElementType.TYPE, ElementType.METHOD}) |
@SessionScope can then be used without declaring the proxyMode as follows:
1 |
|
Or with an overridden value for the proxyMode as follows:
1 |
|
For further details, consult the Spring Annotation Programming Model.
【7.10.3】Automatically detecting classes and registering bean definitions
Spring can automatically detect stereotyped classes and register corresponding BeanDefinitions with the ApplicationContext. For example, the following two classes are eligible for such autodetection:
1 |
|
1 |
|
To autodetect these classes and register the corresponding beans, you need to add
@ComponentScanto your@Configurationclass, where thebasePackagesattribute is a common parent package for the two classes.
1 |
|
The following is an alternative using XML
1 |
|
The use of context:component-scan implicitly enables the functionality of context:annotation-config. There is usually no need to include the context:annotation-config element when using context:component-scan.
Furthermore, the
AutowiredAnnotationBeanPostProcessorandCommonAnnotationBeanPostProcessorare both included implicitly when you use the component-scan element. That means that the two components are autodetected and wired together - all without any bean configuration metadata provided in XML.
You can disable the registration of
AutowiredAnnotationBeanPostProcessorandCommonAnnotationBeanPostProcessorby including the annotation-config attribute with a value of false.
diable? 意识就是全部用 XML 的方式进行了。
【7.10.4】Using filters to customize scanning
默认情况下,@Component, @Repository, @Service, @Controller 等都会被自动加载,可以通过 Add them as includeFilters or excludeFilters parameters of the @ComponentScan annotation (or as include-filter or exclude-filter sub-elements of the component-scan element) 的方式过滤。
The following example shows the configuration ignoring all @Repository annotations and using “stub” repositories instead.
1 |
|
xml-based1
2
3
4
5
6
7
8<beans>
<context:component-scan base-package="org.example">
<context:include-filter type="regex"
expression=".*Stub.*Repository"/>
<context:exclude-filter type="annotation"
expression="org.springframework.stereotype.Repository"/>
</context:component-scan>
</beans>
【7.10.5】Defining bean metadata within components
Spring components can also contribute bean definition metadata to the container. You do this with the same
@Beanannotation used to define bean metadata within@Configurationannotated classes. Here is a simple example:
可以类似于用 @Bean 在 @Configuration 声明中的 classes 里面定义一个 bean 一样,可以通过 @Bean 在一个 Component 中定义一个 bean
1 |
|
Other method level annotations that can be specified are @Scope, @Lazy, and custom qualifier annotations
可以在一个 bean 中再定义另外一个 bean…
【7.10.6】Naming autodetected components
When a component is autodetected as part of the scanning process, its bean name is generated by the
BeanNameGeneratorstrategy known to that scanner.
当在 scanning process 中检测到一个 component,它的 bean name 是通过BeanNameGenerator策略生成的。For example, if the following two components were detected, the names would be myMovieLister and movieFinderImpl:
1 | ("myMovieLister") |
1 |
|
If you do not want to rely on the default bean-naming strategy, you can provide a custom bean-naming strategy. First, implement the
BeanNameGeneratorinterface, and be sure to include a default no-arg constructor. Then, provide the fully-qualified class name when configuring the scanner:
如果你想自定义 bean-naming strategy,可以通过实现BeanNameGenerator接口实现,
1 |
|
1 | <beans> |
【7.10.7】Providing a scope for autodetected components
As with Spring-managed components in general, the default and most common scope for autodetected components is singleton. However, sometimes you need a different scope which can be specified via the
@Scopeannotation. Simply provide the name of the scope within the annotation:
1 | ("prototype") |
For details on web-specific scopes, see Section 7.5.4, “Request, session, global session, application, and WebSocket scopes”.
To provide a custom strategy for scope resolution rather than relying on the annotation-based approach, implement the
ScopeMetadataResolverinterface, and be sure to include a default no-arg constructor. Then, provide the fully-qualified class name when configuring the scanner:
1 |
|
1 | <beans> |
【7.11】Using JSR 330 Standard Annotations
Starting with Spring 3.0, Spring offers support for JSR-330 standard annotations (Dependency Injection). Those annotations are scanned in the same way as the Spring annotations. You just need to have the relevant jars in your classpath.
[Note]
If you are using Maven, the javax.inject artifact is available in the standard Maven repository ( http://repo1.maven.org/maven2/javax/inject/javax.inject/1/). You can add the following dependency to your file pom.xml:
1 | <dependency> |
【7.11.1】Dependency Injection with @Inject and @Named
Instead of @Autowired, @javax.inject.Inject may be used as follows:
1 | import javax.inject.Inject; |
As with
@Autowired, it is possible to use@Injectat the field level, method level and constructor-argument level. If you would like to use a qualified name for the dependency that should be injected, you should use the@Namedannotation as follows:
1 | import javax.inject.Inject; |
【7.11.2】@Named and @ManagedBean: standard equivalents to the @Component annotation
Instead of
@Component, `@javax.inject.Namedorjavax.annotation.ManagedBean` may be used as follows:
1 | import javax.inject.Inject; |
It is very common to use
@Componentwithout specifying a name for the component.@Namedcan be used in a similar fashion:
1 | import javax.inject.Inject; |
When using
@Namedor@ManagedBean, it is possible to use component scanning in the exact same way as when using Spring annotations:
1 |
|
In contrast to
@Component, the JSR-330@Namedand the JSR-250ManagedBeanannotations are not composable. Please use Spring’s stereotype model for building custom component annotations.
与@Component不同的是,JSR-330所提供的@Named和JSR-250提供的ManageBean注解不可以被组合..
【7.11.3】Limitations of JSR-330 standard annotations
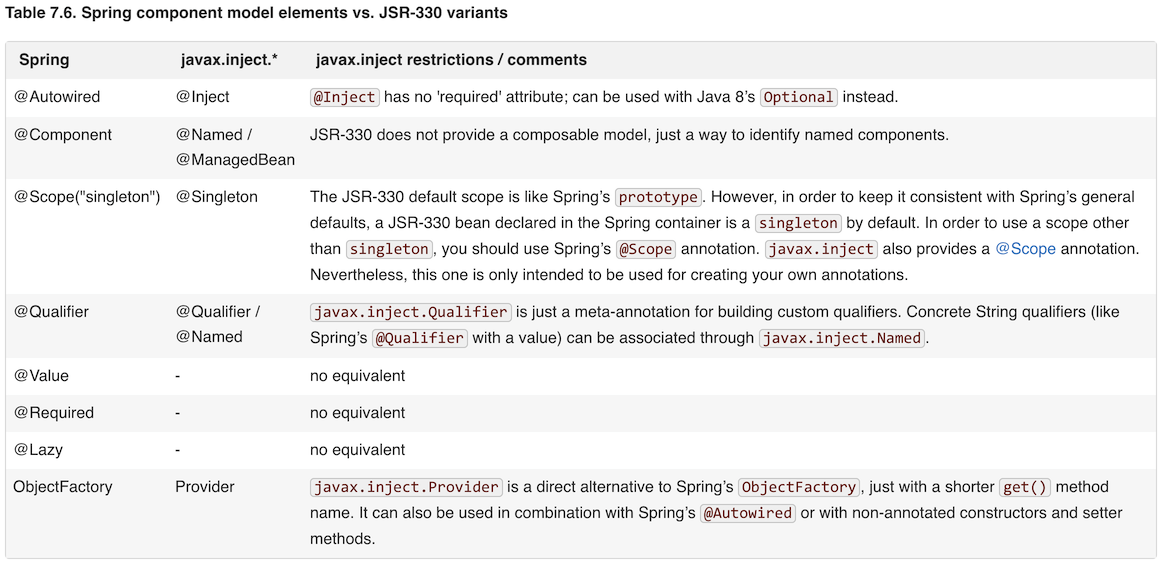
【7.12】Java-based container configuration
【7.12.1】Basic concepts: @Bean and @Configuration
The central artifacts in Spring’s new
Java-configurationsupport are@Configuration-annotatedclasses and@Bean-annotatedmethods.
Annotating a class with
@Configurationindicates that its primary purpose is as a source of bean definitions. Furthermore,@Configurationclasses allow inter-bean dependencies to be defined by simply calling other@Beanmethods in the same class. The simplest possible@Configurationclass would read as follows:
1 |
|
The AppConfig class above would be equivalent to the following Spring
XML
1 | <beans> |
Full @Configuration vs 'lite' @Beans mode?
When
@Beanmethods are declared within classes that are not annotated with@Configurationthey are referred to as being processed in a ‘lite’ mode. For example, bean methods declared in a@Componentor even in a plain old class will be considered ‘lite’.
这个在[7.10.5] Defining bean metadata within components中有详细的介绍。
【7.12.2】Instantiating the Spring container using AnnotationConfigApplicationContext
Spring’s
AnnotationConfigApplicationContext, new in Spring 3.0, it is capable of accepting not only@Configurationclasses as input, but also plain@Componentclasses and classes annotated with JSR-330 metadata.
When
@Configurationclasses are provided as input, the@Configurationclass itself is registered as a bean definition, and all declared@Beanmethods within the class are also registered as bean definitions.
When
@Componentand JSR-330 classes are provided, they are registered as bean definitions, and it is assumed that DI metadata such as@Autowiredor@Injectare used within those classes where necessary.
Simple construction
In much the same way that Spring XML files are used as input when instantiating a
ClassPathXmlApplicationContext,@Configurationclasses may be used as input when instantiating anAnnotationConfigApplicationContext. This allows for completely XML-free usage of the Spring container:
通过 @Configuration 的初始化方式与 XML 的初始化方式雷同,如下,
1 | public static void main(String[] args) { |
AppConfig.class实现了@Configuration注解,
As mentioned above,
AnnotationConfigApplicationContextis not limited to working only with@Configurationclasses. Any@Componentor JSR-330 annotated class may be supplied as input to the constructor. For example:
1 | public static void main(String[] args) { |
The above assumes that
MyServiceImpl,Dependency1andDependency2use Spring dependency injection annotations such as@Autowired.
Building the container programmatically using register(Class<?>…)
An
AnnotationConfigApplicationContextmay be instantiated using a no-arg constructor and then configured using theregister()method.
1 | public static void main(String[] args) { |
Enabling component scanning with scan(String…)
To enable component scanning, just annotate your
@Configurationclass as follows:
1 |
|
等价于
Experienced Spring users will be familiar with the XML declaration equivalent from Spring’s context: namespace
1 | <beans> |
写程序的方式,
AnnotationConfigApplicationContextexposes thescan(String…)method to allow for the same component-scanning functionality:
1 | public static void main(String[] args) { |
Remember that
@Configurationclasses are meta-annotated with@Component, so they are candidates for component-scanning! In the example above, assuming thatAppConfigis declared within thecom.acmepackage (or any package underneath), it will be picked up during the call toscan(), and upon refresh() all its@Beanmethods will be processed and registered as bean definitions within the container.
这段解释了如何通过 @Configuration 和 @Bean 实现 bean 的注入的。
Support for web applications with AnnotationConfigWebApplicationContext
AnnotationConfigWebApplicationContext
This implementation may be used when configuring the Spring
ContextLoaderListenerservlet listener, Spring MVCDispatcherServlet, etc. What follows is a web.xml snippet that configures a typical Spring MVC web application. Note the use of thecontextClasscontext-param and init-param:
1 | <web-app> |
【7.12.3】Using the @Bean annotation
@Beanis a method-level annotation and a direct analog of the XML<bean/>element. The annotation supports some of the attributes offered by<bean/>, such as: init-method, destroy-method, autowiring andname.
You can use the @Bean annotation in a @Configuration-annotated or in a @Component-annotated class.
Declaring a bean
To declare a bean, simply annotate a method with the
@Beanannotation. You use this method to register a bean definition within anApplicationContextof the type specified as the method’s return value. By default, the bean name will be the same as the method name. The following is a simple example of a@Beanmethod declaration:
1 |
|
The preceding configuration is exactly equivalent to the following Spring XML:
1 | <beans> |
Both declarations make a bean named
transferServiceavailable in theApplicationContext, bound to an object instance of typeTransferServiceImpl:
1 | transferService -> com.acme.TransferServiceImpl |
我的疑问是,@Service不也是做的类似的事情?为什么还要有 @Bean?
Bean dependencies
A
@Beanannotated method can have an arbitrary number of parameters describing the dependencies required to build that bean. For instance if ourTransferServicerequires anAccountRepositorywe can materialize that dependency via a method parameter:
由@Bean所注解的方法可以通过其参数来描述其所依赖的 bean;
1 |
|
Receiving lifecycle callbacks
The regular Spring lifecycle callbacks are fully supported as well. If a bean implements
InitializingBean,DisposableBean, orLifecycle, their respective methods are called by the container.
The standard set of
*Awareinterfaces such asBeanFactoryAware,BeanNameAware,MessageSourceAware,ApplicationContextAware, and so on are also fully supported.
The
@Beanannotation supports specifying arbitrary initialization and destruction callback methods, much like Spring XML’sinit-methodanddestroy-methodattributes on the bean element:
1 | public class Foo { |
By default, beans defined using
Java configthat have a publiccloseorshutdownmethod are automatically enlisted with a destruction callback. If you have a publiccloseorshutdownmethod and you do not wish for it to be called when the container shuts down, simply add@Bean(destroyMethod="")to your bean definition to disable the default (inferred) mode.
默认的,通过Java config注入的 bean 会默认的注入一个 public close or shutdown method,如果不想使用它们 simply add @Bean(destroyMethod="") to your bean definition
You may want to do that by default for a resource that you acquire via JNDI as its lifecycle is managed outside the application. In particular, make sure to always do it for a
DataSourceas it is known to be problematic on Java EE application servers.
特别的,当你使用 JNDI 的方式注入一个 bean,它的生命周期是在容器之外被管理的,特别的,当使用 JNDI 加载一个DataSource的时候,一定记得 disable 掉自动的close和shutdown。
1 | (destroyMethod="") |
Specifying bean scope
Using the @Scope annotation
1 |
|
@Scope and scoped-proxy
Spring offers a convenient way of working with scoped dependencies through scoped proxies.
1 |
|
Customizing bean naming
1 |
|
Bean aliasing
1 |
|
Bean description
1 |
|
【7.12.4】Using the @Configuration annotation
@Configurationis a class-level annotation indicating that an object is a source of bean definitions.@Configurationclasses declare beans via public@Beanannotated methods. Calls to@Beanmethods on@Configurationclasses can also be used to define inter-bean dependencies.
Injecting inter-bean dependencies
When
@Beanshave dependencies on one another, expressing that dependency is as simple as having one bean method call another:
1 |
|
In the example above, the
foobean receives a reference tobarvia constructor injection.
Lookup method injection
正如前面Method Injection介绍的那样,当一个单例模式需要引用一个非单例模式的类的时候,需要通过一个 Abstract 方法借助 CGLIB 的方式来实现,通过 Java-configuration 的方式,you can create a subclass of CommandManager where the abstract createCommand() method is overridden in such a way that it looks up a new (prototype) command object:
1 |
|
Further information about how Java-based configuration works internally
1 |
|
clientDao() 将会被调用两次,或许你会认为每次调用会生成一个新的 DAO,但是,却没有,因为 ClientDAO 在 Spring 容器中是单例模式的;那么 Spring 容器是如何做到的呢?
All
@Configurationclasses are subclassed at startup-time withCGLIB. In the subclass, the child method checks the container first for anycached(scoped) beans before it calls the parent method and creates a new instance.
在容器初始化的时候,所有的@Configuration的类都会通过CGLIB生成相应的子类;当初始化实例的时候,子类的初始化方法会检查缓存(Cached beans)是否已经生成了相应的 bean 实例,如果已经创建,则不会重复创建。看来秘密还是在 CGLIB…
Note that as of Spring 3.2, it is no longer necessary to add CGLIB to your classpath because CGLIB classes have been repackaged under org.springframework.cglib and included directly within the spring-core JAR.
【7.12.5】 Composing Java-based configurations
Using the @Import annotation
Much as the
element is used within Spring XML files to aid in modularizing configurations, the @Import annotation allows for loading @Beandefinitions from another configuration class:
1 |
|
Now, rather than needing to specify both
ConfigA.classandConfigB.classwhen instantiating the context, onlyConfigBneeds to be supplied explicitly:
1 | public static void main(String[] args) { |
This approach
simplifiescontainer instantiation, as only one class needs to be dealt with, rather than requiring the developer to remember a potentially large number of@Configurationclasses during construction.
Injecting dependencies on imported @Bean definitions
The example above works, but is simplistic. In most practical scenarios, beans will have
dependencieson one anotheracrossconfiguration classes. when using@Configurationclasses, the Java compiler places constraints on the configuration model, in that references to other beans must be valid Java syntax.
XML-centric use of @Configuration classes
Remember that
@Configurationclasses are ultimately justbeandefinitions in the container. In this example, we create a@Configurationclass namedAppConfigand include it withinsystem-test-config.xmlas a<bean/>definition.
1 |
|
system-test-config.xml:
1 | <beans> |
jdbc.properties:
1 | jdbc.url=jdbc:hsqldb:hsql://localhost/xdb |
1 | public static void main(String[] args) { |
Because
@Configurationis meta-annotated with@Component,@Configuration-annotatedclasses are automatically candidates forcomponent scanning. Using the same scenario as above, we can redefinesystem-test-config.xmlto take advantage ofcomponent-scanning. Note that in this case, we don’t need to explicitly declare<context:annotation-config/>, because<context:component-scan/>enables the same functionality.
system-test-config.xml:
1 | <beans> |
@Configuration class-centric use of XML with @ImportResource
In applications where
@Configurationclasses are the primary mechanism for configuring the container, it will still likely be necessary to use at least some XML. In these scenarios, simply use@ImportResourceand define only as much XML as is needed. Doing so achieves a “Java-centric” approach to configuring the container and keeps XML to a bare minimum.
哼哼,从上面的描述看来@Configuration是发展趋势了,以后 Spring 都会朝着这个方向去发展了,可惜,我直到现在都没有用过… 可以通过Configuration classes 使用@ImportResource注解来定义所需要的 XML 配置;
1 |
|
properties-config.xml
1 | <beans> |
1 | jdbc.properties |
1 | public static void main(String[] args) { |
【7.13】 Environment abstraction
The Environment is an abstraction integrated in the container that models two key aspects of the application environment: profiles and properties.
A profile is a named, logical group of bean definitions to be registered with the container only if the given profile is active. The role of the
Environmentobject with relation to profiles is in determining which profiles (if any) are currently active, and which profiles (if any) should be active by default.
Properties play an important role in almost all applications, and may originate from a variety of sources: properties files, JVM system properties, system environment variables, JNDI, servlet context parameters, ad-hoc Properties objects, Maps, and so on. The role of the
Environmentobject with relation to properties is to provide the user with a convenient service interface for configuring property sources and resolving properties from them.
【7.13.1】Bean definition profiles
Bean definition profiles is a mechanism in the core container that allows for registration of different beans in different environments. includings
- working against an in-memory datasource in development vs looking up that same datasource from JNDI when in QA or production
- registering monitoring infrastructure only when deploying an application into a performance environment
- registering customized implementations of beans for customer A vs. customer B deployments
Let’s consider the first use case in a practical application that requires a
DataSource. In a test environment, the configuration may look like this:
1 |
|
Let’s now consider how this application will be deployed into a QA or production environment, assuming that the datasource for the application will be registered with the production application server’s JNDI directory. Our
dataSourcebean now looks like this:
1 | (destroyMethod="") |
The problem is how to switch between using these two variations based on the current environment
@Profile
The
@Profileannotation allows you to indicate that a component is eligible for registration when one or more specified profiles are active. Using our example above, we can rewrite thedataSourceconfiguration as follows:
定义在 class level
1
2
3
4
5
6
7
8
9
10
11
12
13
("dev")
public class StandaloneDataConfig {
public DataSource dataSource() {
return new EmbeddedDatabaseBuilder()
.setType(EmbeddedDatabaseType.HSQL)
.addScript("classpath:com/bank/config/sql/schema.sql")
.addScript("classpath:com/bank/config/sql/test-data.sql")
.build();
}
}1
2
3
4
5
6
7
8
9
10
("production")
public class JndiDataConfig {
(destroyMethod="")
public DataSource dataSource() throws Exception {
Context ctx = new InitialContext();
return (DataSource) ctx.lookup("java:comp/env/jdbc/datasource");
}
}@Profilecan be used as a meta-annotation for the purpose of creating a custom composed annotation. The following example defines a custom@Productionannotation that can be used as a drop-in replacement for@Profile("production"):1
2
3
4
5(ElementType.TYPE)
(RetentionPolicy.RUNTIME)
("production")
public Production {
}这样可以使用
@Production来替换@Profile("production")@Profilecan also be declared at the method level to include only one particular bean of a configuration class:
也可以使用再方法级别;1
2
3
4
5
6
7
8
9
10
11
12
13
14
15
16
17
18
19
20
public class AppConfig {
("dev")
public DataSource devDataSource() {
return new EmbeddedDatabaseBuilder()
.setType(EmbeddedDatabaseType.HSQL)
.addScript("classpath:com/bank/config/sql/schema.sql")
.addScript("classpath:com/bank/config/sql/test-data.sql")
.build();
}
("production")
public DataSource productionDataSource() throws Exception {
Context ctx = new InitialContext();
return (DataSource) ctx.lookup("java:comp/env/jdbc/datasource");
}
}
通过 @Configuration 的方式定义 Profile 好简单。
XML bean definition profiles
The XML counterpart is the profile attribute of the
Our sample configuration above can be rewritten
in two XML files as follows:
1
2
3
4
5
6
7
8
9
10
11<beans profile="dev"
xmlns="http://www.springframework.org/schema/beans"
xmlns:xsi="http://www.w3.org/2001/XMLSchema-instance"
xmlns:jdbc="http://www.springframework.org/schema/jdbc"
xsi:schemaLocation="...">
<jdbc:embedded-database id="dataSource">
<jdbc:script location="classpath:com/bank/config/sql/schema.sql"/>
<jdbc:script location="classpath:com/bank/config/sql/test-data.sql"/>
</jdbc:embedded-database>
</beans>1
2
3
4
5
6
7
8<beans profile="production"
xmlns="http://www.springframework.org/schema/beans"
xmlns:xsi="http://www.w3.org/2001/XMLSchema-instance"
xmlns:jee="http://www.springframework.org/schema/jee"
xsi:schemaLocation="...">
<jee:jndi-lookup id="dataSource" jndi-name="java:comp/env/jdbc/datasource"/>
</beans>within the same file:
1
2
3
4
5
6
7
8
9
10
11
12
13
14
15
16
17
18
19<beans xmlns="http://www.springframework.org/schema/beans"
xmlns:xsi="http://www.w3.org/2001/XMLSchema-instance"
xmlns:jdbc="http://www.springframework.org/schema/jdbc"
xmlns:jee="http://www.springframework.org/schema/jee"
xsi:schemaLocation="...">
<!-- other bean definitions -->
<beans profile="dev">
<jdbc:embedded-database id="dataSource">
<jdbc:script location="classpath:com/bank/config/sql/schema.sql"/>
<jdbc:script location="classpath:com/bank/config/sql/test-data.sql"/>
</jdbc:embedded-database>
</beans>
<beans profile="production">
<jee:jndi-lookup id="dataSource" jndi-name="java:comp/env/jdbc/datasource"/>
</beans>
</beans>
Activating a profile
If we started our sample application right now, we would see a
NoSuchBeanDefinitionExceptionthrown, because the container could not find the Spring bean nameddataSource.
Activating a profile can be done in several ways,
but the
most straightforwardis to do itprogrammaticallyagainst theEnvironmentAPIwhich is available via an ApplicationContext:1
2
3
4AnnotationConfigApplicationContext ctx = new AnnotationConfigApplicationContext();
ctx.getEnvironment().setActiveProfiles("dev");
ctx.register(SomeConfig.class, StandaloneDataConfig.class, JndiDataConfig.class);
ctx.refresh();profiles may also be activated declaratively through the
spring.profiles.activeproperty which may be specified throughsystem environment variables,JVM system properties,servletcontext parameters in web.xml, or even as an entry inJNDI(see Section 7.13.3, “PropertySource abstraction”)In
integration tests, active profiles can be declared via the@ActiveProfilesannotation in the spring-test module (see the section called “Context configuration with environment profiles”).
Note that profiles are not an “either-or” proposition; 注意,profiles 不是 “either-or” 的关系,而是 “And” 的关系,我们可以同时加载几个 Profiles
1 | ctx.getEnvironment().setActiveProfiles("profile1", "profile2"); |
Declaratively, spring.profiles.active may accept a comma-separated list of profile names:
1 | -Dspring.profiles.active="profile1,profile2" |
Default profile
1 |
|
If no profile is active, the dataSource above will be created
If any profile is enabled, the default profile will not apply.
【7.13.3】PropertySource abstraction
Spring’s Environment abstraction provides search operations over a configurable hierarchy of property sources. To explain fully, consider the following:
1 | ApplicationContext ctx = new GenericApplicationContext(); |
asking Spring whether the
fooproperty is defined for the current environment. To answer this question, theEnvironmentobject performs a search over a set ofPropertySourceobjects.
Environment将会从一系列的PropertySource对象中去查找。
A
PropertySourceis a simple abstraction over any source of key-value pairs, and Spring’sStandardEnvironmentis configured with twoPropertySourceobjects — one representing the set of JVM system properties (a laSystem.getProperties()) and one representing the set of system environment variables (a laSystem.getenv()).
a PropertySource 是一个简单的键值对,StandardEnvironment 包含两个 PropertySource 对象… 类似的有,
StandardServletEnvironment is populated with additional default property sources including servlet config and servlet context parameters.
StandardPortletEnvironment similarly has access to portlet config and portlet context parameters as property sources
Both can optionally enable a JndiPropertySource.
Concretely, when using the
StandardEnvironment, the call toenv.containsProperty("foo")will return true if afoosystem propertyorfoo environment variableis present at runtime.
Most importantly, the entire mechanism is
configurable. Perhaps you have acustomsource of properties that you’d like to integrate into this search,没问题,你可以将你自己的PropertySourceset into the currentEnvironment:
1 | ConfigurableApplicationContext ctx = new GenericApplicationContext(); |
【7.13.4】@PropertySource
The
@PropertySourceannotation provides a convenient and declarative mechanism for adding aPropertySourceto Spring’sEnvironment.
Given a file “app.properties” containing the key/value pair
testbean.name=myTestBean, the following@Configurationclass uses@PropertySourcein such a way that a call totestBean.getName()will return “myTestBean”.
1 |
|
【7.14】Registering a LoadTimeWeaver
The
LoadTimeWeaveris used by Spring to dynamically transform classes as they are loaded into the Java virtual machine (JVM).
To enable load-time weaving add the
@EnableLoadTimeWeavingto one of your@Configurationclasses:
1 |
|
Alternatively for XML configuration use the
context:load-time-weaverelement:
1 | <beans> |
This is particularly useful in combination with Spring’s JPA support where load-time weaving may be necessary for
JPAclass transformation. Consult the LocalContainerEntityManagerFactoryBean javadocs for more detail. For more on AspectJ load-time weaving, see Section 11.8.4, “Load-time weaving with AspectJ in the Spring Framework”.
【7.15】Additional Capabilities of the ApplicationContext
the
org.springframework.beans.factorypackage provides basic functionality for managing and manipulating beans, including in a programmatic way. Theorg.springframework.contextpackage adds theApplicationContextinterface, which extends theBeanFactoryinterface, in addition to extending other interfaces to provide additional functionality in a more a_pplication framework-oriented style_
Many people use the
ApplicationContextin a completely declarative fashion, not even creating it programmatically, but instead relying on support classes such asContextLoaderto automatically instantiate anApplicationContextas part of the normal startup process of a Java EE web application.
【7.15.1】Internationalization using MessageSource
The
ApplicationContextinterface extends an interface calledMessageSource, and therefore providesinternationalization(i18n) functionality. Spring also provides the interfaceHierarchicalMessageSource, which can resolve messages hierarchically.
String getMessage(String code, Object[] args, String default, Locale loc): The basic method used to retrieve a message from theMessageSource. When no message is found for the specified locale, the default message is used. Any arguments passed in become replacement values, using theMessageFormatfunctionality provided by the standard library.String getMessage(String code, Object[] args, Locale loc): Essentially the same as the previous method, but with one difference: no default message can be specified; if the message cannot be found, a NoSuchMessageException is thrown.String getMessage(MessageSourceResolvable resolvable, Locale locale):
如何寻找 MessageSource
When an
ApplicationContextis loaded, it automatically searches for aMessageSourcebean defined in the context. The bean must have the namemessageSource. If such a bean is found, all calls to the preceding methods are delegated to the message source. If _no_ message source is found, theApplicationContextattempts to find a parent containing a bean with the same name. If it does, it uses that bean as the MessageSource. If the ApplicationContext cannot find any source for messages, an empty DelegatingMessageSource is instantiated in order to be able to accept calls to the methods defined above.
ResourceBundleMessageSource and StaticMessageSource
Spring provides two MessageSource implementations,
ResourceBundleMessageSourceandStaticMessageSource. Both implementHierarchicalMessageSourcein order to do nested messaging. TheStaticMessageSourceis rarely used but provides programmatic ways to add messages to the source. TheResourceBundleMessageSourceis shown in the following example,
1 | <beans> |
In the example it is assumed you have three resource bundles defined in your classpath called format, exceptions and windows,
1 | # in format.properties |
1 | # in exceptions.properties |
1 | public static void main(String[] args) { |
The resulting output from the above program will be…
1 | Alligators rock! |
So to summarize, the
MessageSourceis defined in a file called beans.xml, which exists at the root of your classpath. ThemessageSourcebean definition refers to a number of resource bundles through itsbasenamesproperty. The three files that are passed in the list to thebasenamesproperty exist as files at the root of your classpath and are calledformat.properties,exceptions.properties, andwindows.propertiesrespectively.
The next example shows arguments passed to the message lookup; these arguments will be converted into Strings and inserted into placeholders in the lookup message.
1 | <beans> |
1 | public class Example { |
With regard to internationalization (i18n), Spring’s various
MessageSourceimplementations follow the same locale resolution and fallback rules as the standard JDKResourceBundle. In short, and continuing with the example messageSource defined previously, if you want to resolve messages against the British (en-GB) locale, you would create files calledformat_en_GB.properties,exceptions_en_GB.properties, andwindows_en_GB.propertiesrespectively.
1 | # in exceptions_en_GB.properties |
1 | public static void main(final String[] args) { |
You can also use the
MessageSourceAwareinterface to acquire a reference to any MessageSource that has been defined
As an alternative to
ResourceBundleMessageSource, Spring provides aReloadableResourceBundleMessageSourceclass. This variant supports the same bundle file format but is more flexible than the standard JDK based ResourceBundleMessageSource implementation.
【7.15.2】Standard and Custom Events
Event handling in the
ApplicationContextis provided through theApplicationEventclass andApplicationListenerinterface
If a bean that implements theApplicationListenerinterface is deployed into the context, every time anApplicationEventgets published to theApplicationContext, that bean is notified.
Essentially, this is the standard Observer design pattern.
Table 7.7. Built-in Events
ContextRefreshedEvent,ContextStartedEvent,ContextStoppedEvent,ContextClosedEvent,RequestHandledEvent
You can also create and publish your own custom events. This example demonstrates a simple class that extends Spring’s
ApplicationEventbase class:
1 | public class BlackListEvent extends ApplicationEvent { |
To publish a custom ApplicationEvent, call the
publishEvent()method on anApplicationEventPublisher. Typically this is done by creating a class that implementsApplicationEventPublisherAwareand registering it as a Spring bean. The following example demonstrates such a class:
1 | public class EmailService implements ApplicationEventPublisherAware { |
At configuration time, the Spring container will detect that
EmailServiceimplementsApplicationEventPublisherAwareand will automatically callsetApplicationEventPublisher(). In reality, the parameter passed in will be the Spring container itself; you’re simply interacting with the application context via itsApplicationEventPublisherinterface.
上面这个实例的意思是,当我要在发送邮件的时候,需要做一个判断,看当前的邮件地址是不是在黑名单中,如果是在黑名单当中,则通过ApplicationEventPublisherAware发送事件,然后由后面的BlackListNotifier捕获该事件并进行处理。
To receive the custom
ApplicationEvent, create a class that implementsApplicationListenerand register it as a Spring bean. The following example demonstrates such a class:
1 | public class BlackListNotifier implements ApplicationListener<BlackListEvent> { |
You may register as many event listeners as you wish, but note that by default event listeners receive events synchronously,This means the · method blocks until all listeners have finished processing the event.
One advantage of this synchronous and single-threaded approach is that when a listener receives an event, it operates inside the
transaction contextof thepublisherif a transaction context is available.
为什么处理事件要设置为同步模式,好处是,处理事件的 handler 可以与 publisher 在同一个事务当中,一旦 handler 失败,那么可以回滚,保证事件是可以重新发送的。
If another strategy for event publication becomes necessary, refer to the JavaDoc for Spring’s
ApplicationEventMulticasterinterface.
ApplicationEventMulticaster可以同时发送多个事件
1 | <bean id="emailService" class="example.EmailService"> |
Putting it all together, when the
sendEmail()method of theemailServicebean is called, if there are any emails that should be blacklisted, a custom event of typeBlackListEventis published. TheblackListNotifierbean is registered as anApplicationListenerand thus receives theBlackListEvent, at which point it can notify appropriate parties.
Annotation-based Event Listeners
As of Spring 4.2, an event listener can be registered on any public method of a managed bean via the
EventListenerannotation. TheBlackListNotifiercan be rewritten as follows:
1 | public class BlackListNotifier { |
If your method should listen to several events or if you want to define it with no parameter at all, the event type(s) can also be specified on the annotation itself: 下面这个例子就是当 Spring 启动或者重启的时候触发
1 | ({ContextStartedEvent.class, ContextRefreshedEvent.class}) |
It is also possible to add additional runtime filtering via the
conditionattribute of the annotation that defines aSpELexpression that should match to actually invoke the method for a particular event.
1 | (condition = "#blEvent.test == 'foo'") |
If you need to publish an event as the result of processing another, just change the method signature to return the event that should be published, something like:
1 |
|
This feature is not supported for
asynchronous listeners.
Asynchronous Listeners
If you want a particular listener to process events
asynchronously, simply reuse the regular@Asyncsupport:
1 |
|
Be aware of the following limitations when using asynchronous events:
- If the event listener throws an
Exceptionit will not be propagated to the caller, check AsyncUncaughtExceptionHandler for more details.- Such event listener cannot send replies. If you need to send another event as the result of the processing, inject
ApplicationEventPublisherto send the event manually.
最重要的限制应该是第一点,就是异常不能再外部被捕获,也就意味着,事件不能回滚重发。
Ordering Listeners
If you need the listener to be invoked before another one, just add the
@Orderannotation to the method declaration:
1 |
|
Generic Events
You can create the following listener definition to only receive
EntityCreatedEventfor aPerson:
1 |
|
Due to type erasure, this will only work if the event that is fired resolves the generic parameter(s) on which the event listener filters on (that is something like class
PersonCreatedEvent extends EntityCreatedEvent<Person> { … }).
In certain circumstances, this may become quite tedious if all events follow the same structure (as it should be the case for the event above). In such a case, you can implement
ResolvableTypeProviderto guide the framework beyond what the runtime environment provides:
1 | public class EntityCreatedEvent<T> |
####【7.15.3】Convenient access to low-level resources
####【7.15.4】Convenient ApplicationContext instantiation for web applications
You can create
ApplicationContextinstances declaratively by using, for example, a ContextLoader. Of course you can also createApplicationContextinstances programmatically by using one of theApplicationContextimplementations.
You can register an
ApplicationContextusing theContextLoaderListeneras follows:
1 | <context-param> |
The listener inspects the contextConfigLocation parameter. If the parameter does not exist, the listener uses
/WEB-INF/applicationContext.xmlas a default.
【7.15.5】 Deploying a Spring ApplicationContext as a Java EE RAR file
It is possible to deploy a Spring ApplicationContext as a
RARfile, encapsulating the context and all of its required bean classes and library JARs in a Java EE RAR deployment unit.
【7.16】The BeanFactory
The
BeanFactoryprovides the underlying basis for Spring’s IoC functionality but it is only used directly in integration with other third-party frameworks and is now largely historical in nature for most users of Spring. TheBeanFactoryand related interfaces, such asBeanFactoryAware,InitializingBean,DisposableBean, are still present in Spring for the purposes of backward compatibility with the large number of third-party frameworks that integrate with Spring. Often third-party components that can not use more modern equivalents such as@PostConstructor@PreDestroyin order to remain compatible with JDK 1.4 or to avoid a dependency on JSR-250.
由于历史的原因BeanFactory同时为 Spring IoC 提供了一些只能被第三方框架所调用的底层基础功能;BeanFactory以及相关接口,比如BeanFactoryAware,InitializaingBean,DisposableBean依然存在于 Spring 中,目的就是为了兼容大量的第三方框架,这些框架大多数不能使用更为先进的@PostConstruct或者@PreDestroy是因为为了兼容 JDK1.4。
This section provides additional background into the differences between the
BeanFactoryandApplicationContextand how one might access the IoC container directly through a classic singleton lookup.
7.16.1 BeanFactory or ApplicationContext?
Use an
ApplicationContextunless you have a good reason for not doing so.
Because the
ApplicationContextincludes all functionality of theBeanFactory, it is generally recommended over the BeanFactory, except for a few situations such as inembeddedapplications running onresource-constraineddevices where memory consumption might be critical and a few extra kilobytes might make a difference.
ApplicationContext包含了BeanFactory的所有功能,通常建议直接使用ApplicationContext,除非在一些极端的情况,比如资源有限的嵌入式系统等等
Spring makes heavy use of the
BeanPostProcessorextension point (to effect proxying and so on)
Spring 为了使得代理生效等等功能而大量的使用了BeanPostProcessor的扩展点(extension point)特性。
If you use only a plain
BeanFactory, a fair amount of support such astransactionsandAOPwill not take effect, at least not without some extra steps on your part.
如果你只是用原始的BeanFactory,那么一些特性诸如transactions和AOP就不能生效了。
The following table lists features provided by the
BeanFactoryandApplicationContextinterfaces and implementations.
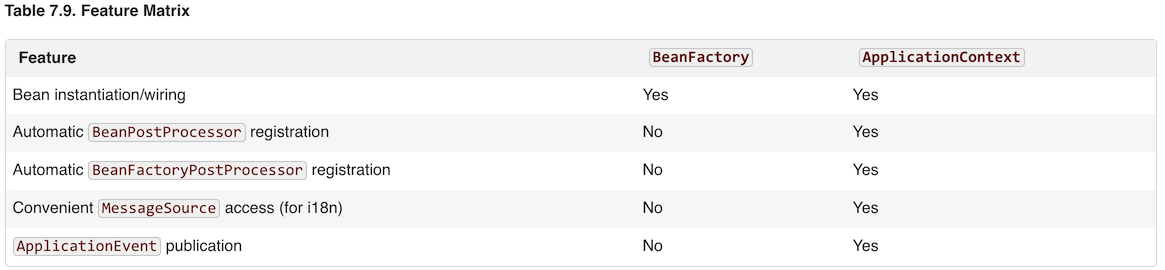
To explicitly register a bean post-processor with a
BeanFactoryimplementation, you need to write code like this:
1 | DefaultListableBeanFactory factory = new DefaultListableBeanFactory(); |
To explicitly register a BeanFactoryPostProcessor when using a BeanFactory implementation, you must write code like this:
1 | DefaultListableBeanFactory factory = new DefaultListableBeanFactory(); |
【7.16.2】 Glue code and the evil singleton
这个小节介绍了如果是第三方框架通过自己的 DI 实例化一个单例带来的问题,没有深入去读..