References
前言
原本以为,Spring 通过解析 bean 的配置,生成并注册 bean defintions 的过程不太复杂,比较简单,不用单独开辟一篇博文来讲述;但是当在分析前面两个章节有关 @Autowired、@Component、@Service 注解的注入机制的时候,发现,如果没有对有关 bean defintions 的解析和注册机制彻底弄明白,则很难弄清楚 annotation 在 Spring 容器中的底层运行机制;所以,本篇博文作者将试图去弄清楚 Spring 容器内部是如何去解析 bean 配置并生成和注册 bean definitions 的相关主流程;
备注,本文是作者的原创作品,转载请注明出处。
bean definition 是什么?
➥ bean definitions 是什么?
其实很简单,就是 Java 中的 POJO,用来描述 bean 配置中的 element 元素的,比如,我们有如下的一个简单的配置
beans.xml1
2
3
4
5
6
7
8
9
10
11
12
13
14
15
16<beans xmlns="http://www.springframework.org/schema/beans"
xmlns:xsi="http://www.w3.org/2001/XMLSchema-instance"
xmlns:p="http://www.springframework.org/schema/p"
xmlns:context="http://www.springframework.org/schema/context"
xsi:schemaLocation="http://www.springframework.org/schema/beans
http://www.springframework.org/schema/beans/spring-beans.xsd
http://www.springframework.org/schema/context
http://www.springframework.org/schema/context/spring-context.xsd">
<context:component-scan base-package="org.shangyang" />
<bean name="jane" class="org.shangyang.spring.container.Person">
<property name="name" value="Jane Doe"/>
</bean>
</beans>
可以看到,上面有三个 element
- <beans/>, root element
- <context:component/>, component-scan element
- <bean/>, bean element
在配置文件 beans.xml 被 Spring 解析的过程中,每一个 element 将会被解析为一个 bean definition 对象缓存在 Spring 容器中;
➥ 需要被描述为 bean definitions 的配置对象主要分为如下几大类,
- xml-based,解析 xml beans 的情况;
- 使用 @Autowired、@Required 注解注入 beans 的解析情况;
需要特殊处理并解析的元素 <context:annotation-config/> - 使用 @Component、@Service、@Repository,@Beans 注解注入 beans 的解析情况;
需要特殊处理并解析的元素 <context:annotation-scan/>
➥ 最开始我的确是这么认识 bean definitions 的,但是当我分析完有关 bean definitions 的相关逻辑和源码以后,对其认识有了升华,参考写在最后;
源码分析
最好的分析源码的方式,就是通过高屋建瓴,逐个击破的方式;首先通过流程图获得它的蓝图(顶层设计图),然后再根据蓝图上的点逐个击破;最后才能达到融会贯通,胸有成竹的境界;所以,这里作者用这样的方式带你深入剖析 Spring 容器里面的核心点,以及相关主流程到底是如何运作的。
测试用例
为了一次性把上述源码分析所描述有的情况阐述清楚,我们继续使用 Spring Core Container 源码分析六:@Service 中使用的测试用例;唯一做的修改是,再使用一个特殊的 element xmlns:p 来配置 john,这样可以进一步去调试自定义 Spring 配置标签是如何实现的;
beans.xml1
2
3
4
5
6
7
8
9
10
11
12
13
14
15
16
17
18
19
20
21
22
23
24
25<beans xmlns="http://www.springframework.org/schema/beans"
xmlns:xsi="http://www.w3.org/2001/XMLSchema-instance"
xmlns:p="http://www.springframework.org/schema/p"
xmlns:context="http://www.springframework.org/schema/context"
xsi:schemaLocation="http://www.springframework.org/schema/beans
http://www.springframework.org/schema/beans/spring-beans.xsd
http://www.springframework.org/schema/context
http://www.springframework.org/schema/context/spring-context.xsd">
<context:component-scan base-package="org.shangyang" />
<bean name="john"
class="org.shangyang.spring.container.Person"
p:name="John Doe"
p:spouse-ref="jane"/>
<bean name="jane" class="org.shangyang.spring.container.Person">
<property name="name" value="Jane Doe"/>
</bean>
<bean name="niba" class="org.shangyang.spring.container.Dog">
<property name="name" value="Niba" />
</bean>
</beans>
流程分析
整个流程是从解析 bean definitions 流程开始的,对应的入口是主流程的 step 1.1.1.2 obtainFreshBeanFactory;
入口流程
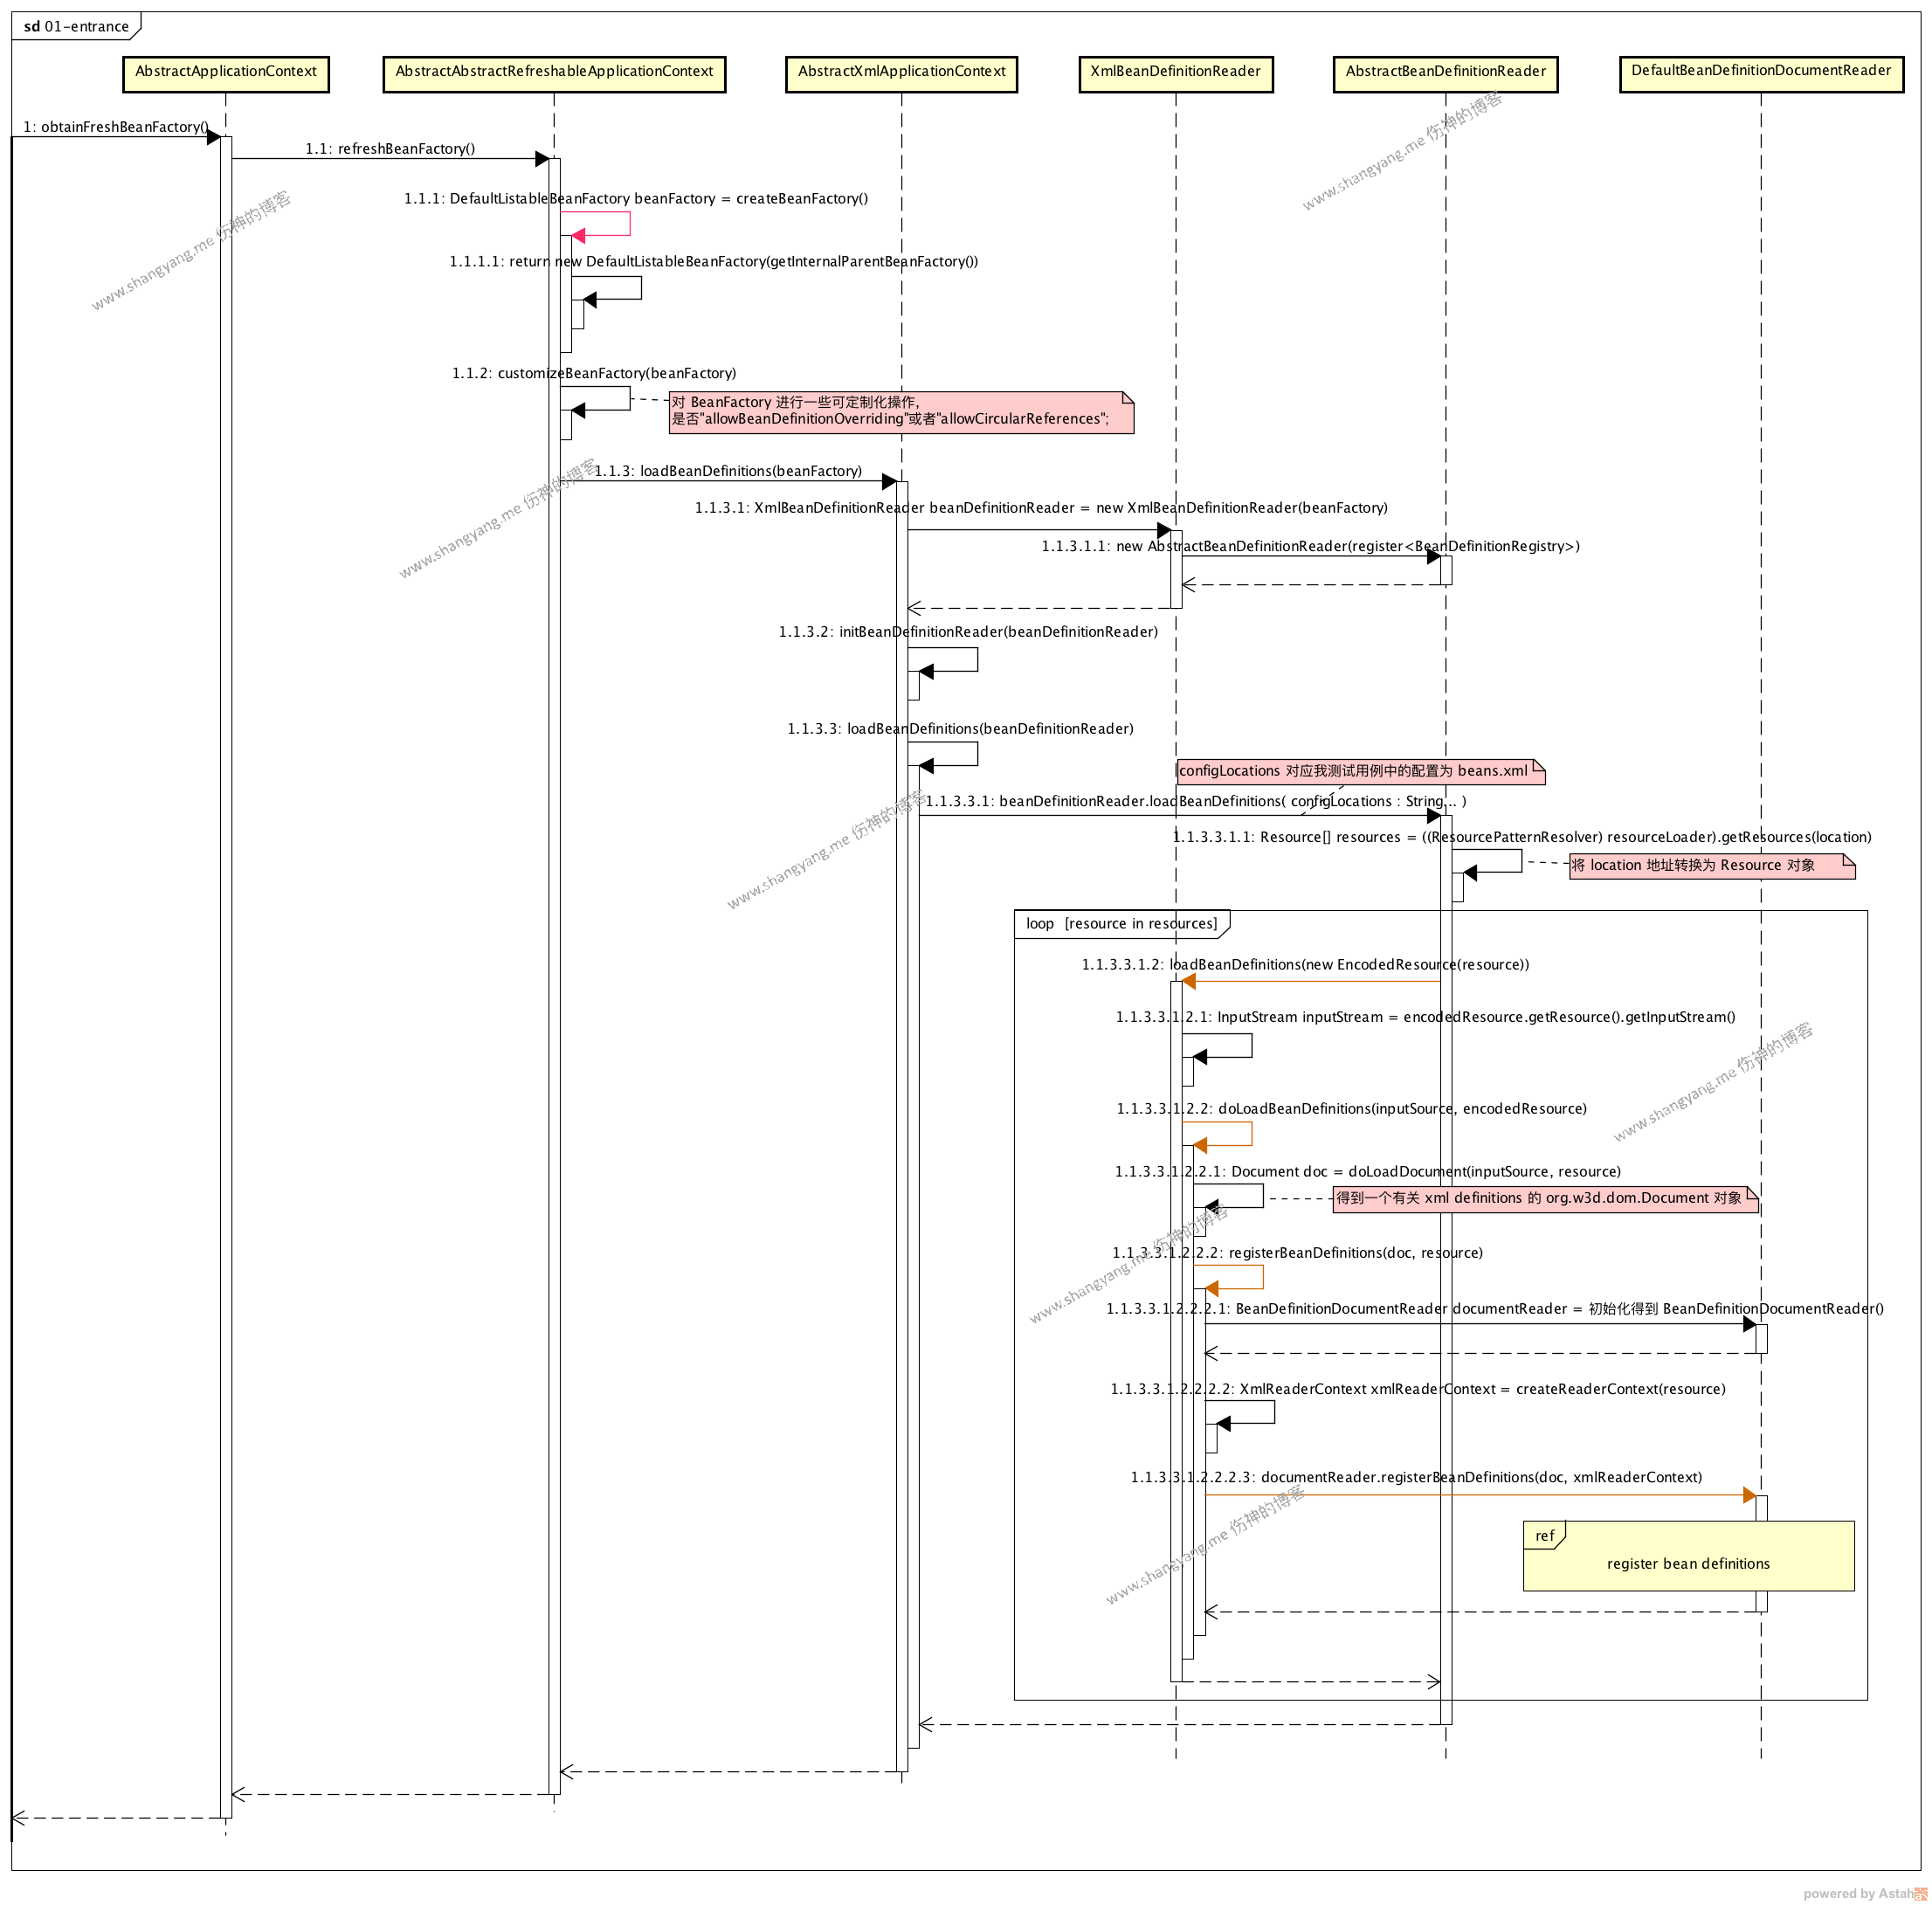
首选初始化得到 BeanFactory 实例 DefaultListableBeanFactory,用来注册解析配置后生成的 bean definitions;
然后通过 XmlBeanDefinitionReader 解析 Spring XML 配置文件
根据用户指定的 XML 文件路径 location,进行解析并且得到 Resource[] 对象,具体参考 step 1.1.3.3.1.1 getResource(location) 步骤;这里,对其如何通过 location 得到 Resource[] 对象做进一步分析,看源码,PathMatchingResourcePatternResolver.java
1
2
3
4
5
6
7
8
9
10
11
12
13
14
15
16
17
18
19
20
21
22
23
24
25
26
27public Resource[] getResources(String locationPattern) throws IOException {
Assert.notNull(locationPattern, "Location pattern must not be null");
if (locationPattern.startsWith(CLASSPATH_ALL_URL_PREFIX)) {
// a class path resource (multiple resources for same name possible)
if (getPathMatcher().isPattern(locationPattern.substring(CLASSPATH_ALL_URL_PREFIX.length()))) {
// a class path resource pattern
return findPathMatchingResources(locationPattern);
}
else {
// all class path resources with the given name
return findAllClassPathResources(locationPattern.substring(CLASSPATH_ALL_URL_PREFIX.length()));
}
}
else {
// Only look for a pattern after a prefix here
// (to not get fooled by a pattern symbol in a strange prefix).
int prefixEnd = locationPattern.indexOf(":") + 1;
if (getPathMatcher().isPattern(locationPattern.substring(prefixEnd))) {
// a file pattern
return findPathMatchingResources(locationPattern);
}
else {
// a single resource with the given name
return new Resource[] {getResourceLoader().getResource(locationPattern)};
}
}
}这里的解析过程主要分为两种情况进行解析,一种是前缀是 classpath: 的情况,一种是普通的情况,正如我们当前所使用的测试用例的情况,既是 new ClassPathXmlApplicationContext(“beans.xml”) 的情况,这里不打算在这里继续深挖;
以测试用例 beans.xml 为例,从 #2 解析得到的 Resource 实例 resource 对应的是 beans.xml 的配置信息,从 step 1.1.3.3.1.2 loadBeanDefinitions 开始将会对 resource 既是 beans.xml 中的元素依次进行解析;首先生成对应 beans.xml 的 org.w3c.Document 对象实例 document,见 step 1.1.3.3.1.2.2.1,其次得到解析 document 对象的 BeanDefinitionDocumentReader 实例 documentReader,将当前的 Resource 对象封装为 XmlReaderContext 实例 xmlReaderContext,最后通过 documentReader 开始正式解析 document 对象得到 bean definitions 并将其注册到当前的 beanFactory 实例中,该步骤见 step 1.1.3.3.1.2.2.2.3
当完成上述三个步骤以后,将进入 register bean definitions process 流程
register bean definitions process
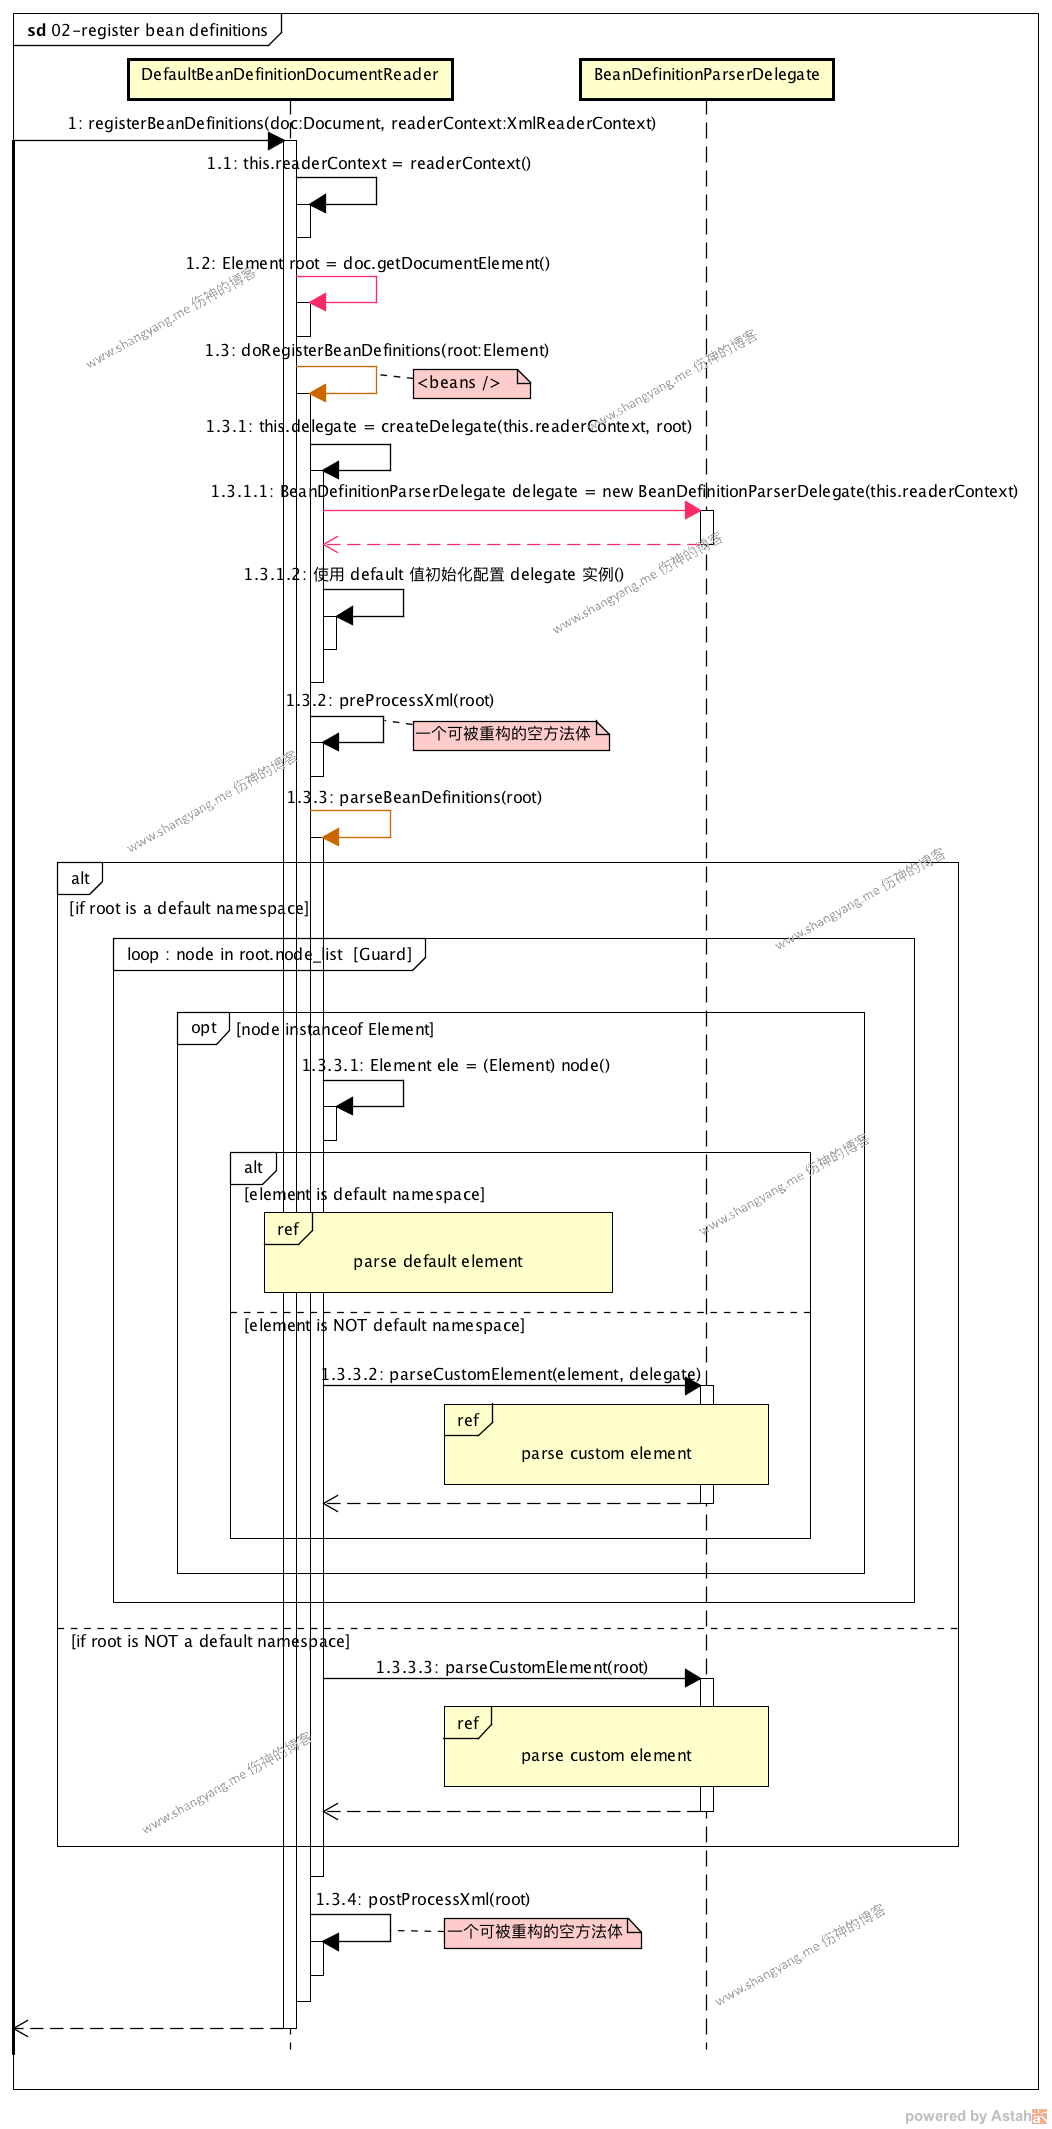
➥ 首先,重要的两件事情是,
从 document 对象中获得了 Root 实例 root,见 step 1.2
看一个 root 元素,长什么样的1
2
3
4
5
6
7
8
9<beans xmlns="http://www.springframework.org/schema/beans"
xmlns:xsi="http://www.w3.org/2001/XMLSchema-instance"
xmlns:p="http://www.springframework.org/schema/p"
xmlns:context="http://www.springframework.org/schema/context"
xsi:schemaLocation="http://www.springframework.org/schema/beans
http://www.springframework.org/schema/beans/spring-beans.xsd
http://www.springframework.org/schema/context
http://www.springframework.org/schema/context/spring-context.xsd">
</beans>就是一个 xml 配置文件中的最顶层元素 <beans/>
- 然后初始化得到 documentReader 实例的解析对象既 this.delegate<BeanDefinitionParserDelegate>,后面针对 element 元素的解析将会使用到它;
➥ 后续,当前面的工作准备好了以后,来看看是如何解析 element 的?
首先,判断 root 元素的 namespace 对应的是不是 default namespace,若不是,将进入 step 1.3.3.3: parse custom element;这里我们关注常规流程,既是当 root 元素的 namespace 是 default namespace 的流程;
遍历 root 元素下的所有 element,
- 若 element 的 namespace 是 default namespace,将进入 parse default element 流程;
比如当前 element 是普通的 <bean/> - 若 element 的 namespace 不是 default namespace,将进入 parse custom element 流程;
比如当前 element 是 <context:annotation-config/> 或者是 <context:component-scan/>
parse default element process
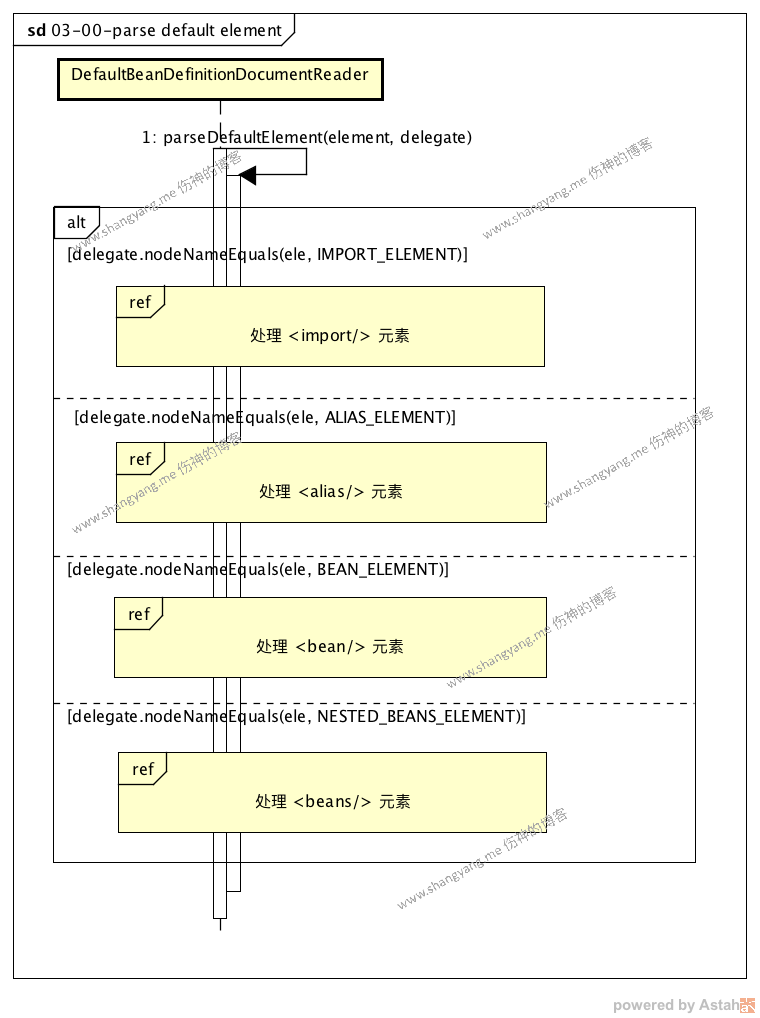
可以看到,该流程中包含四个子流程,依次处理不同的 element 元素的情况,其它三种都是比较特殊的情况,我们这里,主要关注“解析 <bean/>” 元素的流程”
解析 bean element 流程
这里,为了能够尽量的展示出解析 <bean/> 元素的流程中的逻辑,我将使用一个比较特殊的 <bean/> 来梳理此部分的流程;1
2
3
4<bean name="john"
class="com.example.Person"
p:name="John Doe"
p:spouse-ref="jane"/>
该 <bean/> 元素使用了 namespace xmlns:p=”http://www.springframework.org/schema/p"
➥ 首先,通过 BeanDefintionParserDelegate 对象解析该 element,得到一个 BeanDefinitionHolder 对象 bdHolder 实例;该解析过程中会依次去解析 bean id, bean name, 以及相关的 scope, init, autowired model 等等属性;见 step 1.1
➥ 其次,对 bean definition 进行相关的修饰操作,见 step 1.2
常规步骤
- 遍历当前 element 中的所有 attributes,依次得到 atttribute node
- 取得 node 所对应的 namespace URI,并判断该 namespace 是否是 custom namespace,如果是 custom namespace,那么正式进入对该 attribute node 的修饰过程,如下所述;
attribute node 的修饰过程
假设,我们当前的 attribute node 为 p:spouse-ref=”jane”,看看该属性是如何被解析的,
首先,通过 node namespace 得到对应的 NamespaceHandler 实例 handler
通过 xmlns:p=”http://www.springframework.org/schema/p" 得到的 NamespaceHandler 为 SimplePropertyNamespaceHandler 对象;其次,调用 SimplePropertyNamespaceHandler 对象对当前的元素进行解析;
可以看到,前面的解析并没有什么特殊的,从元素 p:spouse-ref=”jane” 中解析得到 propery name: spouse-ref,property value: jane;但是后续解析,比较特殊,需要处理 REF_SUFFIX 的情况了,也就是当 property name 的后缀为 -ref 的情况,表示该 attribute 是一个 ref-bean 属性,其属性值引用的是其它的 bean 实例,所以呢,这里将其 property value 封装为了一个RuntimeBeanReference对象实例,表示将来在解析该 property value 为 Java Object 的时候,需要去初始化其引用的 bean 实例 jane,然后注入到当前的 property value 中;最后,将解析后得到的 bean definition 封装在 bean definition holder 对象中进行返回;
➥ 最后,注册 bean definition;
见 step 1.3.2 register.registerBeanDefinition(beanName, beanDefinition),register 就是当前的 bean factory 实例,通过将 bean name 和 bean definition 以键值对的方式在当前的 bean factory 中进行注册;这样,我们就可以通过 bean 的名字,得到其对应的 bean definition 对象了;
➥ 写在该小节最后,
我们也可以自定义某个 element 或者 element attribute,并且定义与之相关的 namespace 和 namespace handler,这样,就可以使得 Spring 容器解析自定义的元素;类似于 dubbo 配置中所使用的 <dubbo /> 自定义元素那样;
parse custom element process
此步骤对应 register bean definitions process 步骤中的 step 1.3.3.2
该小节我将试图使用一个常用的 custom element: <context:component-scan/> 来梳理整个流程;
- 首先得到与 <context:component-scan /> 元素相关的 namespace uri: http://www.springframework.org/schema/context,见 step 1.1
- 通过 #1 得到的 namespace uri 解析得到相应的 NamespaceHandler,这里得到的是 ContextNamespaceHandler;见 step 1.2
从 step 1.2.1 getHandlerMappings() 返回了所有内置的 namespace uri 与 namespace handler 所一一对应的键值对; - 使用 #2 返回的 NamespaceHandler 既 ContextNamespaceHandler 进行 parse 操作,见 step 1.3,参考子流程 parse element by ContextNamespaceHandler,注意,之所以这里单独使用一个子流程来介绍,是因为使用 ContextNamespaceHandler 来解析只是其中的一种解析情况,将来考虑分析更多的子流程情况;
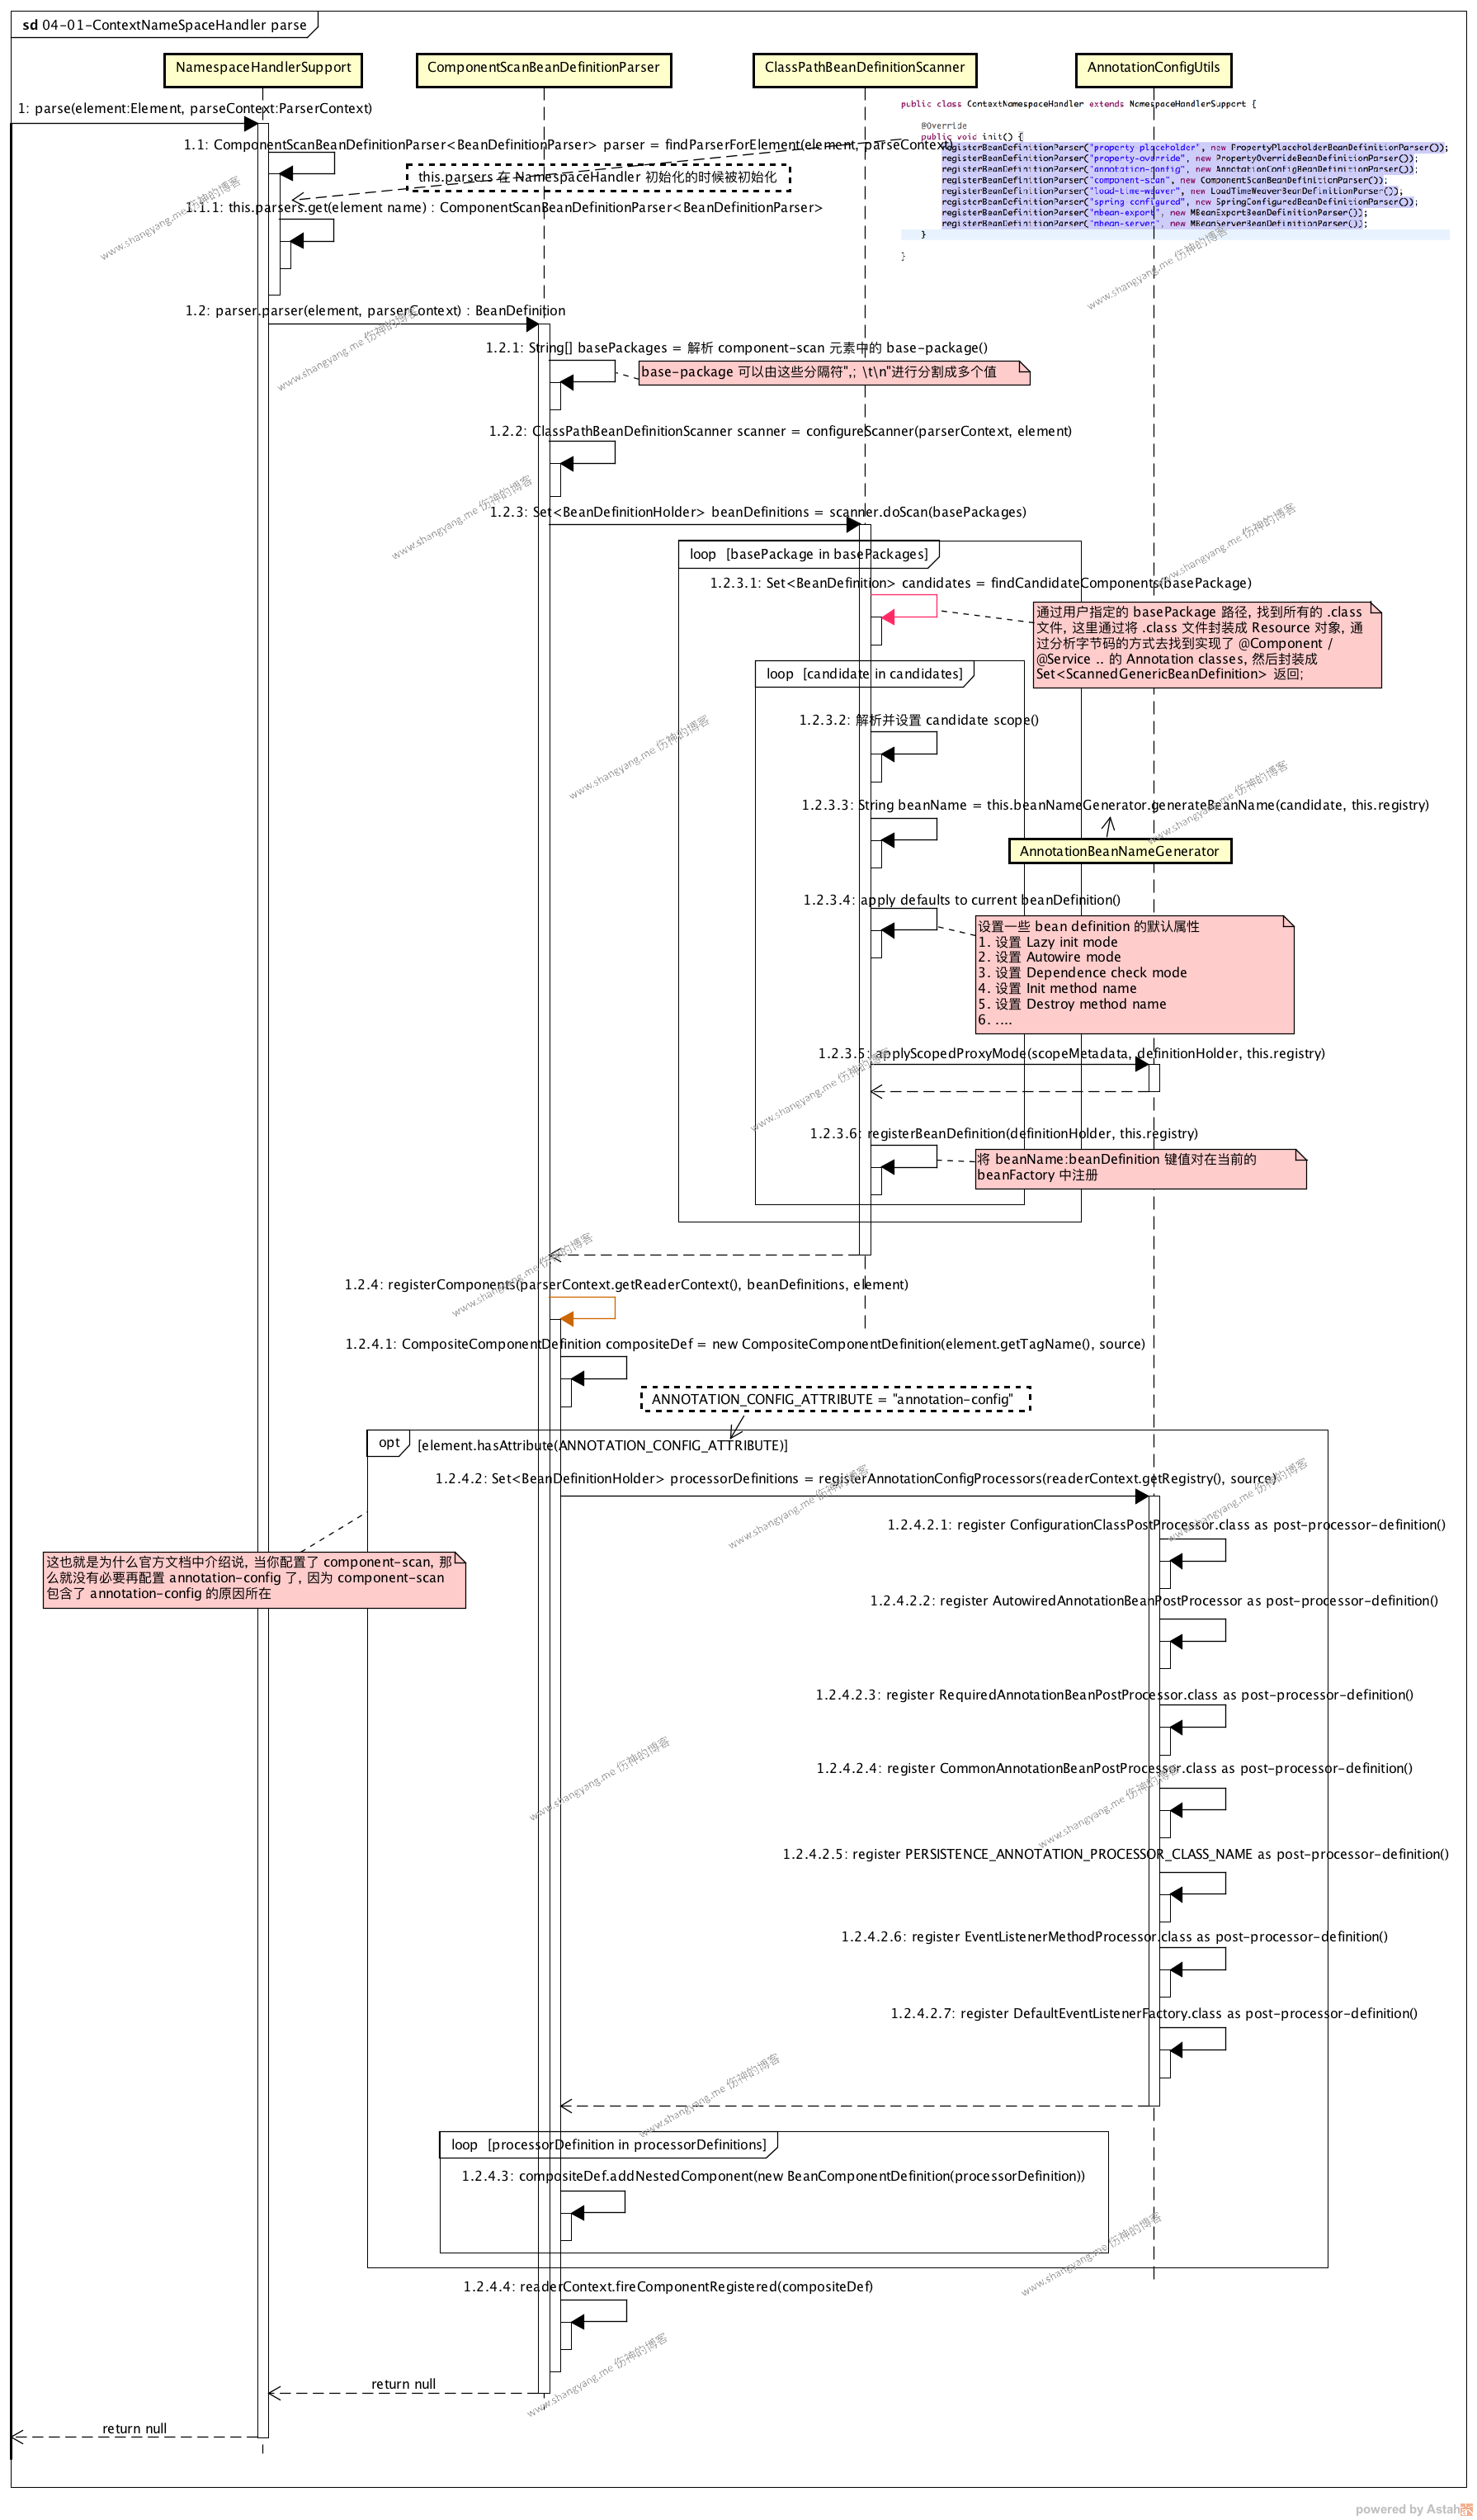
parse element by ContextNamespaceHandler
继续 parse custom element process 章节中所使用到的例子,<context:component-scan/> 来分析该流程,
➥ 在开始分析之前,看看 component-scan 元素长什么样,
注意,component-scan element 本身包含 annotation-config attribute;
➥ 流程分析
首先,根据 element name: component-scan 找到对应的 BeanDefinitionParser,在 ContextNamespaceHandler 初始化的时候,便初始化设置好 8 对内置的 element name 与 parsers 的键值对;这里,根据名字 component-scan 找到对应的 parser ComponentScanBeanDefinitionParser 对象;
其次,使用 ComponentScanBeanDefinitionParser 对象开始解析工作,
首先,解析 <context:component-scan base-package=”org.shangyang”/> 得到 basePcakges String[] 对象;
其次,初始化得到 ClassPathBeanDefinitiionScanner 对象实例 scanner,然后调用 scanner.doScan 方法进入 do scan 流程,该流程中将会遍历 base package 中所包含的所有 .class 文件,解析之,并生成相应的 bean definitions;另外在这个流程中,还要注意的是,最后会将 bean definitions 在当前的 bean factory 对象中进行注册;
最后,这一步是从 step 1.2.4 开始,主要处理的逻辑为,当 element 含有 annotation-config 属性的时候,将会注册一系列的 post-processors-bean-definitions;
do scan 流程
这里主要介绍上一个小节中 #2 步骤中所提到的 do scan 流程步骤,对应 parse element by ContextNamespaceHandler 流程图中的 step 1.2.3 scanner.doScan;
➥ 先来看看 step 1.2.3.1 findCandidateComponent(basePackage)
ClassPathScanningCandidateComponentProvider.java (已删除大量不相干代码)1
2
3
4
5
6
7
8
9
10
11
12
13
14
15
16
17
18
19
20
21
22
23
24
25
26
27
28
29
30
31
32
33
34
35
36
37
38
39
40
41
42
43public Set<BeanDefinition> findCandidateComponents(String basePackage) {
Set<BeanDefinition> candidates = new LinkedHashSet<BeanDefinition>();
try {
String packageSearchPath = ResourcePatternResolver.CLASSPATH_ALL_URL_PREFIX +
resolveBasePackage(basePackage) + '/' + this.resourcePattern;
//1. 从当前用户自定的 classpath 子路径中,通过 regex 查询到所有的所匹配的 resources;要特别注意的是,
// 这里为什么不直接通过 Class Loader 去获取 classes 来进行判断? 因为这样的话就相当于是加载了 Class Type,而 Class Type 的加载过程是通过 Spring 容器严格控制的,是不允许随随便便加载的
// 所以,取而代之,使用一个 File Resource 去读取相关的字节码,从字节码中去解析........
Resource[] resources = this.resourcePatternResolver.getResources(packageSearchPath);
boolean traceEnabled = logger.isTraceEnabled();
boolean debugEnabled = logger.isDebugEnabled();
//2. 依次遍历用户定义的 bean Class 对象
for (Resource resource : resources) {
if (traceEnabled) {
logger.trace("Scanning " + resource);
}
if (resource.isReadable()) {
try {
// 将从字节码中获取到的相关 annotation(@Service) 以及 FileSystemResource 对象保存在 metadataReader 当中;
MetadataReader metadataReader = this.metadataReaderFactory.getMetadataReader(resource);
if (isCandidateComponent(metadataReader)) {
ScannedGenericBeanDefinition sbd = new ScannedGenericBeanDefinition(metadataReader);
sbd.setResource(resource);
sbd.setSource(resource);
if (isCandidateComponent(sbd)) {
candidates.add(sbd);
}
...
}
...
}
...
}
}
}
catch (IOException ex) {
throw new BeanDefinitionStoreException("I/O failure during classpath scanning", ex);
}
return candidates;
}
代码第 10 行
1
Resource[] resources = this.resourcePatternResolver.getResources(packageSearchPath);
这一步通过递归搜索 base package 目录下的所有 .class 文件,并将其字节码封装成 Resource[] 对象;上面的注释解释得非常清楚了,这里封装的是 .class 文件的字节码,而非 class type;除了注解中所描述的,这里再引申说明下,这里为什么不直接加载其 Class Type 还有一个原因就是当 Spring 在加载 Class Type 的时候,很有可能在该 Class Type 上配置了 AOP,通过 ASM 字节码技术去修改原有的字节码以后,再加入 Class Loader 中;所以,之类不能直接去解析 Class Type,而只能通过字节码的方式去解析;
这一步同样
告诫我们,在使用 Spring 容器来开发应用的时候,开发者不要随随便便的自行加载 Class Type 到容器中,因为有可能在加载 Class Type 之前需要通过 Spring 容器的 ASM AOP 进行字节码的修改以后再加载;代码第 23 行
1
MetadataReader metadataReader = this.metadataReaderFactory.getMetadataReader(resource);
解析当前的 .class 字节码,解析出对应的 annotation,比如 @Service,并将其协同 FileSystemResource 对象一同保存到 metadataReader 对象中;
代码第 24 行
1
2
3
4
5
6
7
8
9
10
11
12
13protected boolean isCandidateComponent(MetadataReader metadataReader) throws IOException {
for (TypeFilter tf : this.excludeFilters) {
if (tf.match(metadataReader, this.metadataReaderFactory)) {
return false;
}
}
for (TypeFilter tf : this.includeFilters) { // includedFilters 包含三类 annotation,1. @Component 2. @ManagedBean 3. @Named
if (tf.match(metadataReader, this.metadataReaderFactory)) {
return isConditionMatch(metadataReader);
}
}
return false;
}既是从当前的 metadataReader 中去判断是否存在 1. @Component 2. @ManagedBean 3. @Named 三种注解中的一种,如果是,则进入下面的流程
代码 25 - 29 行,将符合 #3 标准的 annotation 封装为 ScannedGenericBeanDefinition annotation-bean-definition,并加入 candidates 返回
1
2
3
4
5
6
7
8
9if (isCandidateComponent(metadataReader)) {
ScannedGenericBeanDefinition sbd = new ScannedGenericBeanDefinition(metadataReader);
sbd.setResource(resource);
sbd.setSource(resource);
if (isCandidateComponent(sbd)) {
candidates.add(sbd);
}
...
}
➥ 依次处理并注册返回的 candidates
该步骤从流程图 parse element by ContextNamespaceHandler 中的 step 1.2.3.2 开始,主要做了如下几件事情,
- 设置 candiate (既 annotation bean definition) 的 scope
通过 AnnotationBeanNameGenerator 生成 bean name,因为通过 @Component、@Service 注解的方式注入的 bean 往往没有配置 bean name,所以往往需要通过程序的方式自行生成相应的 bean name,看看内部的源码,如何生成 bean name 的,
1
2
3
4
5
6
7
8
9
10
11
12
13
14
15/**
* 因为通过 @Component、@Serivce 等注解的方式不会像 xml-based 配置那样提供了一个 name 的标签,可以指定 bean name;所以,这里需要去单独为其生成一个;
*/
public String generateBeanName(BeanDefinition definition, BeanDefinitionRegistry registry) {
if (definition instanceof AnnotatedBeanDefinition) {
String beanName = determineBeanNameFromAnnotation((AnnotatedBeanDefinition) definition); // 处理诸如 @Service("dogService") 的情况
if (StringUtils.hasText(beanName)) {
// Explicit bean name found.
return beanName;
}
}
// Fallback: generate a unique default bean name. 里面的实现逻辑就是通过将 Class Name 的首字母大写编程小写,然后返回;
return buildDefaultBeanName(definition, registry);
}通常情况下,是将类名的首字母进行小写并返回;对应 step 1.2.2.3.3
- 设置 annotation bean definition 的默认值,参考 step 1.2.4
- 设置 scoped proxy 到当前的 annotation bean definition
- 最后,将 annotation bean definition 注册到当前的 bean factory
注册 post-processor-bean-definitions
该步骤从流程图 parse element by ContextNamespaceHandler 的 step 1.2.4.2 registerAnnotationConfigProcessors 开始,将会依次注册由如下 post-processor class 对象所对应的 post-processor-bean-definitions,
- ConfigurationClassPostProcessor.class
- AutowiredAnnotationBeanPostProcessor.class
- RequiredAnnotationBeanPostProcessor.class
- CommonAnnotationBeanPostProcessor.class
- 通过 PERSISTENCE_ANNOTATION_PROCESSOR_BEAN_NAME 发射得到的 class
- EventListenerMethodProcessor.class
- DefaultEventListenerFactory.class
注意,这里都是通过 Class 对象注册的,并非注册的实例化对象,下面,我们来简单分析一下注册相关的源码,以注册 AutowiredAnnotationBeanPostProcessor post-processor-bean-definition 为例子,
AnnotationConfigUtils#registerAnnotationConfigProcessors1
2
3
4
5
6if (!registry.containsBeanDefinition(AUTOWIRED_ANNOTATION_PROCESSOR_BEAN_NAME)) {
// 将 AutowiredAnnotationBeanPostProcessor.class 封装为 bean definition
RootBeanDefinition def = new RootBeanDefinition(AutowiredAnnotationBeanPostProcessor.class);
def.setSource(source);
beanDefs.add(registerPostProcessor(registry, def, AUTOWIRED_ANNOTATION_PROCESSOR_BEAN_NAME));
}
上面的步骤将 AutowiredAnnotationBeanPostProcessor.class 封装为 bean definition;
AnnotationConfigUtils.registerPostProcessor1
2
3
4
5
6
7private static BeanDefinitionHolder registerPostProcessor(
BeanDefinitionRegistry registry, RootBeanDefinition definition, String beanName) {
definition.setRole(BeanDefinition.ROLE_INFRASTRUCTURE);
registry.registerBeanDefinition(beanName, definition); // 注册 bean definition
return new BeanDefinitionHolder(definition, beanName);
}
这一步将 AutowiredAnnotationBeanPostProcessor 所对应的 bean definition 注入了当前的 bean factory 当中;
AutowiredAnnotationBeanPostProcessor 提供了 @Autowired 注解注入机制的实现,详情参考 AutowiredAnnotationBeanPostProcessor 章节;
写在最后
通过上述的分析,可以清晰的看到,bean definition 的作用是什么,就是通过 bean definition 中的描述去限定通过 Class Type 实例化得到 instance 的业务规则,我们看看由 do scan 流程 所生成的 annotation-bean-definition
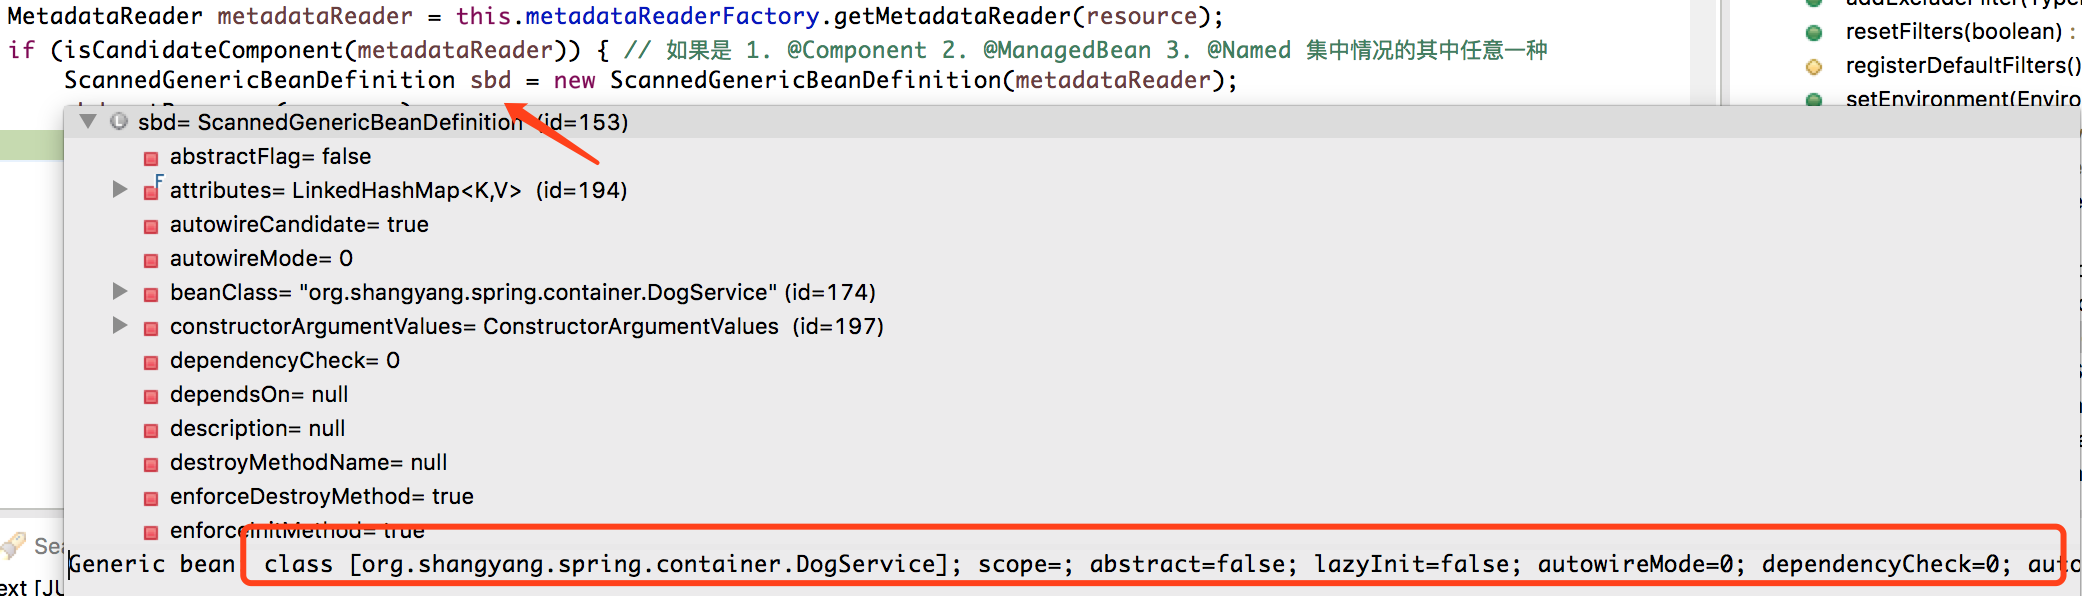
可以看到,当我们在后续要根据该 annotation-bean-definition 得到一个 DogService 实例的时候,所要遵循的业务规则,如下所示,1
2
3
4
5
6
7
8
9
10
11
12
13Generic bean: class [org.shangyang.spring.container.DogService];
scope=;
abstract=false;
lazyInit=false;
autowireMode=0;
dependencyCheck=0;
autowireCandidate=true;
primary=false;
factoryBeanName=null;
factoryMethodName=null;
initMethodName=null;
destroyMethodName=null;
defined in file [/Users/mac/workspace/spring/framework/sourcecode-analysis/spring-core-container/spring-sourcecode-test/target/classes/org/shangyang/spring/container/DogService.class]
不过,要注意,这里所得到的 ScannedGenericBeanDefinition 实例,同样没有真正去加载 org.shangyang.spring.container.DogService Class Type 到容器中,而只是将 class name 字符串赋值给了 ScannedGenericBeanDefinition.beanClass,言外之意,将来在加载 Class Type 到容器中的时候,或许与实例化 instance 一样也要根据 bean definitions 中的规则来限定其加载行为,目前我所能够想到的与其相关的就是 ASM 字节码技术,可以在 bean definition 中定义 ASM 字节码修改规则,来控制相关 Class Type 的加载行为;